background image

8

Date: 12-28-2016

Page 3 of 3

Brandi Youth JR Loft Bunk Bed

Model #2001/2098/2124/2099-310/311

CARE & MAINTENANCE:


The tou

ch of a so

ft 

c

loth is all the maintenance the finish will 

ever need. Please do not use harsh or a

b

rasive cleaners f

or polishing, as they may 

cause damage to the finish. Periodic checks are recommended to make sure that all hardware is securely tightened.

A

A

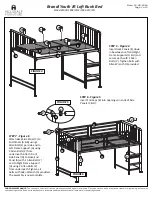
STEP 7 - Figure 6

Attach Back Side Panel (C) to 

End Panels (A & B) using 1 

Allen Bolt (2) per side and to 

Left Frame Support (G) using 

2 Allen Bolts (2) from 

underneath. Attach Front 

Side Panel (D) to Open End 

Panel (A) with 1 Allen Bolt (2) 

and to Right Frame Support 

(H) using 2 Allen Bolts (2) 

from underneath. Tighten all 

bolts with Allen Wrench (5) provided. 

The assembly is now complete.

7

7

7

7

7

7

B

E

E

E

2

2

2

2

2

2

C

D

FIGURE 4

FIGURE 5

FIGURE 

6

STEP 5 - Figure 4

Insert Deck Panels (E) down 

in bewtween Left and Right 

Frame Supports (G & H) and 

secure each with 2 Allen 

Bolts (7). Tigthen bolts with 

Allen Wrench (5) provided.

STEP 6 - Figure 5

Insert End Caps (8) into openings on ends of Side 

Panels (C & D).

G

H

H

G

Summary of Contents for Brandi Youth JR Loft 2001

Page 1: ...il ladder and other components are in their proper position free from damage and that all connectors are tight Do not allow horseplay on or under the bed and prohibit jumping on the bed Always use the ladder for entering and leaving the upper bunk Do not use substitute parts Contact the manufacturer or dealer for replacement parts Use of a night light may provide added safety precaution for a chil...

Page 2: ...uct When assembling do not let children play around the working area Please confirm all parts are correct before starting the assembly process Do not tighten all bolts and screws completely until the entire unit has been assembled and set up Be careful if using power tools as they can over tighten screws and strip threads WARNING QTY CODE HARDWARE QTY CODE COMPONENTS COMPONENTS CODE QTY Right Frame...

Page 3: ...c checks are recommended to make sure that all hardware is securely tightened STEP 4 Figure 3 Insert Shelves J down on to Shelf Supports F G H 2 3 3 3 3 F F J J B 2 FIGURE 2 FIGURE 3 STEP 2 Figure 2 Next attach Left and Right Shelf Wall I in between Left and Right Support Frames G H using 1 Allen Bolt 2 from each end STEP 3 Figure 2 Attach Shelf Supports F in between End Panel B and Shelf Wall I u...

Page 4: ...ls A B using 1 Allen Bolt 2 per side and to Left Frame Support G using 2 Allen Bolts 2 from underneath Attach Front Side Panel D to Open End Panel A with 1 Allen Bolt 2 and to Right Frame Support H using 2 Allen Bolts 2 from underneath Tighten all bolts with Allen Wrench 5 provided The assembly is now complete 7 7 7 7 7 7 B E E E 2 2 2 2 2 2 C D FIGURE 4 FIGURE 5 FIGURE 6 STEP 5 Figure 4 Insert De...

Reviews: