35
Chapter 3 Installation
|
Hillstone
Hillstone SG-6000 E-Series Hardware Reference Guide
Chapter 3 Installation
Before Installation
A yellow seal with dark ink characters is stuck on a mounting screw of the chassis.
Keep the seal intact. The sales representative will check this seal before
maintenance operation. Please get the permission of your sales representative
before opening the chassis yourself. Warranty will be void if you disassemble the
chassis without authorization.
Before installation, make sure that:
You have read
Chapter 2 Installation Preparations
carefully.
The requirements in
Chapter 2 Installation Preparations
Hillstone products can be installed:
On a workbench
On a standard 19-inch rack
Installing the Device on a Workbench
Hillstone product can be placed on a stable and clean workbench. For skid
prevention, take the following steps to fit anti-skid pads on the device before
installing:
Step 1: Tear off the sticker from the rubber pad.
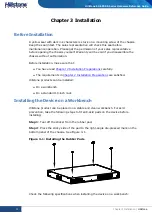
Step 2: Press the sticky side of the pad to the right-angle die-pressed mark on the
bottom panel of the chassis. See Figure 3-1.
Figure 3-1: Installing the Rubber Pads
Check the following specifications when installing the device on a workbench:

