19
Chapter 2 Installing and Removing an Expansion Module
|
Hillstone
Hillstone SG-6000 X-Series Expansion Modules Reference Guide
Chapter 2 Installing and Removing an Expansion
Module
Overview
This chapter describes how to install and remove an expansion module. All expansion
modules of SG-6000-X series are hot-removable and hot-insertable.
Installing an Expansion Module
Installing an Expansion Module of SG-6000-X10800
Each module of SG-6000-X10800 has the similar installation and replacement
procedure. Note that SCM should be installed in the slot SCM0 or SCM1 of the back
panel, SWM should be installed in the slot SWM0 or SWM1 of the back panel and
other modules should be installed in the general expansion slots Slot1 to Slot12.
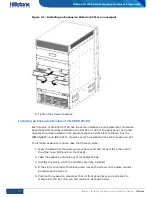
To install an expansion module, take the following steps:
1.
Wear the ESD wrist strap around your bare wrist and connect the other end of
the strap to an ESD point on the chassis.
2.
Take the expansion module out of its antistatic bag.
3.
Identify the slot in which the module should be installed.
4.
If the slot is covered with a blank plate, you should replace the blank plate. See
Removing an Expansion Module
.
5.
Position the SCM so that its front side faces you (when you install the SCM or
SWM module, the lever should be on the downside; when you install the SSM,
Bypass, QSM or IOM module, the lever should be on the left side). Make sure
the SCM module is plain with the outside edge of the expansion slot. Rotate the
levers to outside, and slide the expansion module straight into the slot along the
guide rail.

