background image

*2332219*

2332219

English

11

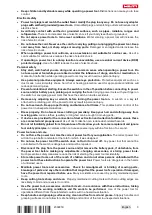
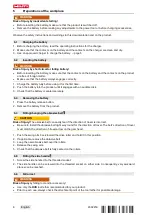
1. Remove the abrasive belt. → page 8

2. Detach the worn felt pads from the gear head and the swing arm.

3. Peel the backing foil off the adhesive side of the new felt pads.

4. Affix the new felt pads to the gear head and the swing arm.

7.2

Changing the drive roller

6

A worn drive roller can be replaced.

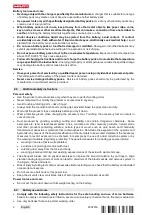
1. Remove the abrasive belt. → page 8

2. Press and hold down the spindle lock button.

3. Unscrew the drive roller by turning it counter-clockwise.

4. Screw the new drive roller on to the spindle.

5. Release the spindle lock button.

7.3

Changing the guard

7

The guard protects the gear head from damage by the abrasive belt. It can be replaced when worn.

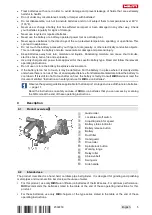
1. Remove the abrasive belt. → page 8

2. Remove the drive roller. → page 11

3. Remove the securing screws and lift off the guard.

4. Hold the new guard in position, install the securing screws and tighten them to the specified torque.

Technical data

Tightening torque, securing screws for guard

2.4 Nm

(1.8 ftlb

f

)

5. Install the drive roller.

7.4

Changing the guide roller / relay roller

8

The guide roller and relay roller can be replaced when worn or damaged.

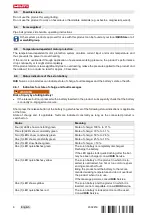
1. Remove the abrasive belt. → page 8

2. Remove the securing screw and remove the roller. If necessary, use an open-ended wrench to lock the

shaft.

3. Insert the new roller and install the securing screw.

4. Lock the shaft with an open-ended wrench and tighten the securing screw to the specified torque.

Technical data

Tightening torque, securing screw for guide roller⁄relay roller 8 Nm

(6 ftlb

f

)

8

Transport and storage of cordless tools and batteries

Transport

CAUTION

Accidental starting during transport

!

Always transport your products with the batteries removed!

Remove the battery/batteries.

Never transport batteries loose and unprotected. During transport, batteries should be protected from

excessive shock and vibration and isolated from any conductive materials or other batteries that may

come in contact with the terminals and cause a short circuit.

Comply with the locally applicable

regulations for transporting batteries.

Summary of Contents for GTB 6X-22

Page 1: ...GTB 6X 22 English 1 Fran ais 13 Espa ol 26 Portugu s 39...

Page 2: ...1...

Page 3: ...2 3 4 5...

Page 4: ...6 7 8...

Page 5: ...GTB 6X 22 en Original operating instructions 1 fr Notice d utilisation originale 13 es Manual de instrucciones original 26 pt Manual de instru es original 39...

Page 6: ......

Page 7: ...us injury or fatality CAUTION CAUTION Draws attention to a potentially dangerous situation that could lead to personal injury or damage to the equipment or other property 1 2 2 Symbols in the operatin...

Page 8: ...ards The product and its ancillary equipment can present hazards if used incorrectly by untrained personnel or if used not in accordance with the intended use The type designation and serial number ar...

Page 9: ...ting and balance at all times This enables better control of the power tool in unexpected situations Dress properly Do not wear loose clothing or jewellery Keep your hair and clothing away from moving...

Page 10: ...roduct or accessories in any way Avoid touching rotating parts risk of injury Always hold the tool with both hands on the grips provided Keep the grips clean and dry Wait until the product stops compl...

Page 11: ...uch it may be defective Put the battery in a place where it is clearly visible and where there is no risk of fire at an adequate distance from flammable materials Allow the battery to cool down If it...

Page 12: ...nserted in the product subsequently check that the battery is correctly re engaged and secure Short press the release button of the battery to get whichever of the following status indications is appl...

Page 13: ...n sequence followed by one 1 LED showing constantly red If a connected product can still be used the re maining battery capacity is below 50 If a connected product can no longer be used the battery ha...

Page 14: ...product until it engages with an audible click 3 Check that the battery is seated securely 5 3 Removing the battery 1 Press the battery release button 2 Remove the battery from the product 5 4 Fitting...

Page 15: ...witch 2 Slide the on off switch forward The motor runs 3 Lock the on off switch 6 2 Setting belt speed Use the adjusting knob to set the belt speed Stages of belt speed Stage 1 3 8 m s 12 5 ft s Stage...

Page 16: ...nd dirt Never expose the battery to high levels of moisture e g by being dipped in water or left in the rain If a battery has been soaked by moisture treat it as a damaged battery Isolate it in a non...

Page 17: ...torque securing screws for guard 2 4 Nm 1 8 ftlbf 5 Install the drive roller 7 4 Changing the guide roller relay roller 8 The guide roller and relay roller can be replaced when worn or damaged 1 Remov...

Page 18: ...e Allow the battery to warm up slowly to room temperature The battery doesn t engage with an audible click The retaining lug on the battery is dirty Clean the retaining lug and re insert the battery T...

Page 19: ...cumentation ainsi que celles figurant sur le produit Toujours conserver le mode d emploi proximit du produit et uniquement le transmettre des tiers avec ce mode d emploi 1 2 Explication des symboles 1...

Page 20: ...Hilti utilis e Observer les instructions au chapitre Utilisation conforme l usage pr vu Accu lithium ions Ne jamais utiliser l accu comme outil de percussion Ne pas laisser tomber l accu Ne pas utilis...

Page 21: ...ue avec des surfaces mises la terre tels que tuyaux radiateurs cuisini res et r frig rateurs Il y a un risque lev de choc lectrique au cas o votre corps serait reli la terre Ne pas exposer les outils...

Page 22: ...lectroportatifs sont dangereux lorsqu ils sont entre les mains de personnes non initi es Prendre soin des outils lectroportatifs et des accessoires V rifier que les parties en mouvement fonctionnent c...

Page 23: ...des mat riaux trait s Prendre les mesures n cessaires pour maintenir l exposition un niveau s r par exemple en utilisant un syst me de collecte des poussi res ou en portant une protection respiratoire...

Page 24: ...Respecter les directives sp cifiques pour le transport le stockage et l utilisation d accus Li Ion Page 24 Lire les remarques relatives la s curit et l utilisation des accus Li Ion Hilti que vous tro...

Page 25: ...nnements possibles sont affich s en permanence tant que le produit raccord est allum tat Signification Quatre 4 DEL sont allum es en vert en continu tat de charge de 100 71 Trois 3 DEL sont allum es e...

Page 26: ...f rence 21 6 V Vitesse de la bande 3 8 m s 8 4 m s 12 5 ft s 27 6 ft s Dimensions de la bande 30 in x 1 1 2 in Force de tension de la bande 4 kg 9 kg 9 lb 20 lb Angle d enroulement 270 4 7 rad Diam t...

Page 27: ...la bande abrasive Le sens de d filement doit co ncider avec la fl che du sens de d filement sur la t te de r duction 1 Appuyer le bras oscillant en direction du galet d entra nement et le maintenir e...

Page 28: ...8 m s 12 5 ft s Niveau 2 4 6 m s 15 1 ft s Niveau 3 5 4 m s 17 7 ft s Niveau 4 6 2 m s 20 3 ft s Niveau 5 7 2 m s 23 6 ft s Niveau 6 8 4 m s 27 6 ft s 6 3 Pon age 4 ATTENTION Risque de blessures Le fa...

Page 29: ...n l immergeant dans de l eau ou en le laissant sous la pluie Si l accu a t tremp le traiter comme un accu endommag L isoler dans un r cipient ininflammable et s adresser au S A V Hilti Veiller ce que...

Page 30: ...uant le couple de serrage prescrit Caract ristiques techniques Couple de serrage des vis de fixation de la t le de protec tion 2 4 Nm 1 8 ftlbf 5 Monter le galet d entra nement 7 4 Remplacement du gal...

Page 31: ...e tr s basse Laisser l accu se r chauffer lentement la temp rature ambiante L accu ne s encliquette pas avec un clic audible L ergot d encliquetage sur l accu est encrass Nettoyer l ergot d encliqueta...

Page 32: ...esta documentaci n y en el producto Conserve este manual de instrucciones siempre junto con el producto y entregue el producto a otras personas siempre acompa ado del manual 1 2 Explicaci n de s mbolo...

Page 33: ...s prescripciones Bater a de Ion Litio Nunca utilice la bater a como herramienta de percusi n No deje que la bater a se caiga No utilice bater as que hayan recibido alg n golpe ni que est n da adas de...

Page 34: ...tengan puesta a tierra como pueden ser tubos calefacciones cocinas y frigor ficos El riesgo a quedar expuesto a una sacudida el ctrica es mayor si su cuerpo tiene contacto con tierra No exponga las he...

Page 35: ...iarizada con ella o que no haya le do este manual de instrucciones Las herramientas el ctricas utilizadas por personas inexpertas son peligrosas Cuide su herramienta el ctrica y los accesorios adecuad...

Page 36: ...o La exposici n del usuario y las personas circundantes debe regularse seg n la clase de peligro de los materiales con los que se trabaje Tome las medidas necesarias para mantener la exposici n a un n...

Page 37: ...a las directivas especiales aplicables al transporte almacenamiento y uso de las bater as de Ion Litio p gina 37 Lea las instrucciones de seguridad y uso de las bater as de Ion Litio de Hilti que pued...

Page 38: ...pleado Para recibir una de las siguientes indicaciones pulse brevemente la tecla de desbloqueo de la bater a El estado de carga y las posibles aver as tambi n se muestran de forma permanente mientras...

Page 39: ...a continuaci n parpadea un 1 LED per manentemente en rojo Cuando un producto conectado puede seguir uti liz ndose la capacidad restante de la bater a es inferior al 50 Cuando un producto conectado ya...

Page 40: ...xtracci n de la bater a 1 Pulse la tecla de desbloqueo de la bater a 2 Retire la bater a del producto 5 4 Elevaci n cambio de la banda abrasiva 2 PRECAUCI N Riesgo de lesiones Una direcci n de marcha...

Page 41: ...conexi n y desconexi n 2 Empuje el interruptor de conexi n y desconexi n hacia delante El motor funciona 3 Bloquee el interruptor de conexi n y desconexi n 6 2 Ajuste de la velocidad de la banda Use...

Page 42: ...jillas de ventilaci n obstruidas Limpie cuidadosamente las rejillas de ventilaci n con un cepillo seco y suave Evite la exposici n innecesaria de la bater a al polvo o la suciedad No exponga nunca la...

Page 43: ...puede cambiarse 1 Extraiga la banda abrasiva p gina 34 2 Desmonte el rodillo motor p gina 37 3 Desmonte los tornillos de fijaci n y retire la chapa protectora 4 Coloque la nueva chapa protectora y ens...

Page 44: ...dicador del estado de carga y de aver as de la bater a V ase el cap tulo Mostrar la bater a de Ion Litio Si se producen aver as que no est n incluidas en esta tabla o que no pueda solucionar usted dir...

Page 45: ...ginal 1 Indica es sobre a documenta o 1 1 Sobre esta documenta o Antes da coloca o em funcionamento leia esta documenta o Esta a condi o para um trabalho seguro e um manuseamento sem problemas Tenha e...

Page 46: ...ti Tenha em aten o as indica es no cap tulo Utili za o conforme a finalidade projectada Bateria de i es de l tio Nunca utilize a bateria como ferramenta de percuss o N o deixe cair a bateria N o utili...

Page 47: ...o estiver com liga o terra As ferramentas el ctricas n o devem ser expostas chuva nem humidade A infiltra o de gua numa ferramenta el ctrica aumenta o risco de choque el ctrico N o use o cabo de liga...

Page 48: ...o da ferramenta Muitos acidentes s o causados por ferramentas el ctricas com manuten o deficiente Mantenha as ferramentas de corte sempre afiadas e limpas Acess rios com gumes afiados tratados correc...

Page 49: ...Fa a frequentemente pausas e exerc cios para melhorar a circula o sangu nea nos dedos Os trabalhos mais longos devido s intensas vibra es podem causar dist rbios nos vasos sangu neos ou no sistema ne...

Page 50: ...uia Interruptor on off com bloqueio Roda de ajuste para a velocidade de rota o Indica o de estado da bateria Bot o de destravamento da bateria Bateria Filtro de p Guarda m o Rolo de accionamento Bot o...

Page 51: ...r s 3 LEDs est o sempre acesos a verde Estado de carga 70 a 51 Dois 2 LEDs est o sempre acesos a verde Estado de carga 50 a 26 Um 1 LED est sempre aceso a verde Estado de carga 25 a 10 Um 1 LED pisca...

Page 52: ...nica Hilti 4 Caracter sticas t cnicas 4 1 Produto Peso sem bateria B22 3 kg 7 lb Tens o nominal 21 6 V Velocidade da cinta 3 8 m s 8 4 m s 12 5 ft s 27 6 ft s Dimens es da cinta 30 in x 1 1 2 in For a...

Page 53: ...a de lixa Preste aten o direc o de funcionamento prescrita da cinta de lixa A direc o de funcionamento tem de coincidir com a seta da direc o de funcionamento na cabe a de engrenagem 1 Pressione a b s...

Page 54: ...s 17 7 ft s Posi o 4 6 2 m s 20 3 ft s Posi o 5 7 2 m s 23 6 ft s Posi o 6 8 4 m s 27 6 ft s 6 3 Lixar 4 CUIDADO Risco de ferimentos Tocar na cinta de lixa em movimento pode causar escoria es e ferime...

Page 55: ...tenha a bateria sem res duos de leo e massa consistente externa N o permita que se acumule desnecessariamente p ou sujidade sobre a bateria Limpe a bateria com uma escova seca e macia ou um pano limpo...

Page 56: ...de guia ou de desvio podem ser substitu dos em caso de desgaste ou dano 1 Retire a cinta de lixa P gina 47 2 Desmonte o parafuso de fixa o e retire o rolo Trave se necess rio o veio com uma chave de...

Page 57: ...n o encaixa com clique aud vel A patilha de fixa o na bateria est suja Limpe a patilha de fixa o e volte a encaixar a bateria Forte aquecimento no pro duto ou na bateria Avaria el ctrica Desligue o p...

Page 58: ...tiver d vidas em rela o s condi es de garantia contacte o seu parceiro Hilti local 12 Mais informa es Pode consultar informa es mais pormenorizadas sobre Utiliza o Tecnologia Meio ambiente e Reciclag...

Page 59: ......

Page 60: ...Hilti registered trademark of Hilti Corp Schaan Pos 3 20220107 2332219 2332219...

Reviews: