16
English
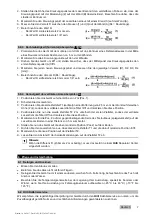
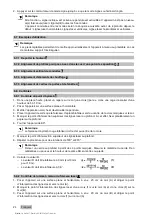
7. Calculate the value R.
◁
The value R should be less than 2 mm.
◁
The value R should be less than 1/8".
5.8.3 Checking perpendicularity (horizontal)
,
1. Position the tool so that the lower plumb beam coincides with the center of a reference cross marked in
the middle of a room at a distance of about 5 m from the walls.
2. Mark all 4 points of intersection on the four walls.
3. Rotate the tool through 90° and make sure that the center of the point of intersection coincides with the
first reference point (A).
4. Mark each new point of intersection and measure each offset (R1, R2, R3, R4 [mm]).
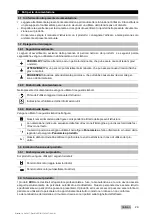
5. Calculate the offset R (RL = room length).
◁
The value R should be less than 3 mm or 1/8".
5.8.4 Checking the accuracy of the vertical line
1. Position the tool at a height of 2 m (pos.1).
2. Switch the tool on.
3. Position the first target plate T1 (vertical) at a distance of 2.5 meters from the tool at the same height (2
meters), so that the vertical laser beam strikes the plate. Mark this position.
4. Then place the second target plate T2 at a position 2 meters below the first target plate, so that the
vertical laser beam strikes the plate. Mark this position.
5. Mark position 2 at the opposite side of the test setup (mirror image) on the laser line on the floor at a
distance of 5 meters from the tool.
6. Now place the tool on the previously marked position (pos. 2) on the floor.
7. Align the laser beam so that it strikes the target plate T1 and the position marked on it.
8. Mark the new position on target plate T2.
9. Read the distance D between the two marks on target plate T2.
Note
If the difference D is greater than 2 mm, the tool must be returned to a
Hilti
repair center for
adjustment.
6 Care and maintenance
6.1 Cleaning and drying
▶
Blow any dust off the glass.
▶
Do not touch the glass surfaces with your fingers.
▶
Use only a soft, clean cloth to clean the tool. If necessary, moisten the cloth with a little alcohol or water.
▶
Observe the temperature limits when storing your equipment. This is particularly important in summer or
winter if the equipment is kept inside a motor vehicle (-25°C to 63°C / -13°F to 145°F).
6.2 Hilti Calibration Service
We recommend that the tool is checked by the
Hilti
Calibration Service at regular intervals in order to verify
its reliability in accordance with standards and legal requirements.
Use can be made of the
Hilti
Calibration Service at any time. Calibration at least once a year is recommended.
The
Hilti
Calibration Service provides confirmation that the device is in conformance, on the day it is tested,
with the specifications given in the operating instructions.
The tool will be readjusted if deviations from the manufacturer’s specification are found.
After checking and adjustment, a calibration sticker applied to the tool and a calibration certificate provide
written verification that the tool operates in accordance with the manufacturer’s specification.
Calibration certificates are always required by companies certified according to ISO 900X.
Your local
Hilti
contact will be pleased to provide further information.
Printed: 10.04.2017 | Doc-Nr: PUB / 5343697 / 000 / 01
Summary of Contents for PM 40-MG
Page 2: ...1 Printed 10 04 2017 Doc Nr PUB 5343697 000 01 ...
Page 3: ...2 3 4 5 Printed 10 04 2017 Doc Nr PUB 5343697 000 01 ...
Page 4: ...6 7 8 Printed 10 04 2017 Doc Nr PUB 5343697 000 01 ...
Page 5: ...9 10 Printed 10 04 2017 Doc Nr PUB 5343697 000 01 ...
Page 6: ...11 12 13 Printed 10 04 2017 Doc Nr PUB 5343697 000 01 ...
Page 8: ...Printed 10 04 2017 Doc Nr PUB 5343697 000 01 ...
Page 176: ...168 Eesti Printed 10 04 2017 Doc Nr PUB 5343697 000 01 ...
Page 177: ...Printed 10 04 2017 Doc Nr PUB 5343697 000 01 ...


