background image

HANDHELD TRANSMITTER

Specified DC motor fan use.

PAIRING PROCESS

Remove the set screw on the back of transmitter, take out the battery 

cover. Insert the 3 volt battery (included) and make sure they are 

seated correctly in each recess with the Po sign facing up. 

When remove or insert the batteries, use a suitable screwdriver to 

loosen or tighten the screws and open the back cover.

NOTE:

 To prevent damage to the transmitter, remove these batteries 

if not used for long periods of time (months).

WARNING:

 Chemical Burn Hazard. Keep batteries away from 

children.

This product contains a lithium button/coin cell battery. If a new or 

used lithium button/coin cell battery is swallowed or enters the body, 

it can cause severe internal burns and can lead to death in as little as 

2 hours. Always completely secure the battery compartment. If the 

battery compartment does not close securely, stop using the product, 

remove the batteries, and keep it away from children. IF you think 

batteries might have been swallowed or placed inside any part of the 

body, seek immediate medical attention.

The batteries shall be disposed of properly, including keeping them 

away from children; Even used cells may cause injury.

With  the  fan’s  power  off,  restore  power  to  the  fan.  Press  and  hold 

0

”  button  for  about  5  seconds  and  release.  If  optional  light  kit  is 

installed, the light kit will flash twice and the signal light on the wall 

control  will  come  on  when  the  button  is  pressed.  The  fan  has 

completed the pairing process with the wall control and is ready for 

use.

NOTE:

 A single fan can be controlled with as many as 3 controls in 

one  room.  Every  control  will  need  to  repeat  the  pairing  process 

based on instructions above and all controls must be within 30 feet 

of the fan.

NOTE:

  If  the  self  calibration  test  failed,  turn  the  AC  power  off; 

restore power and process the self calibration test again.

NOTE:

 During self calibration test, the remote is non-fuctional.

NOTE:

 The learning frequency function and self calibration test will 

continue  to  retain  the  last  set  frequency  and  calibration  set  even 

when the AC power is shut off. If the frequency is changed the self 

calibration test will occur again.

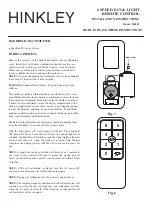
Fig. 1

Set screw

READ AND SAVE THESE INSTRUCTIONS

6 SPEED FAN & LIGHT

REMOTE CONTROL

INSTALLATION INSTRUCTIONS

Model: 980003

Fig. 2

0

2

1

4

3

6

5

Summary of Contents for 980003

Page 1: ...iate medical attention The batteries shall be disposed of properly including keeping them away from children Even used cells may cause injury With the fan s power off restore power to the fan Press and hold 0 button for about 5 seconds and release If optional light kit is installed the light kit will flash twice and the signal light on the wall control will come on when the button is pressed The f...

Page 2: ... resume it will stay at the same brightness as the last time it was turned off D The button is used to set the fan forward or reverse press the button forward for warm weather or reverse for cool weather E DIM and ON OFF dip switch Refer to Fig 1 The DIM selection is the light dimmable selection and is to be used with all bulbs execpt for CFL bulbs The ON OFF selection is the light on only no dimm...

Page 3: ... baterías deben desecharse adecuadamente incluso mantenerlas fuera del alcance de los niños Incluso las células usadas pueden causar lesiones Con el ventilador apagado restablezca la energía del ventilador Mantenga presionado el botón 0 durante unos 5 segundos y suéltelo Si se instala un kit de luz opcional el kit de luz parpadeará dos veces y la luz de señal en el control de pared se encenderá cu...

Page 4: ...el mismo brillo que la última vez que se apagó D El Fig 3 0 2 1 4 3 6 5 El botón se utiliza para configurar el ventilador hacia adelante o hacia atrás pres el botón hacia adelante para clima cálido o hacia atrás para clima frío E Interruptor DIP DIM y ON OFF Consulte la Fig 1 La selección DIM es la selección regulable por luz y se debe utilizar con todas las bombillas excepto las bombillas CFL La ...

Page 5: ...éliminées de manière appropriée notamment en les tenant hors de portée des enfants Même les cellules utilisées peuvent provoquer des blessures Le ventilateur étant éteint rétablissez l alimentation du ventilateur Appuyez et maintenez enfoncé le bouton 0 pendant environ 5 secondes et relâchez Si un kit d éclairage en option est installé le kit d éclairage clignote deux fois et le voyant lumineux de...

Page 6: ...dernière fois qu elle a été éteinte D Le est utilisé pour faire avancer ou reculer le Fig 3 0 2 1 4 3 6 5 ventilateur appuyez sur le bouton vers l avant par temps chaud ou vers l arrière par temps frais E Interrupteur DIP DIM et ON OFF Voir Fig 1 La sélection DIM est la sélection dimmable à la lumière et doit être utilisée avec toutes les ampoules sauf pour les ampoules CFL La sélection ON OFF est...

Reviews: