background image

21 


TIPS FOR USING TEMPLATES 


• 

You can reverse your Machine Frame handles by removing the hand speed control and the 
knob at the top of the “T” part of the handles.  Slide the crossbar out, reattach your handles 
on the rear of the frame, reattach your hand speed control and then you are comfortably 
seated at the rear of the frame.


• 

Some people find it helpful to add friction to your carriage movement for template quilting.  
This will slow down your carriage movement and may make it easier to follow patterns.  
Simply lower your rear roller support until it is rubbing on the base of your machine.  You 
can offset, repeat, and reverse patterns to create new designs.


• 

Many quilt magazines are including machine quilting patterns.  They are easy to photocopy 
and trace onto your quilt.


• 

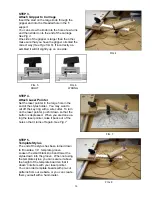
The gripper attaches to both sides of the carriage, slides along the carriage edges, and the 
stylus fastener slides along the t-support for versatility.  


• 

A good way to start a pattern in an exact spot on your quilt is to put the needle into the fab-
ric at the point that you would like to begin the pattern.  Then adjust your stylus location 
using the gripper and fastener knobs to point to the beginning point in your pattern.


• 

Our website has more tips on how to use your pointer package and template boards.  
Please go to:  www.hinterberg.com/tips.aspx


Summary of Contents for Machine quilting frame

Page 1: ...onger than your roller length can be used for a template board surface Pre patterned grooved template boards are available from us at an addi tional cost Board length fits 10 rollers A 1 2 x 8 pine board is required to support the grooved template board STAINING FINISHING Applying a stain and finish to the frame is optional It will not harm it to leave it unfinished If you wish to stain or finish ...

Page 2: ...2 MACHINE QUILTING FRAME BACK FRONT ...

Page 3: ...crew 3053 1 4 Hex Head Bolt 3041 1 4 Allen Head Bolt 3054 2 Carriage Bolt 3022 3 8 Metal Washer 3037 Plastic Washer 3021 1 4 Metal Washer 3043 Allen Wrench 3045 J Hook 3031 Barrel Nut 3032 1 4 Wing Nut 3018 3 8 Wing Nut 3029 Hex Nut 3049 Hex Wrench 3112 T Knob w 5 8 stud 3113 T Knob w 1 1 8 stud 3106 Star Knob w stud 3076 Star Knob ...

Page 4: ...Head Wood Screws 1 1 4 3028 12 Lock Pins 3105 4 Teflon Tape 9029 8 MACHINE FRAME HARDWARE Center Support Hardware DESCRIPTION PART QTY J Hook 3045 4 Allen Head Bolt 3041 4 3 8 x2 Carriage Bolt 3054 1 3 8 Metal Washer 3022 1 1 4 Metal Washer 3021 4 1 4 Wing Nut 3032 4 3 8 Wing Nut 3018 1 Barrel Nut 3031 4 Allen Wrench 3043 1 Pointer Package Hardware Included see page 19 Leg Brace Hardware DESCRIPTI...

Page 5: ...5 WOOD PARTS A B C D E F G H G H I J K L M N O P Q R S T U V W X Y Z ...

Page 6: ...17 3 K Left rear roller support 4006 1 L Left middle roller support 4032 1 M Left spacer 4012 1 N Left front roller support 4016 1 O Right middle roller support 4033 1 P Right rear roller support 4005 1 Q Right spacer 4011 1 R Right front roller support 4015 1 S Pawl 4013 2 T Pawl 4014 1 U Upper Carriage MQF UC 1 V Lower Carriage MQF LC 1 W Top support w square hole 4077 1 X Top support w round ho...

Page 7: ...ght rear roller supports Insert a hex head screw in small bag and metal washer through the ratchet pawl as shown in Fig 2 The small plastic washer goes between the pawl and the pole support to make the pawl work smoothly Tighten the screw so the pawl swings easily You will need to use either a 7 16 wrench or the Hex Head Wrench found in the bag labeled Roller End Hardware See Fig 2a and 2b for cor...

Page 8: ...e You will be attaching the guides to the end frame with 4 1 4 x 1 1 4 hex head screws Place a 1 4 steel washer onto the screw Insert the hex head screw through the guide and then screw into the end frame loosely The screws will be tightened after attaching the roller supports There is a wrench included in the roller end hardware bag that can be used for these screws STEP 5 To Prevent Roller Suppo...

Page 9: ...ver and place it as shown in Fig 7 Now the height adjuster is sandwiched be tween the end frame and the roller support Tighten the screws evenly in the middle roller support guide easing the guide toward the rear support Repeat with middle roller support Tighten the screws evenly in the front support guide easing the guide toward the middle roller support The first time you use the height adjuster...

Page 10: ...middle roller support Insert the aluminum bearing attached to the middle roller sup port into the large hole in front roller sup port See Fig 9 Insert a lock pin as shown in Fig 8 to hold front roller support in either the up or down position Fig 8 shows the outside view of the com pleted right side end frame FIG 9 STEP 10 Left Hand End Frame Assembly The left hand roller supports and guides are a...

Page 11: ...1 STEP 1 Inserting Metal Roller Ends Tap the inserts into the end of the metal rollers evenly with a hammer Don t tap on the end of the bolt because you may damage the threads Tap around the edges of the silver round end If it goes in unevenly at first keep tapping it should straighten itself out as it goes in The metal edges of the insert should be seated on the ends of the roller If the roller e...

Page 12: ...s STEP 1 Assembling Ratchet Wheels The 3 ratchet wheels will be attached to the right end of 3 of the conduit rollers Using the hardware found in the roller end hardware bag slip the 1 4 washer onto the hex head bolt and then screw the hex head bolt into the barrel nut only about 3 or 4 turns Lay the bolt assem bly into the pocket in the ratchet wheel See Fig 1 The bolt assembly must lay flat insi...

Page 13: ...iage tracks To do this stand both end frames up and insert the front car riage track through the hole in each end frame Slide the rear carriage track into the slots in the rear of the end frames See Fig 1 Screw a black star knob onto all of the roller end bolts loosely FIG 1 REAR OF FRAME FRONT OF FRAME ATTACHING CARRIAGE TRACKS INSTRUCTIONS ...

Page 14: ...he angle support and secure with a small washer and a wing nut on the inside of the frame The other end of the angle brace attaches to the end frame Insert a large hex nut in the slot in the end of the angle brace Screw the black knob with post through the end frame into the nut This will secure the angle brace to the end frame See Fig 2 3 STEP 2 Place Carriages on Rollers Place the lower carriage...

Page 15: ...ch of the 3 conduit rollers into the slots in the end frame All of the ratchet wheels should be on the right hand side of the frame Screw a black star knob onto all of the roller end bolts loosely During quilting the pawls will catch the ratchet wheels and prevent them from turning in order to keep tension on your quilt See Fig 1 for roller locations NOTE Fig 1 shows strips of fabric attached to t...

Page 16: ...he center support assembly over and secure car riage bolt with 3 8 washer and wing nut See Fig 4 FIG 3 STEP 3 To attach roller brackets insert barrel nut into the holes on the side of the top support See Fig 5 FIG 4 FIG 5 STEP 1 Lay the Center support up right in the pocket in the Top support w round hole See Fig 1 Lay the Top support with the square hole on top of the other two parts as shown in ...

Page 17: ...kets to each end of the top supports FRONT REAR ASSEMBLED CENTER SUPPORT STEP 5 Make sure the front and rear of the center support are oriented correctly See com pleted picture below Attach the center support to the two carriage rollers using the J hook screws Secure the J hook screws using a 1 4 washer and wing nuts See Fig 7 Using all 4 J hook screws attach both ends of the center support to bot...

Page 18: ... U Handle Insert knob with long stud through I horizontal support and into U handle See Fig 4 If you have trouble tightening this knob down all the way insert the plastic washer in between the knob and the horizon tal support A tip for positioning the U Handle Tighten the U handle knob until it is snug Hold knob and turn the handle itself in a tightening direction while tightening the knob After a...

Page 19: ...us Holder Slide the stylus fastener with the u shaped piece inside onto the T support See Fig 2 and insert the stylus thru the large holes See Fig 3 Tighten the black knob until the stylus fastener is holding the stylus securely The metal U shaped piece protects the side of the wood from the end of the knob STEP 1 Assembling Stylus Fastener Thread the small black knob into the stylus fastener Plac...

Page 20: ...the groove When not using the template stylus you can secure it above the height of the template board so that it doesn t interfere with your laser pointer You can order template boards with pre cut patterns from our website or you can create them yourself with a hand router STEP 3 Attach Gripper to Carriage Insert the stud on the large knob through the gripper and into the threaded hole in the T ...

Page 21: ...bing on the base of your machine You can offset repeat and reverse patterns to create new designs Many quilt magazines are including machine quilting patterns They are easy to photocopy and trace onto your quilt The gripper attaches to both sides of the carriage slides along the carriage edges and the stylus fastener slides along the t support for versatility A good way to start a pattern in an ex...

Page 22: ...ecure to end frame using attached Velcro Your quilt backing may be much wider than your quilt top Attach end tensioners to edge of quilt back and use pins to secure edge of top to backing If you are quilting a small quilt or wall hanging on a 10 frame you may need to purchase some extra Velcro to make your end tensioners longer ...

Page 23: ...e sewing machine on the frame you will need to lift the rear roller out of its slot See Fig 25 Slide the roller into the neck area of the sewing machine and replace the rear roller in its slot See Fig 26 You may need to adjust the position of your machine on the carriage in order to get the maximum quilting area Tighten all the knobs on the frame and get ready to start quilting You will need to ad...

Page 24: ...your roller length and subtracting two inches eg 120 rollers 2 118 leaders The three leaders will be cut from this length of fabric 2 For the Original Machine Quilting Frame you will cut one length about 15 wide one 10 wide and one 5 wide 3 Zigzag or serge the long edges of the fabric to avoid raveling 4 See next page for more photos and instructions on how to attach the leaders Tape aprons to rol...

Page 25: ...and the 5 wide apron goes on the rear roller The aprons must be taped on straight Start by using several small pieces of tape spaced out across the roller See Fig 1 You can look down the end of the roller to see if it is straight See Fig 3 below Then put one long strip of tape across the whole roller See Fig 2 The leaders will roll over the top of the roller toward the back of the frame See Figs 3...

Page 26: ...els is on your right hand side Take your time with this process as it is critical for satisfactory results Step 2 To begin spread your backing fabric across the frame with the bottom edge closest to you Backing fabric is wrong side up See Fig 1 Standing at the front of the frame with the leader hanging match the center of the backing fabric with the center of the leader on the middle roller Rememb...

Page 27: ... that the tension is even all along the length of the roller and fill in the rest of the pins Note that the leader on the rear roller should roll off of the bottom of the roller and be pulled towards you while the middle roller leader rolls off the top and is pulled away from you Now your backing fabric is attached to the frame See Fig 4 Step 4 Next you will attach your batting and quilt top The b...

Page 28: ...n roll the top and batting onto the front roller carefully Stop every few inches and feel for wrinkles in the batting You can check the underside of the frame to see wrinkles in the batting Continue rolling until the rear edge of the top and batting are even with the rear roller Step 7 The final step is to pin the rear edge of your quilt top and batting to the rear roller using the same method as ...

Page 29: ...rewarding If this is your first try at machine quilting start with a small quilt with a simple pattern or even printed fabric Take some time to get the feel of the machine movement on the frame Each machine will have limitations depending on the length of the arm of your machine Even if you have machine quilted be fore the technique is different Your quilt is stationary and you will be moving your...

Page 30: ...ed to adjust the roller support guide To do this remove the rollers loosen the 4 lag screws in the roller support guides and push the guides towards the roller supports to squeeze them and add sup port It is very important to put the anti friction tape on the sides of the roller supports so that they slide against each other more easily When you load a new quilt onto the frame you will lower the r...

Reviews: