5
1
2
3
4
5
6
7
8
9
10
11
Operating Precautions
Follow these precautions to ensure safe operation and to
obtain the full benefits of the various functions.
Operating temperature and humidity:
0 to 50°C (32 ± 122°F), 80%RH or less (non-condensating)
Temperature and humidity range for guaranteed accuracy:
23 ± 5°C (73 ± 9°F), 80% RH or less (non-condensating)
Before using the instrument the first time, verify that it
operates normally to ensure that the no damage occurred
during storage or shipping. If you find any damage, con-
tact your dealer or Hioki representative.
Setting up the Instrument
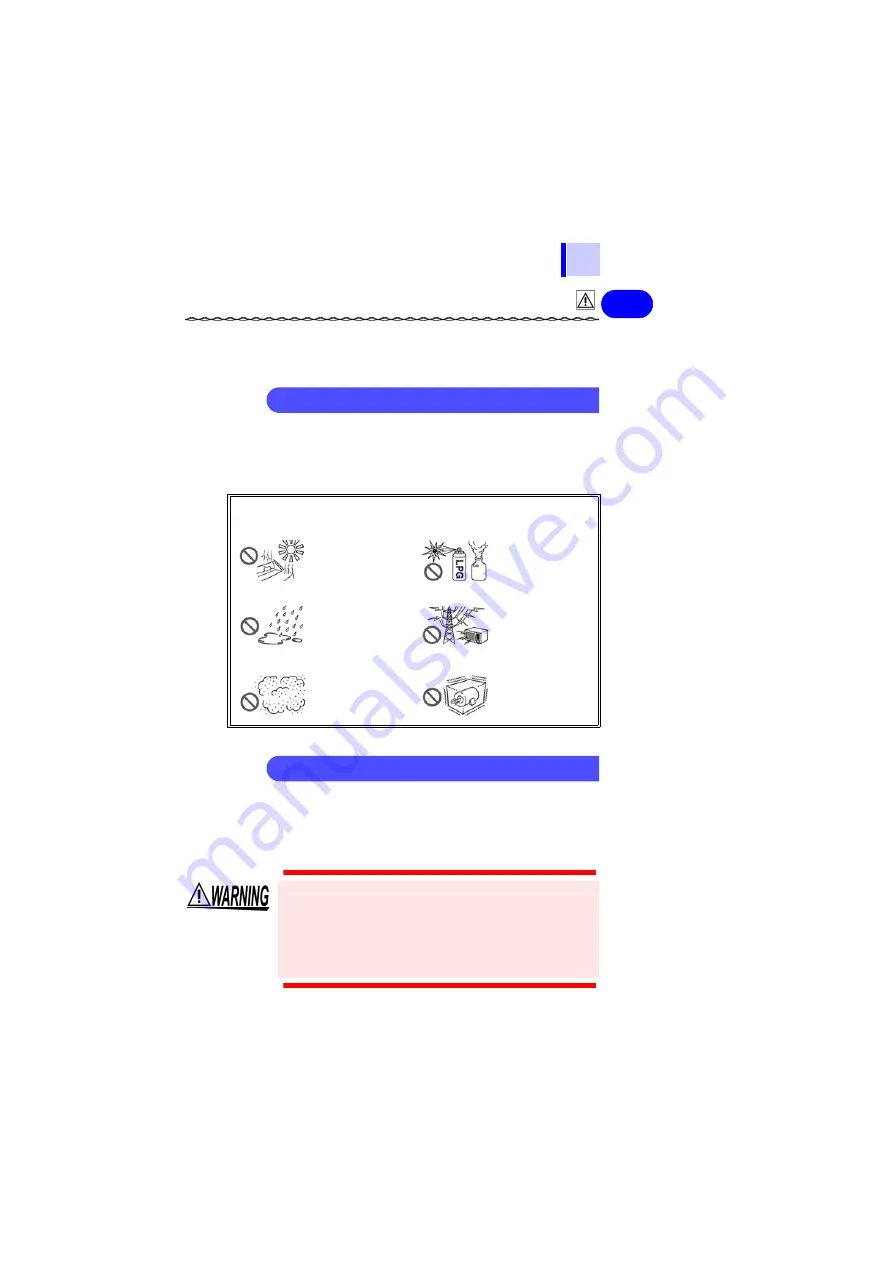
Avoid the following locations that could cause an accident or damage
to the instrument.
Exposed to direct
sunlight
Exposed to high
temperature
In the presence of
corrosive or explo-
sive gases
Exposed to liquids
Exposed to high
humidity or con-
densation
Exposed to strong
electromagnetic
fields
Near electromag-
netic radiators
Exposed to high
levels of particu-
late dust
Subject to vibration
Preliminary Checks
Before using the instrument, make sure that the
insulation on the test leads is undamaged and that
no bare conductors are improperly exposed. Using
the instrument in such conditions could cause an
electric shock, so contact your dealer or Hioki rep-
resentative for replacements. (Model 3851-10 TEST
LEAD)
Summary of Contents for 3802-50
Page 2: ......
Page 6: ...2 IEC 61010 DC AC DC AC...
Page 7: ...3 1 2 3 4 5 6 7 8 9 10 11 rdg dgt rdg dgt 1...
Page 9: ...5 1 2 3 4 5 6 7 8 9 10 11 0 50 80 rh 23 5 80 rh 3851 10...
Page 10: ...6 OFF...
Page 13: ...1 3 9 1 2 3 4 5 6 7 8 9 10 11 12 13 3802 50 1 3 10 13 11 12...
Page 16: ...12 1 3 OFF OFF V V mV 1000 mV SHIFT DC AC SHIFT nS SHIFT A 5100 A SHIFT DC AC mA A SHIFT DC AC...
Page 17: ...1 3 13 1 2 3 4 5 6 7 8 9 10 11 12 13 A A A mA A mA COM V...
Page 18: ...14 1 3...
Page 20: ...16 2 1 3851 10 AC AC100 V 50 Hz 60 Hz 1 2 SHIFT 2 1 69...
Page 21: ...2 1 17 1 2 3 4 5 6 7 8 9 10 11 3 V COM 4 5 ACV 6 DUAL 7 AC 0 OK...
Page 23: ...2 2 19 1 2 3 4 5 6 7 8 9 10 11 5 6 Hz DUAL 27 dBm dBV DUAL 2 V SHIFT dBm dBV 52 AC...
Page 24: ...20 2 3 2 3 A mA A OFF...
Page 26: ...22 2 4 2 4 1 2 4 1 2 RANGE 34 3 4 5 RANGE AUTO...
Page 28: ...24 2 5 2 5 1 2 SHIFT 3 RANGE RANGE 34 4 5 6 1000 510 00 10 00 SHIFT RANGE AUTO...
Page 29: ...2 6 25 1 2 3 4 5 6 7 8 9 10 11 2 6 1 2 3 4 0 3 0 8 V 0 0500 V 0 3 V 0 8 V...
Page 30: ...26 2 7 2 7 1 2 RANGE 34 3 4 5 99 99 mF 0 01 2 RANGE AUTO...
Page 31: ...2 8 27 1 2 3 4 5 6 7 8 9 10 11 Hz DUAL 2 2 18 2 3 20 4 45 RANGE 2 8 OFF DUAL Hz...
Page 34: ...30 2 11 2 11...
Page 35: ...2 11 31 1 2 3 4 5 6 7 8 9 10 11 1 2 SHIFT 4 6 53 0 3 4 5 K K 0 SHIFT K TEMP K 0...
Page 36: ...32 2 11...
Page 38: ...34 3 2 RANGE RANGE 3 2 5 V 51 V 1000 V 510 V RANGE nS DUTY...
Page 39: ...3 3 35 1 2 3 4 5 6 7 8 9 10 11 3 3 1 HOLD 1 OFF 4 7 54 2 HOLD 3 HOLD HOLD 3 3 TRIG TRIG...
Page 40: ...36 3 3 3 3 2 1 4 7 54 2 HOLD 3 HOLD 4 HOLD HOLD...
Page 41: ...3 3 37 1 2 3 4 5 6 7 8 9 10 11 V 0 05 V mV 0 5 mV A 5 A mA 0 5 mA A 0 05 A OL...
Page 42: ...38 3 3 3 3 3 1 ms 250 s MAX MIN 1 REL 2 HOLD 3 DUAL REL HOLD HOLD RANGE 99999 OL DC...
Page 44: ...40 3 5 REL REL mV 1 2 REL 3 5 REL...
Page 46: ...42 3 7 3 3856 02 4 RS 232C INTERFACE 5 6 RS 232C INTERFACE...
Page 47: ...3 8 43 1 2 3 4 5 6 7 8 9 10 11 3 8 1 A 3 8 A mA A...
Page 50: ...46 SHIFT ON HOLD HOLD HOLD HOLD HOLD HOLD HOLD HOLD HOLD REL HOLD HOLD HOLD HOLD HOLD HOLD...
Page 58: ...54 4 7 OFF 4 7 3 4 1 SHIFT 2 REL 5 3 RANGE DUAL 4 Hz 5 SHIFT OFF OFF 100 1000 1 SHIFT ON 2 5 5...
Page 63: ...5 1 59 1 2 3 4 5 6 7 8 9 10 11 5 5 1 DUTY RS 232C USB 4 20 mA 0 20 mA dB REL A TN 1 8 Duty...
Page 71: ...6 1 67 1 2 3 4 5 6 7 8 9 10 11 9 8 TEL 0268 28 0823 FAX 0268 28 0824 1 6 6 1 68...
Page 72: ...68 6 1 4 11 58 69 69 55 71 24 OFF Error mA A A 43 ch Err A mA A A mA A mA 47 41...
Page 73: ...6 2 69 1 2 3 4 5 6 7 8 9 10 11 9 8 6 2 6 3 OFF...
Page 74: ...70 6 3 1 OFF 2 3 OPEN 4 6F22 6LR61 5 OPEN OFF...
Page 77: ...6 5 73 1 2 3 4 5 6 7 8 9 10 11 9 8 No 1 REL 2 REL 3 No No 1 09 4 6 5...
Page 78: ...74 6 5...
Page 80: ......
Page 81: ...3802 50 DIGITAL HiTESTER Instruction Manual...
Page 82: ......
Page 164: ...80 6 5 Checking the Instrument Software Version...
Page 165: ......
Page 166: ......
Page 167: ......
Page 168: ......


