background image

Hipo INKJET plotter manual 


21 


The plotter has been through accuracy tests with paper weighs 45g, for 

you reference. Using different types of paper may need to change some of 

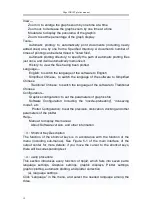
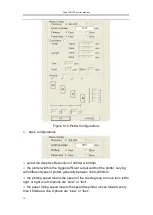
these parameters. You need to tick ‘√’ of the Correction setting to change 

these parameters. See Figure 7-17. 
 

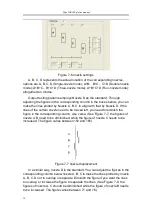
 width and length correction (i.e. The Nozzle moving direction and 

paper-feeding direction) 

Fill in the ‘ideal’ and ‘actual’ figures according to Figure 7-17, and print a 

grid map of 1 meter square, and then fill in the measured data in the ‘actual’ 

column. (with mm as the unit, accurate to 0.05mm) 


Figure 7-17 width and length correction parameters 


In a similar way, if you use a grid map of 1500mm, then you should fill 

1500mm in the ‘ideal’ and ‘actual’ columns. Then fill in the measured data in 

the ‘actual’ column.   
 

If the measured data is bigger than the standard value, and the length of 

the printed graph is still larger than the standard value, then you should fill in a 

larger figure in ‘actual’ column, vise versa.      
 

When the Length, width correction parameter is settled, there’s no need to 

frequently adjust it. Adjustment is needed when you change the type of paper. 

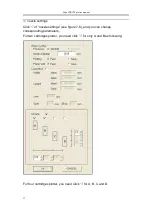
  Software configuration    

Click “configuration”—“software configuration”, you will see the following 

interface. 


Summary of Contents for HH JET Series

Page 1: ...Hipo INKJET plotter manual 0 HIPO JET PLOTTER MANUAL...

Page 2: ...n installation steps method of operation and other information to ensure the correct use of this product To timely receive our comprehensive after sale services please contact Tel 0086 10 82380636 Fax...

Page 3: ...before installation 4 1 computer system requirements 4 2 Software output formats 4 3 power requirements 4 Chapter 3 Quick installation 5 Chapter 4 Installation of USB driver 7 Chapter 5 Plotting Cente...

Page 4: ...ctive and enjoys simplicity of operation with advanced automatic paper collecting and discharging functions HH JET is favored by the industry especially for plotting large breadth Engineering Line Gra...

Page 5: ...f the following formats plt hpg hpgl dmpl dxf thus require application software capable of generating the above formats for instance AutoCAD and Apparel CAD Or you can also transfer documents of these...

Page 6: ...screw so tight of the screws on both ends of the draw rod temporarily so as to adjust the parallelism between the posts if needed and assist the installation of the handpiece d Add the handpiece It t...

Page 7: ...when connecting USB cable One end of the cable is connected to the USB port of the computer and the other to the USB port of the plotter Make sure to fix it in the clip k Connect the power cord When t...

Page 8: ...appears as follows 3 click INSTALL and wait until the end of installation with the following interface and click OK to finish installation 4 plug the USB port cable of the plotter and turn on the powe...

Page 9: ...Hipo INKJET plotter manual 8 5 click next 6 click next there will be the following installation process 7 Automatic installation is done with the following interface...

Page 10: ...otter panel or plucking the USB plug which is quite normal Just click ok 10 Better equip the computer with USB2 0 protocol to ensure fast data transmission bauds 11 If the CH372 CH375 drive is success...

Page 11: ...Hipo INKJET plotter manual 10 Select device manager USB CH372 CH375 is shown under peripheral interface indicating that the drive is connected normally...

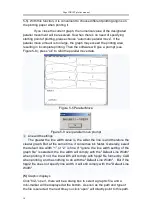
Page 12: ...is directory and all the documents within it to Archive Double click Hpgl2 exe to start the program See its main interface Figure 5 1 The main interface of output center 2 menu introduction This secti...

Page 13: ...witch the language of the software to Traditional Chinese Configuration Graphics configuration to set the parameters of graphics file Software Configuration Including the nozzle preheating ink saving...

Page 14: ...follow the specific size needed by the customer Generally this method is not recommended because it may result in loss of effective graphics DXF If DXF formatted files are selected you will have to d...

Page 15: ...Line width settings The greater the line width value is the wider the line is and therefore the clearer graph But at the same time it consumes ink faster Generally select the default line width 1 or...

Page 16: ...n helps to combine several single files into one for printing Click file merge and there will be a dialog box of file path press ctrl to select files that needs to merge and then click open 7 Plotter...

Page 17: ...biggest efficient output width of the plotter varying with different types of plotter generally between 1600 2200mm the plotting speed means the speed of the nozzle group to move from left to right o...

Page 18: ...nozzle settings Click of nozzle settings see figure 7 6 and you can change corresponding parameters For two cartridges plotter you need click for only A and B as following For four cartridges plotter...

Page 19: ...zle need to be moved left you need to diminish the figure in the corresponding column vise versa See Figure 7 7 the figures of nozzle A B need to be diminished while the figure of nozzle C needs to be...

Page 20: ...rate to 0 01mm The figure is normally below 2 5mm Repeatedly adjust the number will generate the best effect Figure 7 10 correction of displacement Figure 7 12 fill in a positive number in the column...

Page 21: ...figure is normally below 1 50mm Repeatedly adjust the number will generate the best effect Figure 7 15 fill in a positive number to correct overlapping If in the process of plotting there s the situa...

Page 22: ...l column with mm as the unit accurate to 0 05mm Figure 7 17 width and length correction parameters In a similar way if you use a grid map of 1500mm then you should fill 1500mm in the ideal and actual...

Page 23: ...not selected the files will be saved after plotting autostart With this function the plotter will go straight into automatic plotting once turned on automatically shut down after plotting With this f...

Page 24: ...t with a designated starting point Click file plot with a designated starting point The only difference with plot is that there will be dialog box for you to choose a starting point This function is e...

Page 25: ...omatically one by one or add new files to the list Figure 5 18 autodraft lists Notes 1 once the file holder is selected it will be memorized and needs not to be selected every time you run the output...

Page 26: ...sert there will be the file path just select it g change the plotting times of files Select the file and click the left mouse button once in the corresponding plotting times column and then fill in th...

Page 27: ...d the plotter will stop working under whatever circumstances Press RESET to restore normal working condition nozzle cleaning press it to let the cartridges jet out ink so as to clear the dried nozzle...

Page 28: ...e U shaped bracket You can put it either on the front or at the back target the shaped end of the paper collecting axle with the Cone top within the right side of U shaped bracket and the shaped end w...

Page 29: ...rasp the left end of the paper collecting axle and push it to the right lift it and remove the axle roll the cut down printing paper over the scroll better with two people grab the paper scroll and ro...

Page 30: ...stores Please use cartridges of quality to ensure printing quality 2 signs of out of ink The ink in the cartridge is consumed in the process of printing and the signs of out of ink will gradually turn...

Page 31: ...Do not pull out the raster at pleasure 4 when the plotter is off do not play with the cartridges or move it with haste to avoid generating electric current in the process which would damage the mainb...

Page 32: ...ter you can add a small amount of lubricating oil to the guide way if the noise of the cartridges movements augments 2 raster is a fine measuring instrument you should not touch or pull the metal stri...

Reviews:

Related manuals for HH JET Series