Now look at your KK 2.1 Control Board. On the back side, you’ll see a plug called “Program-
ming Port.” Grab the flat, grey ribbon cable from the KK 2.1 Control Board box and plug one
of the ends (doesn’t matter which) into the Programming Port. Give it a good push to make
sure it’s firmly seated. Leave the other end free for the moment, as this will be the cable
you’ll use to connect your Programmer to the board when you’re tuning it. Just plug in the
cable and leave it there for convenience.
Now grab your double-sided tape tabs and attach them to the four corners of the the
squishy side of the Distribution Board/Control Board, then stick it to your frame in the posi-
tion you just tested out.
Attaching the Servos
Estimated time to complete: 5 minutes
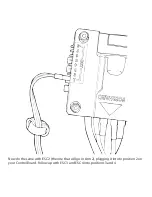
Now you’re ready to attach all those servo wires coming out of your ESCs. Take a look at your
Control Board. On the right side, you’ll see a bunch of “Out” pins numbered 1 through 8.
Start with the ESC you plan to put in your new best friend, Arm 1. Holding the connector on
the servo wire with the white wire up, plug the servo wire into the pins on the right side of
your Control Board in position 1. Do yourself a favor and put a small piece of tape on this ESC
so you can later identify it as ESC 1. You will need to know this later.
Now that ESC 1 is all plugged in, place it back in Arm 1.


