background image

12

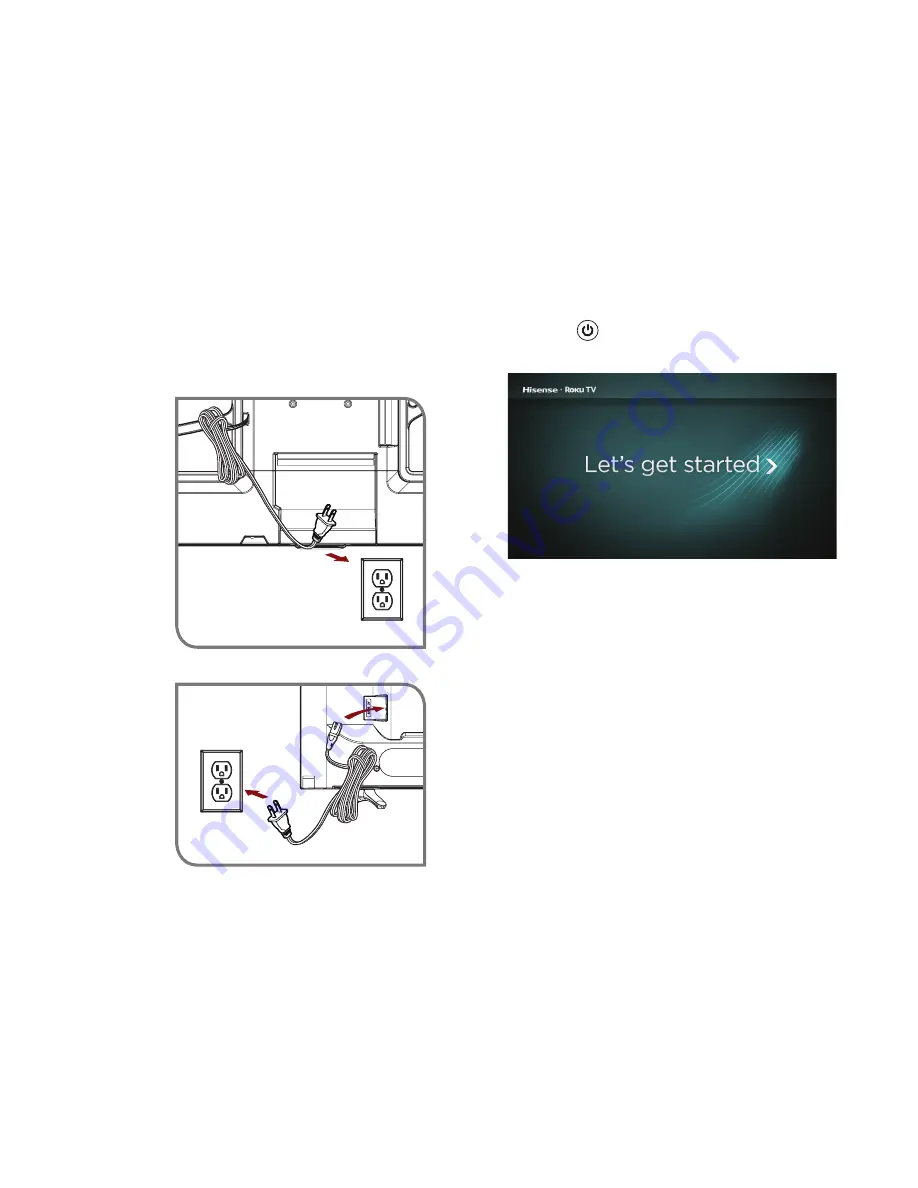
Press the 

Power 

 button on the remote to turn on the TV. A 

startup screen appears that displays the 

Hisense

 • 

Roku TV

 logo.

Choose 

Set up for home use

 to access all TV features and 

maximize Eco Save. 

NOTE:

 Only retailers that need to set up the TV for display should 

select 

Set up for store use

.  

Turn on the TV

Connect the power cord to the back of your TV and plug it into a 
power outlet.

(for 40″)


(for 48″/50″)

Power 

Cord

Wall Outlet

Wall Outlet

Power

Cord

Summary of Contents for 40H4C1

Page 1: ...ES G160319 1 ...

Page 2: ...ransmitted or distributed in whole or in part in any manner electronic or otherwise whether or not for a charge or other or no consideration without the prior written permission of Hisense Company Ltd and Roku Inc Requests for permission to store reproduce transmit or distribute materials may be made to the following address USA Hisense USA Corporation PO Box 3289 Suwanee GA 30024 CANADA Hisense C...

Page 3: ...ed to access certain channels Content may not be available in all areas in which the Roku TVs are sold and channel availability is subject to change Roku search is for movies and TV shows and does not work with all channels º Limitation apply Please see support roku com for device compatibility information ...

Page 4: ...to 9 PM EST Saturday Sunday 9 AM to 6 PM EST Service Email Service hisense usa com http www hisense usa com support http www hisense usa com support productReg asp CANADA Phone 1 855 344 7367 Hours of Operation Monday Friday 8 AM to 8 PM EST Service Email canadasupport hisense com http www hisense canada com support http www hisense canada com support productReg asp MEXICO Phone 01 800 008 8880 Ho...

Page 5: ...Quick Start Guide this document Important Safety Information and Warranty Card leaflet 2 legs that forms the TV stand 4 screws M4 12 for 40 4 screws M4 20 for 48 50 IMPORTANT To prevent accidentally discarding items that came with your TV be sure to check ALL of the foam in the carton box Required tools and devices Wireless router not included for Internet connectivity Phillips screwdriver not inc...

Page 6: ...4 Buttons and ports on the Hisense Roku TV Back View of the TV 40 TV Side View TV Bottom View TV Bottom Panel VIDEO L R AV IN DIGITAL AUDIO OUT HDMI 1 ARC ANT Cable AUDIO OUT RESET HDMI 2 HDMI 3 ...

Page 7: ...5 Back View of the TV 48 50 TV Side View TV Bottom View TV Bottom Panel S ANT CABLE HDMI 1 AUDIO OUT ARC HDMI 2 RESET HDMI 3 DIGITAL AUDIO OUT for 48 TV Bottom Panel for 50 ...

Page 8: ... to complete the installation steps 1 Carefully place your TV facing down on a soft flat surface to prevent damage to the TV or scratches to the screen 2 Remove the two legs that form the stand from the accessory bag and then insert them into the bottom slots of the TV 3 Secure the legs to the TV with the 4 screws in the accessory bag Screws M4 12 40 Screws M4 20 48 50 leg leg ...

Page 9: ... in length when measured from the attaching surface of the mounting hook 9 5 11 5 mm 48 50 8 9 5 mm 40 Wall mount hole pattern VESA mm 100 100 for 40 200 200 for 48 200 400 for 50 Wall mount screw size mm M4 for 40 M6 for 48 50 Follow instructions provided with the Wall mount bracket To complete the installation please contact the wall mount manufacturer or the retailer from which you purchased th...

Page 10: ...rief Description ANT CABLE Antenna VHF UHF Antenna ANT OUT Connect an outdoor or indoor antenna HDMI DVD Player Recorder Set top Box Satellite Receiver Satellite antenna cable VCR Video Camera Connect a High Definition Multimedia Interface HDMI cable from an external device AV IN VIDEO Yellow Connect a composite video cable and left right audio cables from an external AV device L White R Red DIGIT...

Page 11: ...nect headphone for audio out of the TV Connect an audio adapter not provided from an external analog audio system USB DC 5V 0 5A MAX Connect a USB device for browsing photos music and movies The unit only recognizes a USB Memory Stick RESET Restart or factory reset your TV ...

Page 12: ...n to Roku Home screen OK Select an option from a menu UP or DOWN Move up or down LEFT or RIGHT Move left or right INSTANT REPLAY Replay last 7 seconds of streaming video OPTIONS Access to picture settings move streaming channel icons and more RWD SCAN Rewind streaming video scroll left one page at a time PLAY PAUSE Start or pause playback FWD SCAN Fast forward streaming video scroll right one page...

Page 13: ...batteries Do not mix alkaline standard carbon zinc or rechargeable for example NiCd or NiMH batteries If your remote gets warm hot during use discontinue use and contact customer support immediately at www hisense usa com support Using Your Cable Set top Box or Satellite Receiver Remote as a Universal Remote If you prefer to use your Cable Set top Box or Satellite Receiver Remote as a Universal Re...

Page 14: ...Choose Set up for home use to access all TV features and maximize Eco Save NOTE Only retailers that need to set up the TV for display should select Set up for store use Turn on the TV Connect the power cord to the back of your TV and plug it into a power outlet for 40 for 48 50 Power Cord Wall Outlet Wall Outlet Power Cord ...

Page 15: ...and Hulu Explore your passions Your Roku TV offers hundreds of streaming channels to fuel your passions including fitness kids family cooking sports religion travel International programming and more Get in the groove Connect your favorite music streaming service to your TV including Pandora Spotify SiriusXM VEVO and dozens more Access your MP3 collection instantly with Amazon Cloud Player or the ...

Page 16: ... automatically update with the latest software plus you can start streaming the entertainment you know and love Unlike other TVs your new Hisense Roku TV automatically receives regular software updates in the background when it s connected to the Internet This allows it to give you a better experience All software applications services and content accessible through the Television belong to provid...

Page 17: ...ht lets you visually choose among your favorite streaming channels and the inputs where you have attached devices such as a DVR game console antenna or set top box You can easily rearrange the order of the tiles on the Home screen to suit your viewing preferences If you have an antenna or cable connected just click the tuner tile to watch broadcast TV channels The fun has just begun NOTE Cable or ...

Page 18: ... inches 1119 x 698 x 247 mm Weight Without Stand 18 4 lbs 8 34 kg 26 5 lbs 12 kg 28 2 lbs 12 8 kg With Stand 18 7 lbs 8 5 kg 27 1 lbs 12 3 kg 28 9 lbs 13 1 kg DISPLAY Active Screen Size Diagonal 40 inches 47 6 inches 49 5 inches Screen Resolution 1920 x 1080 1920 x 1080 1920 x 1080 Panel Selected Full High Definition backlight Full High Definition backlight Full High Definition backlight POWER Pow...

Page 19: ...ut RGB 60Hz 640x480 800x600 1024x768 1280x1024 1360x768 1440x900 1680x1050 1920x1080 YUV 60Hz 480I 480P 720P 1080I 1080P OTHER FEATURES Parental Control Yes HD Supported Definitions 480i 480P 720P 1080i 1080P Sleep Timer Yes Wall Mount Support VESA Standard excluded Wireless Built In Yes Environmental Conditions Temperature 41 F 95 F 5 C 35 C Humidity 20 80 RH Atmospheric pressure 86 kPa 106 kPa P...

Page 20: ...e if the correct input tile is selected on the Home Screen for the external source you want to view Check to see if the external source device connection is snug and fully inserted into the TV port When you turn on your TV there is a delay for a few seconds before the picture appears This is normal If you have already set up your TV it is initializing and searching for previous setting information...

Page 21: ...twork passwords are case sensitive If you have turned off SSID broadcasting on your wireless router add your network by selecting Add Private Network from the Select Wireless Network screen To check if it is a password problem temporarily disable security on the wireless router If you are not getting 3 or more signal strength bars above the wireless network icon adjust the position of the TV if po...

Page 22: ...nd receiver Connect the device into an outlet on a circuit different from that to which the receiver is connected Consult the dealer or an experienced radio TV technician for help NOTE The manufacturer is not responsible for any radio or TV interference caused by unauthorized modifications to this equipment Such modifications could void the user s authority to operate the equipment The WiFi Module...

Reviews: