background image

4. Refrigerant Pipe

Use the R410A refrigerant. When carrying on the 
leakage check and test, do not mix in the oxygen, the 
acetylene and flammable and the virulent gas, for 
these gases are quite dangerous, and may possibly 
cause explosion. It is suggested that the compressed 
air, the nitrogen or the refrigerant be used to perform 
these experiments.

4.1 The Pipe Material

(1) Prepare the copper pipe on the spot.
(2) Choose dustless, non-humid, clean copper pipe. 
Before installing the pipe, use nitrogen or dry air to 
blow away the tube dust and impurity.

4.2 The Connection of the Pipe

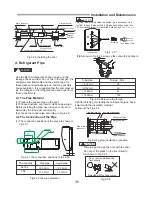
(1) The connection positions of the pipe are shown in 

The capacity

Gas pipe

Liquid pipe

9.52mm

6.35mm

6.35mm

Gas pipe

Liquid pipe

(3) After finishing connecting the refrigerant pipes, keep 
it warm with the insulation material.

6.35mm

9.52mm

15.88mm

19.05mm

Tube size

20

40

80

100

Torque

N.m

Clamp(attached)

Insulation

 (attached)

Refrigerant pipe

(field supplied)

Side of the 
indoor unit

Insulation

(field supplied)

Installation and Maintenance

Canvas duct

Horizon

Service mouth

Air inlet
(with filter)

600mm-600mm

Air-outlet

The valve for the amount of air

Insulation material

Outside air
(through
 the filter)

Static pressure
box

Canvas duct

Static pressure
box

The valve for 

the amount of air

DANGER

The pipe go through the hole with the seal.

Protected with the tape or plug.

Do not put the pipes on the 
floor directly.

C

C

A

A

U

U

T

T

IO

IO

N

N

Do not put the pipes on the floor directly.

18k

9k,12k

Following the Fig 4.2.4

Fig 3.3.6 installing the duct

Fig 4.2.1 the connection positions of the tube 

Fig 4.2.2 the pipe diameter 

Fig4.2.1 

(3) choose the copper pipe according to Fig 4.2.2

(2)AS shown in Fig 4.2.3,screw up the nuts with 2 spanners 

Fig 4.2.3 Screw up the torque

Fig 4.2.4 piping insulation procedure 

Fig 4.2.5

Fig 4.2.2

.

1

AS shown in Fig 4.2.5

35

12

.

7mm

The


18k


indoor unit include the switch


tie-in accessory


only

 for 18K


indoor, It may switch


9.52 gas


connection


tube


into 

12.7 connection tube

,

it


is


installed


outdoor


unit


for

 Fig4.2.2.1. 

G

as valve

O

utdoor unit

S

witch tie

C

onnection tube

Summary of Contents for AMD-09UX4SJD

Page 1: ...Thank you very much for purchasing this Air Conditioner Please read this carefully before installing and using this appliance and keep this manual for future reference use and installation instructions ...

Page 2: ...n or off at half hour within a 24 hour period Save Installation Space Mute Operation The excellent fan design enable the airflow to be quiet and smooth with minimum noise Meeting Various Installation Requirements The back air inlet type is usually be adopted According to the actual installation space The unit is also installed with down air inlet type and the noise will increase about 5 6 dB Self ...

Page 3: ... 8 4 9 Remote controller H1 9 4 1 1 4 1 2 4 1 3 4 1 4 4 1 5 timer mode 4 1 6 sleep mode 4 1 7 super mode Remote controller J1 16 4 2 1 4 2 2 4 2 3 4 2 4 4 2 5 timer mode 4 2 6 sleep mode 4 2 7 super mode Remote controller E4 07 23 4 3 1 4 3 2 4 3 3 4 3 4 4 3 5 timer mode 4 3 6 sleep mode 4 3 7 super mode 1 peration operation mode 11 airflow direction control 12 14 operation mode 18 airflow directi...

Page 4: ...rks and instruction to the operation maintenance and service DANGER WARNING CAUTION NOTE Alert Symbols 1 Contents 36 37 change of Static pressure Installation and Maintenance 1 Safety Notice 31 2 The Tools and Instrument for Installation 32 3 The Installation of the Indoor Unit 32 3 1 Accessories 32 3 2 The Initial Check 32 3 3 Installation 33 4 Refrigerant Pipe 35 4 1 The Pipe Material 35 4 2 The...

Page 5: ... reliable electrical earth facility and the equipment Please do not connect the grounding of this product to various kinds of air feeding tube lines the drain lines the lightning protection facility as well as other tube lines to avoid receiving an electric shock and damages caused by other factors Wiring must be done by a qualified electrician All the wiring must comply with the local electrical ...

Page 6: ... and wireless remote controller It is used for controlling power ON OFF setting the running mode temperature fan speed and other functions Wire remote controller Wireless remote controller SET TEMP ROOM TEMP C AUTO NO ERROR TIMER ON TIMER OFF SET CLOCK SET TIMER A It is used for controlling wire remote controller setting the running mode temperature fan speed and air other functions Note The stand...

Page 7: ...HUMIDIFICATION FAN or HEATING mode COOLING mode the air conditioner makes the room cool DEHUMIDIFICATION mode the air conditioner reduces the humidity in the room FAN mode the air conditioner makes the room s temperature suitable providing the soft air flow HEATING mode The air conditioner makes the room warm 5 TIMER SLEEP button Press this button to active sleep mode and will appear in LCD Press ...

Page 8: ...unction is invalid Mode indication area Which indicate the current running mode Display timer setting Operation mode cooling mode dehumidification mode fan mode heating mode auto mode Fan speed setting auto fan high fan speed meddle fan speed low fan speed Temperature display Room temperature Setting temperature ROOM TEMP C SET TEMP C AUTO A TIMER ON TIMER OFF timer on set timer timer off Outdoor ...

Page 9: ...lti type unit the setting mode may interfere with outdoor mode This is because that all indoor units use one outdoor unit outdoor unit can only run with same mode cooling or heating so when the mode you set is different from the mode that outdoor is running with mode interfere occurs Following shows the mode interfere scene cooling dry heating fan cooling dry heating fan normal mode interfere foll...

Page 10: ...r TIMER OFF flag will stop twinkle and timer begin to work 4 IF you need cancel TIMER OFF press TIMER SLEEP button for 3 seconds to active the timer Press button set time 00 00 Cancel TIMER OFF after five seconds automatically ROOM TEMP C TIMER ON 2 3 2 TIMER ON mode 1 you can set timer on when indoor unit is shut off By press TIMER SLEEP button for 3 seconds timer clock appear on LCD and TIMER ON...

Page 11: ...low and away from heating where the wire remote controller is installed The following is process of installation 1 Insert a minus screw driver into down slot 2 places Be careful not to damage the PC board with minus screw driver 2 Remove the back cover 3 Use two screw φ4 16 to fasten the back and metal board in the mounting place and tighten the screw then link the communication wire 4 Fasten top ...

Page 12: ...o real time 10 11 12 13 3 4 1 2 6 7 5 8 9 MODE CLOCK TIMER ON TIMER OFF DIMMER SMART SWING SWING MUTE TEP SWITCH SLEEP I FEEL SOFT 14 16 17 15 18 14 MUTE BUTTON Used to set or cancel Mute mode operation 16 I FEEL BUTTON Used to start or stop the I feel mode Press this button above 5 seconds Turn off I FEEL mode In I feel mode the Air Conditioner operates basis temperature sensor fitted in remote i...

Page 13: ... DI MM ER SM AR T MU TE TEP SWI TCH SL EE P I FE EL SOF T How to Insert the Batteries Remove the battery cover according to the arrow direction Insert new batteries making sure that the and of battery are matched correctly Reattach the cover by sliding it back into position Note Use 2 LR03 AAA 1 5volt batteries Do not use rechargeable batteries Replace batteries with new ones of the same type when...

Page 14: ...ss once to temperature setting by 1 raise Range of available set temperature HEATING COOLING SWING SMART TIMER ON TIMER OFF CLOCK SLEEP and SUPER operation modes will be specified in the following pages Changing modes during operation sometimes the unit does not response at once Wait 3 minutes Wait 3 minutes before restarting the appliance During heating operation air flow is not discharged at the...

Page 15: ...ted to your own requirement by pressing the and the button of the remote controller Operation mode Direction of airflow COOLING DRY HEATING FAN ONLY horizontal downward SWING SWING Vertical airflow control with the remote controller Using remote controller to set various angles of flow or specific angle as you like Swinging airflow Pressing button once the adjustment louver will swing up and down ...

Page 16: ...on mode and temperature are determined by indoor temperature Heat pump models Cooling only models CLOCK button You can adjust the real time by pressing CLOCK button then using and buttons to get the correct time press CLOCK button again the real time is set MODE CLOCK TIMER ON TIMER OFF DIMMER SMART MUTE TEP SWITCH SLEEP I FEEL SOFT SWING SWING Your feeling What you can do in SMART mode button adj...

Page 17: ...en cancelled When your desired time displayed on LCD press the TIMER ON button and confirm it A beep can be heard Note If you don t set the time in 5 seconds after you press TIMER ON button the remote controller will exit the TIMER ON mode automatically Note It is similar to set TIMER OFF you can make the appliance switch off automatically at your desired time The TIMER indicator on the indoor uni...

Page 18: ...peed changing the set temperature automatically to 18 In SUPER mode you can set airflow direction or timer If you want to escape from SUPER mode press any SUPER MODE FAN ON OFF or TEMPERATURE SETTING button Note The Appliance will continue working in SUPER mode with set temperature of 18 if you don t escape from it by pressing any of the buttons mentioned above SLEEP and SMART buttons are not avai...

Page 19: ...P BUTTON I FEEL BUTTON CLOCK BUTTON ON OFF BUTTON SMART BUTTON MODE BUTTON TIMER ON OFF BUTTON Used to stop or start adjustment louver swinging and set the desired up down airflow direction horizontal 15 SWING BUTTON Used to stop or start adjustment louver swinging and set the desired left right airflow direction vertical Used to select fan speed in sequence auto high medium or low Used to set or ...

Page 20: ...h new ones of the same type when the display becomes dim 17 To operate the room air conditioner aim the remote controller to the signal receptor The remote controller will operate the air conditioner at a distance of up to 8m when pointing at signal receptor of indoor unit Remote controller Remote controller Signal receptor ON O FF MO DE FA N SW IN G SL EE P SU PE R IFE EL DI MM ER TIM ER ON TIM E...

Page 21: ... temperature setting by 1 Range of available set temperature HEATING COOLING FAN unable to set SWING SMART TIMER ON TIMER OFF CLOCK SLEEP and SUPER operation modes will be specified in the following pages Changing modes during operation sometimes the unit does not response at once Wait 3 minutes Wait 3 minutes before restarting the appliance During heating operation air flow is not discharged at t...

Page 22: ... to your own requirement by pressing the and the button of the remote controller Operation mode Direction of airflow COOLING DRY HEATING FAN ONLY horizontal downward SWING SWING Vertical airflow control with the remote controller Using remote controller to set various angles of flow or specific angle as you like Swinging airflow Pressing button once the adjustment louver will swing up and down aut...

Page 23: ... CLOCK ON OFF FAN SWING SWING SWING SWING Indoor temperature Indoor temperature Target temperature Target temperature Below T 3 Over T 3 T 3 or below T T T T T Over T 3 Operation mode Operation mode HEATING FAN ONLY FAN ONLY COOLING COOLING Operation mode and temperature are determined by indoor temperature Heat pump models Cooling only models Your feeling What you can do in SMART mode button adju...

Page 24: ...omatically Note It is similar to set TIMER OFF you can make the appliance switch off automatically at your desired time The TIMER indicator on the indoor unit lights up ON stops flashing After the set timer displayed for 5 seconds the clock will be displayed on the LCD of the remote controller instead of set timer It is convenient to set the timer on with TIMER ON buttons when you go out in the mo...

Page 25: ...emperature automatically to 18 temperature automatically to 32 Fast heating operates at auto fan speed changing the set In SUPER mode you can set airflow direction or timer If you want to escape from SUPER mode press SUPER MODE FAN ON OFF SLEEP or TEMPERATURE SETTING button the display will return to the original mode Note The Appliance will continue working in SUPER mode if you don t escape from ...

Page 26: ... you press this button Press this button to select the operation mode E4 07 4 3 Used to set or cancel the timer operation Remote controller Indication symbols on LCD Note Each mode and relevant function will be further specified in following pages Signal transmit Dry indicator Fan only indicator Heating indicator Cooling indicator High fan speed Medium fan speed Low fan speed Display set temperatu...

Page 27: ...ce batteries with new ones of the same type when the display becomes dim 24 To operate the room air conditioner aim the remote controller to the wire remote controller The remote controller will operate the wire remote controller at a distance of up to 8m when pointing at signal receptor of the wire remote controller FAN MODE TIMER ON CL OC K LOC K TIMER OFF SL EE P SW ING SM ART SUPER ON OFF SET ...

Page 28: ... 1 lower Press once to temperature setting by 1 raise Range of available set temperature HEATING COOLING FAN unable to set Turning on SWING SMART TIMER ON TIMER OFF I FEEL SLEEP and SUPER operation modes will be specified in the following pages Press button when the appliance receives the signal the indoor unit will be started Changing modes during operation sometimes the unit does not response at...

Page 29: ...ouver will swing up and down automatically Desired direction airflow Pressing the SWING button again when the louvers swing to a suitable angle as desired Horizontal airflow control with hands Do not turn the vertical adjustment louvers manually otherwise malfunction may occur If that happens turn off the unit first and cut off the power supply then restore power supply again It is better not to l...

Page 30: ...it again swings stops Operation mode and temperature are determined by indoor temperature Note Temperature airflow and direction are controlled automatically in SMART mode However a decrease or rise of up to 7 can be set with the remote controller if you still feel uncomfortable SMART mode FAN S W IN G FAN MODE TI M E R O N CLOCK IFEEL T IM E R O F F S L E E P S W IN G S M A R T SU PE R invalid fo...

Page 31: ...en cancelled When your desired time displayed on LCD press the TIMER ON button and confirm it A beep can be heard Note If you don t set the time in 10 seconds after you press TIMER ON button the remote controller will exit the TIMER ON mode automatically Note It is similar to set TIMER OFF you can make the appliance switch off automatically at your desired time The TIMER indicator on the indoor un...

Page 32: ...perature automatically to 18 In SUPER mode you can set airflow direction or timer If you want to escape from SUPER mode press any SUPER MODE FAN ON OFF or TEMPERATURE SETTING button Note The Appliance will continue working in SUPER mode with set temperature of 18 if you don t escape from it by pressing any of the buttons mentioned above SLEEP and SMART buttons are not available in SUPER mode SUPER...

Page 33: ...perature is too low frost or ice may form in the outdoor heat exchanger reducing heating performance When this happens a defrosting system of the air conditioner will operate At the same time the fan in the indoor unit stops or runs at a very low speed in some cases a few minutes later the defrosting is over and the heating operation restarts Blow out the survival heating air When stop the air con...

Page 34: ... the refrigerant circuit free from substances other than the specified refrigerant R410A such as air Any presence of air or other foreign substance in the refrigerant circuit causes an abnormal pressure rise or rupture resulting in injury If any refrigerant has leaked out during the installation work ventilate the room The refrigerant reduces a toxic gas if exposed to flames After all installation...

Page 35: ... Standard screwdriver Vacuum pump Charge hose Pipe bender Adjustable wrench Tube cutter Cross head screw driver Number 8 9 10 11 12 13 14 Tool Knife or wire stripper Gradienter Hammer Churn drill Tube expander Inner hexagon spanner Tape measure 3 1 Accessories 3 2 The Initial Check When moving the unit during or after unpacking make sure to lift it by holding its lifting lugs DO not exert any pres...

Page 36: ...and servicing is ensured See Fig 3 2 1 Fig3 2 2 The indoor unit outdoor unit power supply wiring and transmission wiring is at least 1 meter away from televisions and radio this prevents image interference and noise in electrical appliances Noise may be generated depending on the conditions under which the electric wave is generated even if a one meter allowance is maintained Use suspension bolts ...

Page 37: ...e unit to the surface of the water at both ends of the plastic tube and adjust the unit horizontally one thing to watch out for in particular is if it is installed so that the slope is not in the direction of the drain piping as this might cause leaking Installation and Maintenance CAUTION Rack Double nuts and washers Hanger bracket Suspension bolt 3 3 5 Installing the duct Make sure the range of ...

Page 38: ... of the indoor unit Insulation field supplied Installation and Maintenance Canvas duct Horizon Service mouth Air inlet with filter 600mm 600mm Air outlet The valve for the amount of air Insulation material Outside air through the filter Static pressure box Canvas duct Static pressure box The valve for the amount of air DANGER The pipe go through the hole with the seal Protected with the tape or pl...

Page 39: ...er the indoor unit through the drain pipes and corrode the heat exchanger Do not twist or bend the drain hose so that excessive force is not applied to it This type of treatment may cause leaking After piping work is finished check drainage flows smoothly Gradually insert approximately 1000 cc of water into the drain pan to check drainage in the manner described below Gradually pour approximately ...

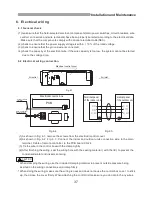
Page 40: ...nents main power switches circuit breakers wire conduit connectors and wire terminals have been properly selected according to the electrical data Make sure that the components comply with national electrical code NEC 2 check to ensure that the power supply voltage is within 10 of the rated voltage 3 check to ensure that the ground wire is connected 4 check the capacity of the electrical wire if t...

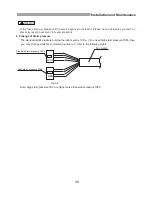
Page 41: ...e shock 6 3 change of Static pressure Fig 6 4 WHT RED Fan motor Standard Static pressure 10Pa High static pressure 30Pa The standard static pressure outside the indoor unit is 10 Pa If you need high static pressure 30Pa then you may change white fan motor terminal into red refer to the following Fig6 4 Note High static pressure 30 Pa is higher noise than static pressure 10Pa 38 ...

Page 42: ...duct This marking indicates that this product should not be disposed with other household wastes throughout the EU To prevent possible harm to the environment or human health from uncontrolled waste disposal recycle it responsibly to promote the sustainable reuse of material resources To return your used device please use the return and collection systems or contact the retailer where the product ...

Reviews: