background image

5

Location


Requirements

Window Installation


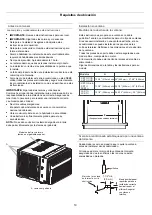
If AC is Blocked  by Storm Window

Before You Begin


Window


opening


measurements

:

A Cabinet


louvers

.

A


conditioner is installed

.

Add wood as shown, or remove storm window before air

.

 
or slots are not caulked or painted shut

. Accumulated rain

water or condensation must be allowed to drain out.

If storm window frame must remain, be sure the drain holes


IMPORTANT

IMPORTANT


A

(


)

With side curtain panels

B

A        

B


12 2

(315mm) min

/5" 

     15 1


min


/5"

(386mm) 

     13 3

 (345mm) min


/5"


22 (559mm) - 37


4

(960mm)

/5" 

     24 9


/10" 

(632mm) - 39 (991mm)

     24 1

- 39


/2" 

(622mm) 

(991mm)

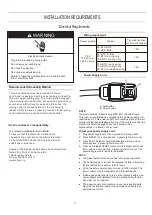
Read these instructions completely and carefully.   


Save these instructions for local inspector’s use. 


Observe all governing codes and ordinances

.


Board 
thickness
as required, 
for proper 
pitch to rear, 
along entire
sill. Fasten 
with nails or 
screws. 

Storm window
frame or other
obstruction.

sash

1-1/2"min

(38 mm)

Models

5K BTU DOE
6K BTU DOE

6K BTU E-star


8K BTU

10K BTU

12K BTU


14K BTU


IMPORTANT

:


Observe


all


governing


codes


and


ordinances

.


Check


the


location


where


air


conditioner


will


be


installed

.


Proper


installation


is


your


responsibility

.


Make


sure


you


have


everything


necessary


for


correct


installation

.

The


location


should


provide

:


Do


not


use


an


extension


cord

.

T

he appliance shall be installed in accordance with


national wiring regulations.


Free


movement


of


air


in


room


to


be


cooled

.


A


large


enough


opening


for


the


air


conditioner

.

NOTE

:


Cabinet


louvers


must


not


be


obstructed

.


Air


must


be


able


to


pass


through


the


cabinet


louvers freely

.

These


instructions


are


for


a


standard


double


h

-


ung


window

.


You


will


need


to


modify


them


for


other


types


of


windows

.

The


air


conditioner


can


be


installed


without


the


side


curtain


panels


if


needed


to


fit


in


a


narrow


window

.


See


the


window


opening


dimensions

.

All


supporting


parts


must


be


secured


to


firm


wood

,


masonry


or


metal

.

The


electrical


outlet


must


be


within


reach


of


the


power


cord

.

Follow


the


dimensions


in


the


table


and


illustration


for your model.


Note


to


Installer:


Be


sure


to


leave


these


instructions


with


the


consumer

.

Note


to


Consumer:


Keep


these


instructions


for


future


reference.

Skill


level:


Installation


of


this


appliance


requires


basic


mechanical


skills.

Completion


time:


Approximately


1


hour.

We


recommend


that


two


people


install


this


product.

Proper


installation


is


the


responsibility


of


the


installer.


Product


failure


due


to


improper


installation


is


not

covered


under


the


Warranty

.

You


MUST


use


all


supplied


parts


and


use


proper

installation


procedures


as


described


in


these

instructions


when


installing


this


air


conditioner

.

Cooling models without  Cabinet 
louvers on top

Summary of Contents for AW-08TW1RAFUE20

Page 1: ...tas sobre las caracter sticas funcionamiento rendimiento piezas o servicio llame al 1 877 465 3566 INSTRUCCIONES DE INSTALACI N Y USO Model Modelo AW 08TW1RAFUE20 AW 10TW1RAFUE20 AW 12TW1RAFUE20 AW 14...

Page 2: ......

Page 3: ...pack the Air Conditioner Prepare Air Conditioner for Installation Window Air Conditioner Installation Complete Installation Starting Your Air Conditioner AIR CONDITIONER USE Using the Remote Control C...

Page 4: ...d damage to the refrigerant tubing Maintenance cleaning and service should only be performed by technicians properly trained and qualified in the use of flammable refrigerants Dispose of air condition...

Page 5: ...een light will turn on 3 Press TEST listen for click Reset button will trip and on some devices a green light will turn off 4 Press and release RESET listen for click Reset button will latch and on so...

Page 6: ...ner Rub a small amount of liquid dish soap over the adhesive with your fingers Wipe with warm water and dry Unpack the Air Conditioner Do not use sharp instruments rubbing alcohol flammable fluids or...

Page 7: ...ide Do not use an extension cord The appliance shall be installed in accordance with national wiring regulations Free movement of air in room to be cooled A large enough opening for the air conditione...

Page 8: ...s in the front panel Do not block the louvers on the outside of the air conditioner Attach Adhesive Seal 1 Cut the adhesive seal to the width of the lower window sash 2 Remove the backing from the sea...

Page 9: ...own 19mm 1 Center air conditioner in window Lower the window sash behind the top rail to hold cabinet in place Keep a firm grip on the air conditioner place the unit into the window opening carefully...

Page 10: ...If you turn off the air conditioner wait at least minutes 3 before turning it back on This prevents the air conditioner from blowing a fuse or tripping a circuit breaker Remark a line on the according...

Page 11: ...Press MODE repeatedly until you see the indicator light glow for the desired setting 2 Choose Fan Dry Cool or Eco Press the minus DOWN button to lower the temperature Each time you press or hold the...

Page 12: ...SUPER 10 Swing Swing 11 FILTER SUPER fast cooling FILTER 10 11 SUPER SUPER button is used to start or stop fast cooling 1 Press SUPER button The air conditioner automatically sets the fan speed to Hi...

Page 13: ...y time until the air conditioner turns ON the delay time can be set from 0 to 24 hours in one hour increments 5 Press TIMER again to enter the delay time The TIMER led on the air conditioner illuminat...

Page 14: ...ull it out 3 Use a vacuum cleaner to clean the air filter If the air filteris very dirty wash it in warm water with a mild detergent Do not wash the air filter in the dishwasher or use any chemical cl...

Page 15: ...peration NOTE A damaged power supply cord must be replaced with a new power supply cord obtained from the product manufacturer and must not be repaired Air conditioner seems to run too much The curren...

Page 16: ...tting You see water dripping from the rear of the unit Water may be collected in the base pan in highly humid conditions or on rainy days This water overflows and drips from the rear of the unit Water...

Page 17: ...el ctricos 17 Herramientas y piezas 18 Desempaquete el climatizador 18 Requisitos de ubicaci n 19 INSTRUCCIONES DE INSTALACI N 20 Prepare el aire acondicionado para realizar la instalaci n 20 Instala...

Page 18: ...erante al manipular instalar y operar el electrodom stico No perfore orificios en la unidad El mantenimiento la limpieza y el servicio deben ser realizados solo por t cnicos capacitados y calificados...

Page 19: ...ica avanzada que detecta la corriente residual Si el cable est aplastado la electr nica detecta la corriente residual y la energ a se desconectar en una fracci n de segundos Para un funcionamiento cor...

Page 20: ...con agua templada y seque No utilice instrumentos afilados ni frote alcohol l quidos inflamables o limpiadores abrasivos para eliminar la cinta o el pegamento Estos productos pueden da ar la superfici...

Page 21: ...nete Nota para el instalador Aseg rese de dejarle estas instrucciones al consumidor Nota para el consumidor Guarde estas instrucciones para futuras referencias Nivel de habilidad La instalaci n de est...

Page 22: ...oquee las lamas de la parte exterior del aire acondicionado 1 Deslice la cortina lateral directamente en el gabinete A ada la cinta adhesiva 1 Corte la cinta adhesiva al ancho de la guillotina inferio...

Page 23: ...de tal manera que la parte inferior del marco del aire acondicionado quede contra el alf izar de la ventana y aseg rese de que la unidad quede centrada en la ventana Cierre cuidadosamente la ventana d...

Page 24: ...medido luego corte la goma EVA por la l nea Quite el reverso de la goma EVA A ada la goma EVA a la carcasa de la cortina el lado con el adhesivo deber a estar frente a la carcasa de la cortina 5 Repi...

Page 25: ...o de Solo ventilador Para cambiar la pantalla de la temperatura de F a C Presione los botones MODE y DOWN v al mismo tiempo durante 5 segundos para cambiar la pantalla de F a C Ventilador 1 Presione F...

Page 26: ...e 5 segundos para cambiar la temperatura desde grados Fahrenheit F a grados cent grados C EI modo Quiet mod para los modelos inverter es solo v lido en elmodo de enfriamiento Toma cerca de 2 a 3 minut...

Page 27: ...tico ofrece 8 horas de Descanso ptimo antes de apagarse NOTA En el modo DIMMER los nuevos ingresos del control volver n la pantalla a normal Configuraci n del aire acondicionado para ENCENDERLO 1 Cone...

Page 28: ...el filtro se seque completamente al aire antes de volver a colocarlo para garantizar la m xima eficacia 4 Vuelva a colocar el filtro y cierre el panel frontal Limpieza del panel frontal 1 Apague el a...

Page 29: ...algunos dispositivos se encender una luz verde para volver al funcionamiento NOTA Se debe reemplazar el cable de alimentaci n da ado por un cable nuevo que se obtiene del fabricante no se debe repara...

Page 30: ...entando enfriar es extremadamente calurosa Permita m s tiempo para que el aire acondicionado enfr e la habitaci n calurosa Las ventanas o las puertas est n abiertas Cierre las ventanas y las puertas E...

Page 31: ...Version No 2234117 01 Versi n No 2234117 01...

Reviews: