background image

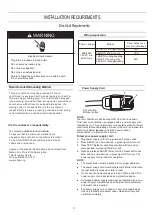
Wiring requirement

Electrical


Shock


Hazard

Plug


into


a


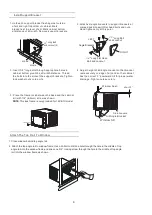
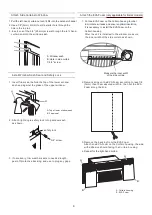
grounded

 3 

prong


outlet

.

Do


not


remove


ground


prong

.

Do


not


use


an


adapter

.

Do


not


use


an


extension


cord

.

Failure


to


follow


these


instructions


can


result


in


death

WARNING

fire, or electrical shock.

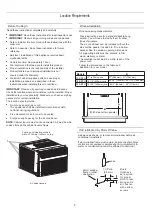
Recommended Grounding Method
     

To contact a qualified 

.

electrical installer

It is the customer’s responsibility:

To assure that the electrical installation is 
adequate and conforms to the Nation Electrical 
Code,ANSI/NFPA 70-last edition,and all local 
codes and ordinances.

 Copies of the standards listed may be obtained from:
 Nation Fire Protection Association
 1 Batterymarch Park
  Quincy,Ma 02169-7471
  www.nfpa.org

This
conditioner is equipped with


a


power


supply


cord


with


a


three-prong


grounding plug.


The


cord


must


be


plugged


into


a


mating

grounded


three

-

prong


outlet

grounded


in


accordance


with


all


local


codes


and


ordinances

If


a


mating


outlet


is


not


available

it


is


the


customer

'

s


responsibility


to


have


a


properly


grounded


three

-

prong


outlet


installed by


a


qualified


electrical


installer

.

 air conditioner must be grounded. This air 

NOTE

Your


air


conditioner’s


device


may


differ


from


the


one shown.


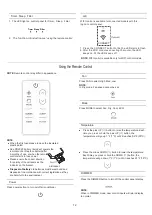
To


test


your


power


supply


cord

1.

Plug


power


supply


cord


into


a


grounded

 3

prong


outlet

.

2.

Press RESET

 (

on


some


devices

a


green


light


will


turn


on

).


3.

Press


TEST

 (

listen


for


click

Reset


button


will


trip

and


on


some


devices

a


green


light


will


turn


off

).

4.

Press and


release


RESET

 (

listen


for


click

Reset


button


will


latch

and


on


some


devices

a


green


light


will


turn


on

). 

The


power supply


cord


is


ready


for


operation

.


NOTE

:

The Reset button


must


be


pushed


in


for


proper


operation

.


The


power


supply


cord


must


be


replaced


if


it


fails


to


trip


when


the


test


button


is


pressed


or


fails


to


reset

.

Do


not


use


the


power


supply


cord


as


an


off

/

on


switch

The


power


supply


cord


is


designed


as


a


protective


device

.

A


damaged


power


supply


cord


must


be


replaced


with


a


new


power


supply


cord


obtained


from


the


product


manufacturer


and


must


not


be


repaired

The


power


supply


cord


contains


no


user


serviceable


parts

Opening


the


tamper

-

resistant


case


voids all


warranty


and


performance


claims

.

A

.

Test


button

B

.

Reset


button

TEST

RESET

A

B

This


room


air


conditioner


is


equipped


with


a


power


supply


cord


required


by


UL

This


power


supply


cord


contains


state

-

of

-

the

-

art


electronics


that


sense


leakage


current

If


the


cord


is


crushed

the


electronics


detect


leakage


current


and


power


will


be


disconnected


in


a


fraction


of


a


second

Power


Supply


Cord

Electrical


Requirements

INSTALLATION


REQUIREMENTS

3

Power


supply

Model

Time

-

delay


fuse

(or circuit breaker)


  208/230V


187.2V min.

  253V m ax.

12K BTU cooling&heating

18A

18K BTU cooling only

15A

20

A

18K BTU cooling&heating
24K


BTU


cooling only


24K BTU cooling&heating

Summary of Contents for AW-12DR3RYFU20

Page 1: ...FU20 AW 18CW3RXFUE20 AW 18DR3RXFU20 AW 24CW3RDFUE20 AW 24DR3RDFU20 INSTRUCCIONES DE INSTALACI N Y USO Model Para consultas sobre las caracter sticas funcionamiento rendimiento piezas o servicio llame...

Page 2: ......

Page 3: ...Air Conditioner Prepare Air Conditioner for Installation Window Air Conditioner Installation Complete Installation Starting Your Air Conditioner AIR CONDITIONER USE Using the Remote Control Changing...

Page 4: ...rvision or instruction concerning use of the appliance by a person responsible for their safety Children should be supervised to ensure that they do not play with the appliance DISPOSING OF THE UNIT c...

Page 5: ...evices a green light will turn on 3 Press TEST listen for click Reset button will trip and on some devices a green light will turn off 4 Press and release RESET listen for click Reset button will latc...

Page 6: ...fluids or abrasive cleaners to remove tape or glue These products can damage the surface of your air conditioner Handle the air conditioner gently WARNING Excessive Weight Hazard Use two or more peopl...

Page 7: ...lation The location should provide Do not use an extension cord The appliance shall be installed in accordance with national wiring regulations Free movement of air in room to be cooled A large enough...

Page 8: ...ease plastic tabs on each side of Front Panel 4 Remove shipping screws from top of unit and also on both sides by the base if installed 6 Add two foam inserts to holes in top of cabinet where shipping...

Page 9: ...he cabinet and drive two 3 4 pan head Phillips locking screws through the safety locks into the cabinet as shown Install Side Curtains Side curtain Curtain housing A B A Lower window sash B Adhesive s...

Page 10: ...and tight to bottom of cabinet Mark brackets at top level of sill Mark cabinet bottom at distance of sill width Remove support brackets 3 Insert 1 2 long bolts through appropriate holes in cabinet bo...

Page 11: ...ower window sash B Foam seal A B 3 Remove the backing from the EVA Foam Attach one EVA Foam on the Curtain housing the side with adhesive should facing the Curtain housing 4 Repeat for the right hand...

Page 12: ...ll Air Conditioner into Cabinet and Install Front Panel to Unit Vent control correct location Air conditioner in the Cool mode operation the better limits Outdoor side 64 4 109 4 F 18 43 C 80 RH indoo...

Page 13: ...temperature display from F to C Press both the MODE and DOWN buttons at the same time for 5 seconds to switch the display from F to C Fan NOTE The Fan button will operate only when the Cool Fan ECO o...

Page 14: ...larity of the cell same as the indicator on the bracket A A Bracket When the first use please remove the insulated plastic patch One CR2025 battery included powers the remote control Replace battery a...

Page 15: ...again for TIMER confirmation and TIMER indicator light on the air conditioner control will be on 4 To cancel the TIMER press the TIMER on remote and the TIMER indicator light will be off Timer To set...

Page 16: ...etely Repairing Paint Damage Check once or twice a year for paint damage This is very important especially in areas near oceans or where rust is a problem If needed touch up with a good grade enamel p...

Page 17: ...peration NOTE A damaged power supply cord must be replaced with a new power supply cord obtained from the product manufacturer and must not be repaired Air conditioner seems to run too much The curren...

Page 18: ...nditioner to provide a downward slope toward the outside to ensure proper drainage See the Installation Instructions NOTE Do not drill a hole in the bottom of the metal base and condensate pan The tem...

Page 19: ...stalaci n del aire acondicionado en una ventana 23 Complete la instalaci n 26 Requisitos de ubicaci n 21 Inicio del aire acondicionado 27 Uso del mando a distancia 28 Cambio en la direcci n del aire 2...

Page 20: ...frigerante al manipular instalar y operar el electrodom stico No perfore orificios en la unidad El mantenimiento la limpieza y el servicio deben ser realizados solo por t cnicos capacitados y califica...

Page 21: ...todos los c digos y ordenanzas locales Su aire acondicionado puede diferir del que se muestra aqu Este aire acondicionado est equipado con un cable de alimentaci n por UL Este cable de alimentaci n co...

Page 22: ...slante EPDM 2 L Tornillos de 3 4 8 M Tornillos de 1 4 10 N Tornillo largo de cabeza plana de 3 4 y tuerca de seguridad 2 O Tornillo largo de 1 2 y tuerca de seguridad 4 P Arandela 2 Q Soportes izquier...

Page 23: ...rdenanzas IMPORTANTE Siga todas las normas y ordenanzas NOTA No se deben obstruir las lamas del gabinete El aire debe pasar libremente por las lamas del gabinete Nota para el instalador Aseg rese de d...

Page 24: ...ado del panel frontal 4 Quite los tornillos de env o de la parte superior de la unidad y de los laterales de la base si est n colocados 6 A ada dos aislantes en los orificios de la parte superior del...

Page 25: ...llos Phillips de cabeza plana de 3 4 a trav s de los cierres de seguridad en el gabinete como se muestra aqu Instale las cortinas laterales Cortina lateral Carcasa de la cortina A B A Guillotina infer...

Page 26: ...e Marque los soportes en la parte superior del alf izar Marque la parte inferior del gabinete a la distancia del ancho del alf izar Quite los soportes 3 Inserte los tornillos largos de 1 2 a trav s de...

Page 27: ...mm menos que el ancho medido luego corte la goma EVA por la l nea B A A Carcasa de la cortina B Goma EVA B A A Parte superior de la banda inferior de la ventana B Sello de espuma A B 3 Quite el revers...

Page 28: ...es l mites para el aire acondicionado en el modo de funcionamiento de refrigeraci n Lado exterior 64 4 109 4 F 18 43 C 80 RH Lado interior 62 6 89 6 F 17 32 C 80 RH Los mejores l mites para el aire ac...

Page 29: ...enos DOWN v la temperatura disminuir de a un 1 F 1 C hasta llegar a los 61 F 16 C Despu s de realizar la limpieza y volver a conectar el filtro presione el bot n POWER para reiniciar la luz del FILTRO...

Page 30: ...s acorde a las normas vigentes ya que son nocivas para el medio ambiente Aseg rese de que la direcci n correcta de la polaridad de la c lula sea la misma que el indicador en el soporte A A Soporte Qui...

Page 31: ...onado 4 Para cancelar TIMER presione TIMER en el control remoto y la luz del indicador TIMER se apagar Temporizador Para establecer el temporizador para el funcionamiento de encendido apagado con un r...

Page 32: ...e antes de volver a colocarlo para garantizar la m xima eficacia 4 Vuelva a colocar el filtro y cierre el panel frontal Limpieza del panel frontal 1 Apague el aire acondicionado 2 Limpie el panel fron...

Page 33: ...algunos dispositivos se encender una luz verde para volver al funcionamiento NOTA Se debe reemplazar el cable de alimentaci n da ado por un cable nuevo que se obtiene del fabricante no se debe repara...

Page 34: ...entando enfriar es extremadamente calurosa Permita m s tiempo para que el aire acondicionado enfr e la habitaci n calurosa Las ventanas o las puertas est n abiertas Cierre las ventanas y las puertas E...

Page 35: ...Version NO 2212161 01 Versi n No 2212161 01...

Reviews: