background image

7

C

B

A

3

/

4

″ 

long

HEX-HEAD
SCREW

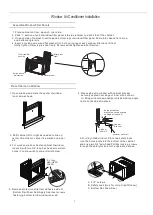
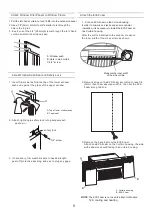
Assemble Window Filler Panels


1. Place cabinet on floor, a bench, or a table.

 2

Slide

 "

I

section


at


end


of


window


filler


panel


into


side


retainer


on


each


side


of


the cabinet.

 3. On each side of cabinet, insert top and bottom legs of window filler panel frame into channel in the top 
    and bottom angle rails.
 4.Insert a  locking screw and flat washer into hole on top leg of each window filler panel Do not
   totally tighten. Allow leg to slide freely. Screws will be tightened after Section .

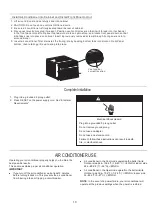
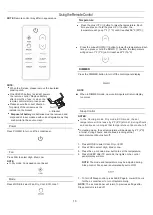
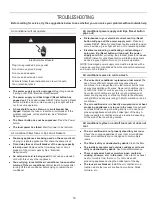
Place Cabinet in Window


1

Open window and mark the center of window 

        inner sill as shown 

.


2.Place cabinet in window with cabinet bracket

securely seated over edge of inner sill as shown
in . Bring window down temporarily behind top angle

      rail to hold cabinet in place.


4

.

For


wooden


window


Fasten cabinet to window

inner sill with two 3/4" long hex head screws into 

       holes  

(

You may wish to pre-drill pilot holes

)


5

.

For Vinyl-Clad window:


Place two safety locks 

      into the holes located in the bottom of the cabinet 
     and drive two 3/4" pan-head Phillips locking  screws 
     through the safety locks into the cabinet as shown.


    3. Shift cabinet left or right as needed to line up 

        center of cabinet on center line marked on inner
        sill.


           A.  3/4"  screws
           B. Safety Lock (Only for Vinly-Clad Window)
           C. Bottom Rail Foam Seal


     6. Remove protective strip from adhesive side of
           Bottom Rail Foam Seal Apply Seal over screws
           fastening bottom rail to window inner sill.
    

Window filler
panel

Side retainer


Top


window


filler


panel


leg

Bottom


window


filler panel leg

window


inner


sill

cabinet


window  outer


sill


Angle


of


cabinet

bracket


securely


seated

on


edge


of


inner


sill

.

Bracket

Window  Air Conditioner Installation

Summary of Contents for AW1221DR3W

Page 1: ...AW1221DR3W AW2521CW3W AW1821CW3W AW1521CW1W Model ...

Page 2: ... INSTRUCTIONS Unpack the Air Conditioner Prepare Air Conditioner for Installation Window Air Conditioner Installation Complete Installation Starting Your Air Conditioner AIR CONDITIONER USE Using the Remote Control Changing Air Direction Exhaust Air Vent Normal Sounds AIR CONDITIONER CARE 15 15 Cleaning the Front Panel 15 Repairing Paint Damage 15 TROUBLESHOOTING 16 11 Cleaning the Air Filter 15 ...

Page 3: ... or sideways to avoid damage to the compressor The wiring diagram is shown at nameplate on the air conditioner This appliance is not intended for use by persons including children with reduced physical sensory or mental capabilities or lack of experience and knowledge unless they have been given supervision or instruction concerning use of the appliance by a person responsible for their safety Chi...

Page 4: ...reen light will turn on 3 Press TEST listen for click Reset button will trip and on some devices a green light will turn off 4 Press and release RESET listen for click Reset button will latch and on some devices a green light will turn on The power supply cord is ready for operation NOTE The Reset button must be pushed in for proper operation The power supply cord must be replaced if it fails to t...

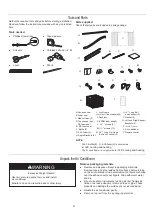
Page 5: ...Q F Baffle 2 F P R E PE foam seal 3 4 L screws 8 NOTE The is not provide for 12K cooling and heating The is only provide for 12K cooling and heating F Baffle 2 G EVA Foam 2 R Lock frame R Lock frame Remove packaging materials Remove and dispose of recycle packaging materials Remove tape and glue residue from surfaces before turning on the air conditioner Rub a small amount of liquid dish soap over...

Page 6: ...the window opening dimensions All supporting parts must be secured to firm wood masonry or metal The electrical outlet must be within reach of the power cord Follow the dimensions in the table and illustration for your model A With side curtain panels B Models A B 12K BTU 15K BTU 24K BTU 25K BTU 17 432mm min 19 1 min 10 485mm 18 1 470mm min 2 27 41 686mm 1041mm 32 2 5 4 823mm 4 1118mm 29 3 5 42 1 ...

Page 7: ...binet where shipping screws were removed from 1 Remove adhesive strip coating from foam gasket Attach adhesive side of gasket to bottom of top angle rail Insert 4 screws from inside of cabinet and secure to top angle rail 2 From inside of cabinet insert 3 screws to attach each side baffle as shown Attach side baffles with flat side against cabinet and angled edge toward rear of cabinet Remove Air ...

Page 8: ...angle rail to hold cabinet in place 4 For wooden window Fasten cabinet to window inner sill with two 3 4 long hex head screws into holes You may wish to pre drill pilot holes 5 For Vinyl Clad window Place two safety locks into the holes located in the bottom of the cabinet and drive two 3 4 pan head Phillips locking screws through the safety locks into the cabinet as shown 3 Shift cabinet left or ...

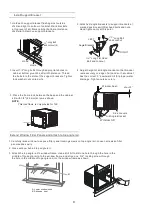
Page 9: ...ngle bracket so that bracket rests securely on edge of sill and so that cabinet has the correct downward tilt for proper water drainage Tighten nuts securely 3 This lock frame is only provide for 12K NOTE Extend Window Filler Panels and attach to top angle rail 1 Carefully raise window to expose filler panel locking screws on top angle rail Loosen screws so filler panels slide easily 2 Close windo...

Page 10: ...ert one of the 3 4 20mm screws through the left hand curtain and into the window sash In order to minimize air leaks and ensure optimal insulation it is necessary to install the EVA Foam on the Curtain housing After the unit is installed to the window measure the inner width of the side curtain as shown 1 Put one EVA Foam on the Curtain housing 9 Measure the inner width of the side curtain 2 Remar...

Page 11: ...upply cord See Electrical Requirements Electrical Shock Hazard Plug into a grounded prong outlet 3 Do not remove ground prong Do not use an adapter Do not use an extension cord Failure to follow these instructions can result in death fire or electrical shock WARNING Install Air Conditioner into Cabinet and Install Front Panel to Unit 1 4 s Lift air conditioner and carefully slide into cabinet 2 CA...

Page 12: ...gh Low Med High FAN FAN Low Med High Low Med High Dry Fan Cool Eco Dry Fan Cool Eco MODE Heat MODE Dry Fan Cool Eco Dry Fan Cool Eco MODE Heat CONNECT CONNECT NOTE NOTE Dry mode should not be used to cool the room Select ECO mode to initiate this function The fan will continue to run after the compressor shuts off for 2 minutes 4 minutes for the first time so the fan will shuts off for 10 minutes ...

Page 13: ...er WIFI WIFI control is available for connected models with this logo on control panel CONNECT CONNECT 1 Press the CONNECT button for 5s the LED start to falsh 2 After the WIFI module connecting the router the LED keeps on Or the LED keeps off Timer Sleep Filter Timer Sleep Filter NOTE WIFI control is available for WIFI control models ...

Page 14: ...dicator on the bracket A A Bracket When the first use please remove the insulated plastic patch after 6 months of use or when the 5 T o turn off Sleep control press SLEEP again or wait 8 hours for the air conditioner to turn off automatically NOTE The air conditioner will return to previous settings after Sleep control is turned off T emperature DIMMER Press the DIMMER button to turn off the contr...

Page 15: ...r filter Filter Changing Air Direction Use the Vertical Level Vane to direct the air right or left Use the whole cartridge to direct air up down or straight ahead A Vertical Level Vane B Cartridge A B Exhaust Air Vent Pull out the exhaust air vent control to Open the exhaust air vent and draw stale or smoky air from the room Push in the exhaust air vent control to close the exhaust air vent for ma...

Page 16: ...t 3 Use a vacuum cleaner to clean the air filter If the air filter is very dirty wash it in warm water with a mild detergent Do not wash the air filter in the dishwasher or use any chemical cleaners Air dry the filter completely before replacing to ensure maximum efficiency 4 Replace the air filter back into the air conditioner and colse the front panel Cleaning the Front Panel 1 Turn off the air ...

Page 17: ... green light will turn on to resume operation NOTE A damaged power supply cord must be replaced with a new power supply cord obtained from the product manufacturer and must not be repaired Air conditioner seems to run too much The current air conditioner replaced an older model The use of more efficient components may cause the air conditioner to run longer than an older model but the total energy...

Page 18: ...o a cooler setting by pressing the minus button to reduce the temperature Set the Fan Speed control to the highest setting Water drips from cabinet into your house The air conditioner is not properly leveled The air conditioner should slope slightly downward toward the outside Level the air conditioner to provide a downward slope toward the outside to ensure proper drainage See the Installation In...

Page 19: ...Version NO 2166536 01 ...

Reviews: