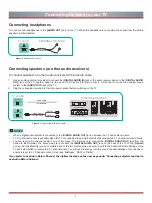
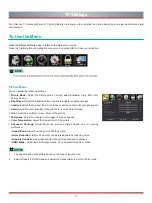
background image

18

Media

Please note that Hisense will not assume any responsibility for any lost data and cannot guarantee perfect compatibility with all 

mass storage devices. Be sure to insert the USB flash drive into the USB 2.0 port. Do not connect any other device (such as a digital 

camera, keyboard, etc.,) to this port.

NOTES

Do not remove the USB flash drive or turn off your TV while viewing or listening to content.
Before you access the Media menu, plug in the USB flash drive. Next press [

Input

] to set the Input Source to Media.

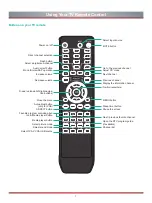
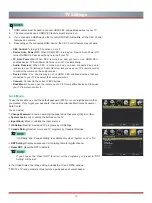
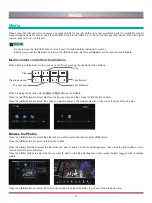
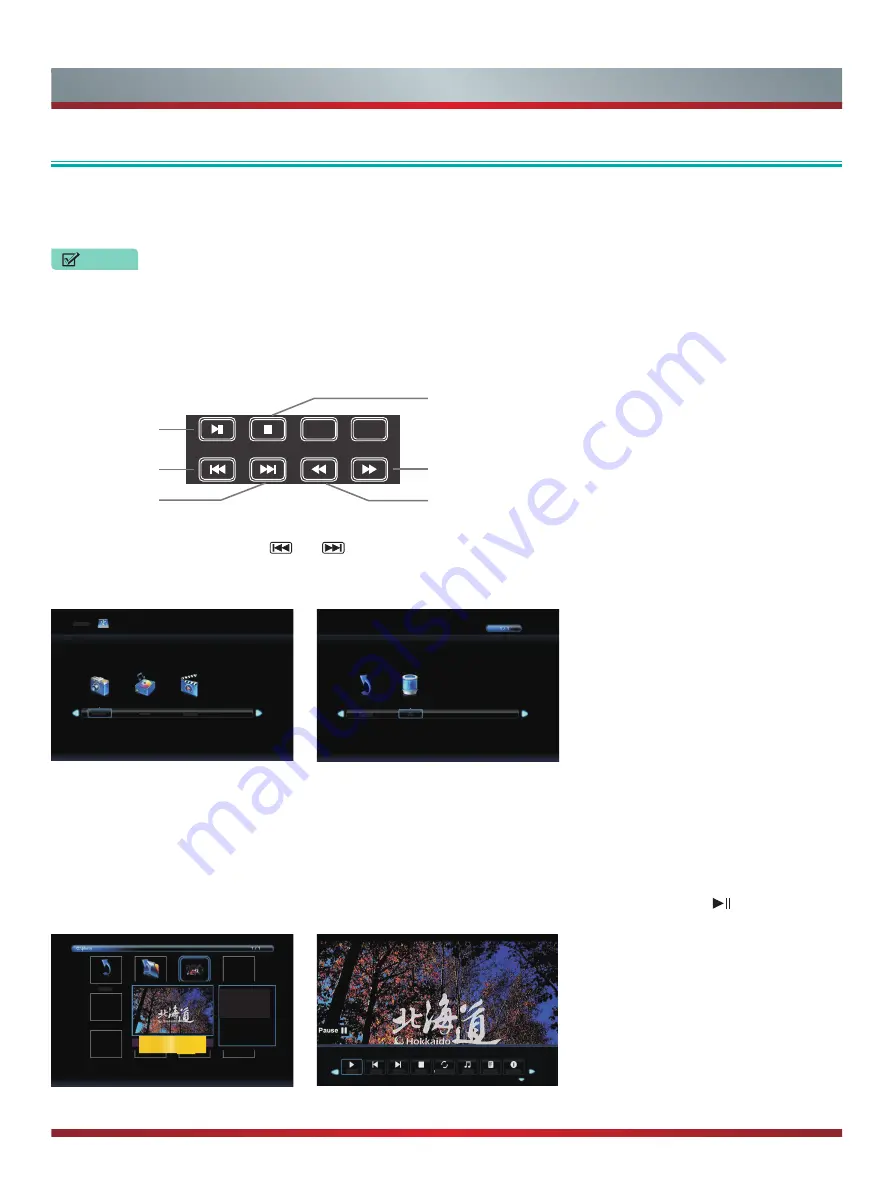
Media content control function buttons

When viewing or listening to content, you can control it by pressing the special function buttons.

When browsing the photos, only the 

 and 

 buttons are available.

Press the [▲/▼] buttons to select Media in the Source menu and then press the [OK] button to enter.
Press the [◄/►] buttons to select the option you want to adjust in the main Media menu, then press the [OK] button to enter.
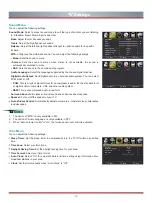
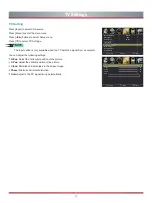
   

Browse the Photos

Press the [◄/►] buttons to select the disk that you want to watch and then press the [

OK

] button.

Press the [◄/►] buttons to select return option to back.

Press the [◄/►] buttons to select the file folder you want to search in the file selecting menu, then press the [OK] button on your 

remote control to enter sub-menu.

Press the [◄/►] buttons to select the file you want to watch in the file selecting menu, then press the [OK or 

 ] button to display 

picture.


Press the [◄/►] buttons to select the Return option and press the [OK] button to go back to the previous menu.
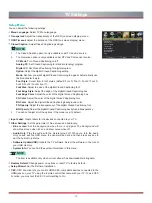
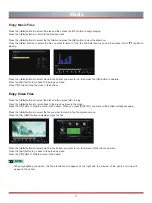
                 Media

Play

The previous one

Fast forward

Stop

The next one

Fast backward

Resolution: 

Size:

Date:

Time:

1920x 1080

1418KBytes

2015 / 05 / 01

20:10:25

Return

Play

Prev.

Next

Stop

RepeatALL

Music

Playlist

Info.

Music

Movie

Photo

USB 2.0

Return

C

Summary of Contents for H3C Series

Page 1: ...English H3C Series ...

Page 2: ...n part in any manner electronic or otherwise whether or not for a charge or other or no consideration without the prior written permission of Hisense Company Ltd Requests for permission to store reproduce transmit or distribute materials may be made to one of the following addresses USA Hisense USA Corporation PO Box 3289 Suwanee GA 30024 CANADA Hisense Canada Co Ltd 405 Britannia Rd E Suite 11 Mi...

Page 3: ...ither expressed or implied that the Application Service will be uninterrupted or error free including but not limited to vagaries of weather disruption of Service acts of God warranties of title local or regional limitations no infringement NOR IMPLIED WARRANTIES OF MERCHANTABILITY OR FITNESS FOR A PARTICULAR PURPOSE No advice or information given by Hisense providers affiliates or contractors or ...

Page 4: ...phones 4 Connecting speakers or other audio receivers 4 Connecting a digital sound bar to use Audio Return Channel ARC 5 Connecting a PC with VGA cable 6 Using Your TV Remote Control 7 Completing the First Time Setup Menu 9 TV Settings 12 To use the Menu 12 Picture Menu 12 Sound Menu 13 Time Menu 13 Setup Menu 14 Lock Menu 15 Channel Menu 16 PC Setting 17 Media 18 Media content control function bu...

Page 5: ...iver to the TV Figure 2 AV device with a composite video cable or ANT OUT Cable Set top box RF Out EXTERNAL DEVICE TV JACK TV JACK ANT CABLE IN not included not included not included EXTERNAL DEVICES DVD Player Recorder Video Camera Set top box Satellite Receiver Satellite antenna cable VCR AV OUT Video L R White L White L Yellow Video Yellow or Green Video Red R Red R Audio Cable Video Cable Conn...

Page 6: ...f the external device to the TV AUDIO L R jacks 2 Plug the connected devices into the YPBPR and L R ports on the TV before switching it on 3 Using your remote press the INPUT button and select Component as the input source Figure 3 AV device with a component video cable Connecting an AV device with an HDMI cable This type of connection supports digital connections between HDMI enabled AV devices s...

Page 7: ...h audio cable TV JACK Audio Cable not included TV JACKS White L Red R Audio Cable not included Audio Cable not included If you prefer to use Audio Return Channel then follow the steps on the next page under Connecting a digital sound bar to use Audio Return Channel NOTES When a digital audio system is connected to the DIGITAL AUDIO OUT jack decrease the TV and system volume 5 1 CH channel audio is...

Page 8: ...ple remotes for each device Only digital sound bars that require a wired connection are compatible with the H3 Series Smart TV To connect a digital sound bar with an HDMI cable 1 Connect the cable that s attached to the soundbar to the HDMI ARC port on the TV 2 Turn on the soundbar by pressing the Power button 3 Press the MENU button on your remote and go to Setup CEC 4 Turn on the CEC Control set...

Page 9: ...es into the mains socket before switching on the TV 3 Using your remote press the INPUT button and select VGA as the input source Computer PC IN VGA PC DVI AUDIO IN Audio Cable not included VGA Cable not included NOTES This device is intended for you to use primarily as an LED TV We recommend that you contact the PC Video Graphic card manufacturer for further support Perfect compatibility is not g...

Page 10: ...avorite program controlling but ton Media player button Select picture mode Media player button Select sound mode Select TV AV VGA USB source Dash button Select a digital sub channel Audio select button Mono Stereo SAP operation Select input source MUTE button Go to the previous channel Adjust CC mode Next channel Previous channel Display the information banner MENU button Sleep timer button Pause...

Page 11: ...y for USA If you would like to program your other household remote controls to your new Hisense television please refer to the User s Manual supplied by your Cable or Satellite provider The Cable or Satellite providers User s Manuals should include instructions on how to program their remote to your television A list of Hisense codes for the most common Cable and Satellite providers are listed bel...

Page 12: ... on the remote to select Next and press OK to go Home Mode Home mode is the recommended state in which you should use the TV Retail Mode Retail mode should only be selected if the TV will be set up for an in store demonstration Setup Mode Press the buttons on the remote to select Quick setup or Customized Press the buttons on the remote to select Next and press OK to go If you select Quick setup t...

Page 13: ...ext and press OK to move to the next step Your TV will begin scanning for available channels in your viewing area After the scan has completed you can exit the Wizard by press ing OK to select Done If you select Customized Setup Mode then you will need to complete the following settings that are explained beginning on page 11 Setup Wizard Live TV Setup Next Exit OK EXIT MENU Move Previous No Yes D...

Page 14: ... wizard Scan Channels If you don t have a Satellite Cable box select No Press the buttons to select Air or Cable Press the buttons to select Next and press OK to move forward After the channel scan has completed press OK to select Done and exit the wizard Setup Wizard Time Setting Time Zone Daylight Savings Time Format Clock Pacific Off 12 hour Set Automatically Next Exit OK EXIT MENU Move Previou...

Page 15: ... Tint Adjust the hue Red Green Blue of the picture Sharpness Adjust how sharp or soft edges of images appear Color Temperature Adjust the overall color of the picture Advanced Settings Adjust advanced picture settings based on your viewing preference Aspect Ratio Adjust how the picture fills the screen Noise Reduction Improve how clear the picture appears by reducing noise Dynamic Contrast Automat...

Page 16: ...ounds Treble Adjust the high frequency sounds Balance Adjust the left and right speaker strength to optimize audio for a specific location MTS Configures the multi track sound You can adjust the following settings Mono Sets the sound to mono Stereo Sets the sound to stereo when stereo is not available the sound is automatically switched to mono SAP Sets the sound to the second audio program Audio ...

Page 17: ... the transparency of the digital Closed Captioning font BG Opacity Adjust the digital Closed Captioning background transparency 3 You can not adjust all of the options if the mode is set to default Input Label Create labels for the devices connected to your TV Other Settings Set the parameter of blue screen and audio only Blue screen Set the background when there is no signal The background will s...

Page 18: ...connected device s HDMI CEC feature must be turned on 3 If you connect an HDMI device that is not HDMI CEC compatible all the CEC Control features do not work 4 Depending on the connected HDMI device the CEC Control feature may not work CEC Control Turning CEC Function on or off Device Auto Power Off When HDMI CEC is turned on Device Auto Power Off turns off HDMI CEC devices when you turn off your...

Page 19: ...7 Directed to older children TV G General audience TV PG Parental Guidance Suggested TV 14 Parents Strongly cautioned TV MA Mature Audiences Only MPAA This system defines the rating control which come from MPAA rules U S Movie Rating NOTE The content ratings will increase depending on the level of the age based rating For example a program with a TV PG V rating may contain moderate violence while ...

Page 20: ...al position of the picture V Pos Adjust the vertical position of the picture Clock Minimize vertical stripes in the screen image Phase Minimize horizontal distortion Auto Adjust to the PC signal timing automatically Picture Time Setup Lock Channel Sound Menu Language Transparent OSD Timeout Closed Caption Input Label PC Settings Other Settings Restore Default Setup Wizard English 25 20 Sec Select ...

Page 21: ... menu and then press the OK button to enter Press the buttons to select the option you want to adjust in the main Media menu then press the OK button to enter Browse the Photos Press the buttons to select the disk that you want to watch and then press the OK button Press the buttons to select return option to back Press the buttons to select the file folder you want to search in the file selecting...

Page 22: ...When you press DISPLAY the menu in the bottom will appear again Press the buttons to select the file you want to watch in the file selection menu Press the OK or button to display or play the file Press the buttons to select menu in the bottom you want to run then press OK button to operate Press the Exit button to go back to the previous menu Press the button to hide the menu in the bottom NOTE W...

Page 23: ...ing erased place the write protect sliding tab in the protect position 8 When you are ready to remove a USB Memory Stick set the unit to go into Standby mode to avoid any damage to your data and the unit 9 A USB Memory Stick that requires its own driver or the device with a special system such as fingerprint recognition are not supported 10 This unit is not allowed to use the USB Memory Stick whic...

Page 24: ...picture is black and white unplug the TV from the AC outlet and replug it after 60 seconds Check that the Color is set to 50 or higher Try different TV channels The sound and or picture is distorted or appears wavy An electric appliance may be affecting the TV Turn off any appliances that are nearby and move it farther away from the TV Insert the power plug of the TV set into another power outlet ...

Reviews: