Description
of
the
appliance
After the installation
After you have successfully installed the
appliance, you should clean it thoroughly
before using. Cleaning details can be found
in the “Cleaning and care” chapter.
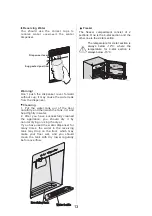
Tips:
Installing from down to up may become
more easy. And the procedure of lower
handle installation will be the same as
upper one.
2. Make the
handle
cover align
the
upper handle hold and the
upper handle holder part’s bottom
face must aim at upper handle
cover's.
3.Forcibly combine them, making
sure they are joint tightly .
2
1
2
3
2
1
1
3
3
1
2
Description of the appliance
View of the appliance
Note:
Due to unceasing modification of our products your refrigerator may be slightly different
from this Instruction Manual, but its functions and using methods remain the same.
1.
Light
cover
2. LED light (inside)
3. Screw
hole
cover
4. Wind
channel
part
in
freezer
chamber
5. Shelf
part
6. Ice
tray
part
7. Ice box
8. Light
cover
9. LED light (inside)
10. Wind
channel
part
in
refrigerator
chamber
11. Shelf
part
12. Shelves
assembly
13. Multifunctional
drawer
14. Shelves assembly
15. Crisper
box
part
16. Roll
wheel
17. Adjustable
bottom
feet
part
18. Upper
hinge
cover
19. Door
switch
20. Freezer door rack
21. Gasket
part
22. Middle
hinge
part
23. Water tank
24. Egg
tray(inside)
25. Small
shelf
26. Door
switch
27.Bottles block stripe
28. Refrigerator door rack(middle)
29. Gasket
part
30. Refrigerator door rack(lower)
REFRIGERATOR
FREEZER
1
2
3
4
5
6
7
8
9
10
11
12
13
14
15
16
17
21
18
19
20
22
23
24
25
26
28
30
27
29
8
Summary of Contents for H630TI-WD
Page 1: ...MODEL NUMBER RD 65WR4SB TYPE NUMBER H630TI WD...
Page 2: ...2014 35 EU 2014 30 EU Safety and warning information 6 14 15 16 17 10 8 9 1 1 6...
Page 3: ...2...
Page 4: ...3...
Page 5: ...4...
Page 6: ...5...
Page 39: ......

