background image

Overview 


conditions 

Storage/Transportation: –20°C to +60°C 

Humidity 

Operation: 20% to 85% RH, non-condensing 
Storage/Transportation: 10% to 90% RH, non-condensing 

Atmospheric pressure 

Operation: 70–106 kPa 
Storage/Transportation: 20–106 kPa 

Execution standard 

Q/0202RSR 631 LCD Monitor 


Accessories 


If any of the following accessories is lost, purchase it from the local distributor. 

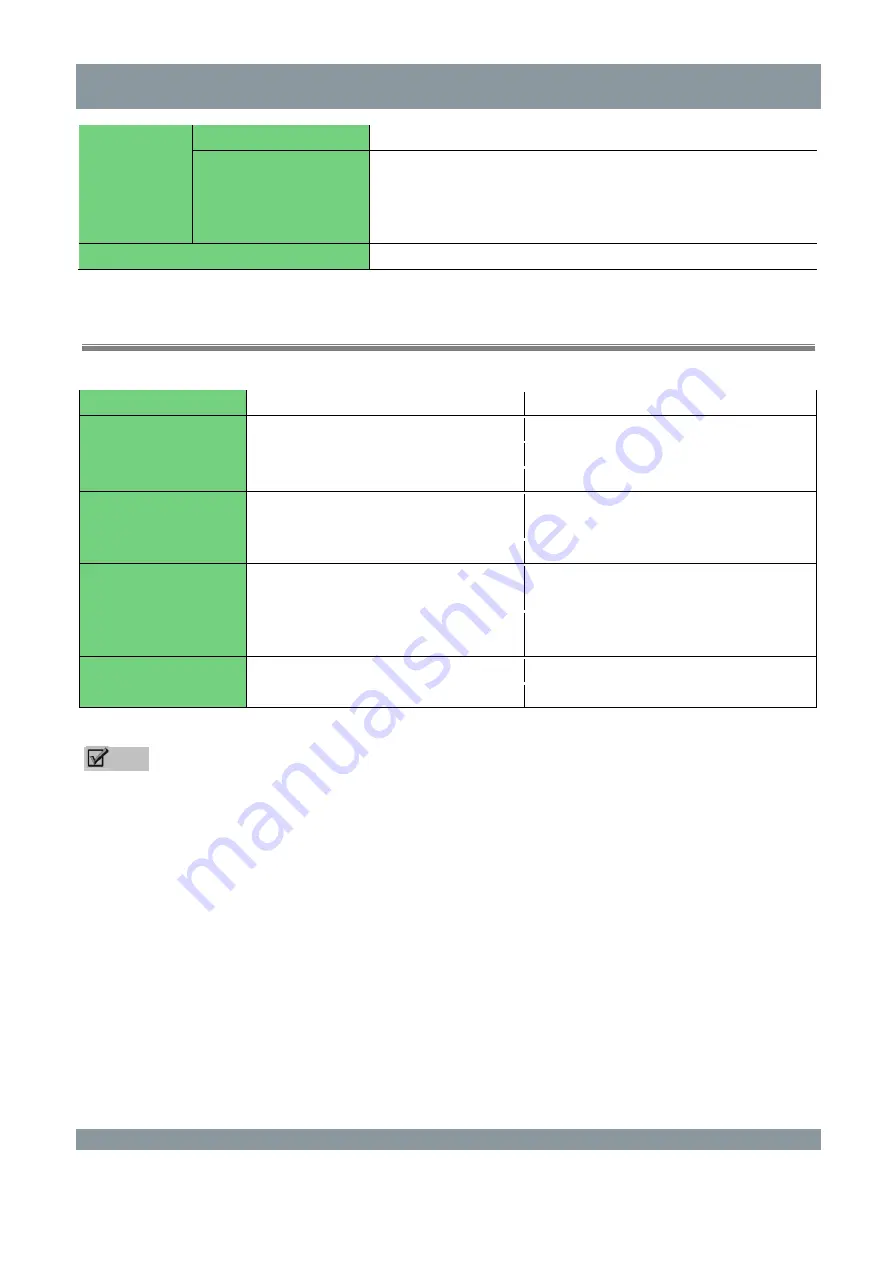
Name 

Quantity 

Remarks 

Power adapter 

Input: 100–240 V AC, 50–60 Hz 

Output: 24 V DC 

Power cable 


DVI-DVI signal cable  1 

Optional, depending on the actual 
delivery 

DP-DP signal cable 


USB data cable 

Optional, depending on the actual 
delivery 

CD 

User Guide and LCD monitor control 
software 

Image clip 


Graphics card 


 Note 


The accessory list is for reference only. If any component is lost or damaged, promptly contact 
Hisense or the specified distributor. Keep the original package properly. If you need to return this 
product, be sure to use the original package. Do not place any heavy weight on top of the package 
during transportation. 


Use a dedicated power adapter with the CCC certification mark that is compatible with the LCD 
monitor. 


Summary of Contents for HMD3G21S

Page 1: ...HMD3G21S User Guide Read the User Guide thoroughly before using Hisense LCD monitor and keep it properly for future reference RSAG2 025 6601SS B Version Hisense website www hisense com...

Page 2: ...the User Guide Hisense national customer service hotline 4009940707 Hisense service quality supervision tel 0532 83091111 Only the repair personnel are allowed to repair the LCD monitor and replace it...

Page 3: ...n the LCD monitor exterior periodically to extend its service life Do not perform cleaning and maintenance when the LCD monitor is energized Disconnect the LCD monitor power cable whenever possible De...

Page 4: ...side so do not disassemble it by yourself If the LCD monitor is abnormal contact Hisense or an authorized distributor Ensure that no sundries exist in the surrounding area of mains disconnection devic...

Page 5: ...Cable Connection 9 USB Connection 10 Operational Instructions and Function Adjustment 11 Operational Instructions 11 Mode Selection 12 Light Box 12 Backlight Highlight 13 Menu Adjustment 13 Main Menu...

Page 6: ...diation to the body and environment Ambient light induction The LCD monitor provides a built in ambient light sensor to measure ambient light in the unit of lux In different environments the LCD monit...

Page 7: ...ndard Rev 2 0 Power input 24 V DC 1 7 A Power consumption Standard power 19 W Max power 40 8 W Energy saving mode Below 0 5 W Input signal interfaces DVI D x 1 DisplayPort x 1 Output signal interfaces...

Page 8: ...r cable 1 DVI DVI signal cable 1 Optional depending on the actual delivery DP DP signal cable 1 USB data cable 1 Optional depending on the actual delivery CD 1 User Guide and LCD monitor control softw...

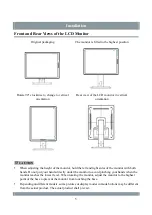
Page 9: ...monitor hold the left and right sides of the monitor with both hands Do not put your hands directly under the monitor to avoid pinching your hands when the monitor reaches the lowest level When rotati...

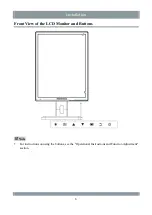
Page 10: ...Installation Front View of the LCD Monitor and Buttons Note For instructions on using the buttons see the Operational Instructions and Function Adjustment section 6...

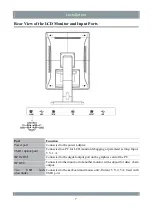
Page 11: ...to a PC for LCD monitor debugging or parameter setting Input 5 V 1 A DP IN DVI Connected to the digital output port on the graphics card of the PC DP OUT Connected to the input port of another monito...

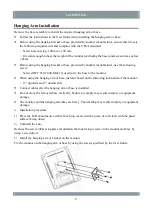
Page 12: ...base to the monitor When using the hanging arm or base install it based on the following inclination of the monitor 15 upwards and 5 downwards Connect cables after the hanging arm or base is installe...

Page 13: ...s you to switch to any of the channels for display The following figure shows the PC connection diagram DVI port DP IN port DP OUT port Signal cable Connected to the PC Digital Digital Digital Signal...

Page 14: ...to another monitor through the DP OUT channel to implement dual screen independent display The daisy chain must be supported by the graphics card USB Connection Connect the LCD monitor to a PC by usin...

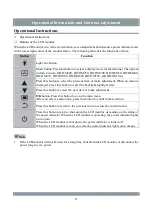
Page 15: ...adjustment When no menu is displayed press this button to enter the backlight highlight state Press this button to select the next item or make adjustment OK button Press this button to go to the main...

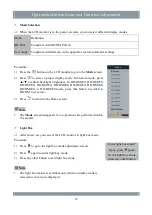
Page 16: ...300 DICOM350 DICOM400 DICOM450 DICOM500 DICOM600 or DICOM700 mode press this button to switch to DICOM User mode 3 Press to return to the Home screen Note The Mode screen disappears if no operations a...

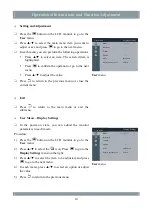
Page 17: ...enu and press to close the menu The following table lists the configurable items of the menu Main Menu First level Menu Second level Menu Remarks User menu Display Settings Mode For details see the Di...

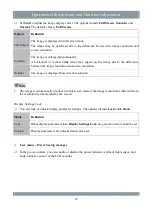
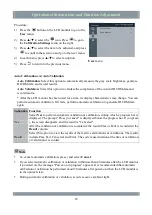
Page 18: ...s to return to the main menu or exit the submenu User Menu Display Settings In the power on state you can adjust the monitor parameters in each mode Procedure 1 Press the button on the LCD monitor to...

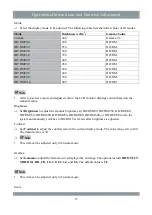
Page 19: ...ys content based on the adjusted value Brightness Set Brightness to adjust the monitor brightness In DICOM200 DICOM250 DICOM300 DICOM350 DICOM400 DICOM450 DICOM500 DICOM600 or DICOM700 mode the system...

Page 20: ...ween the image resolution and screen resolution Normal The image is displayed based on its resolution Note The image is automatically displayed in full screen mode if the image resolution is different...

Page 21: ...ient light sensor The default value is Off The LCD monitor provides a built in ambient light sensor to compensate brightness based on high medium and low ambient light When the ambient light is low th...

Page 22: ...Function Yes Select Yes to perform automatic validation or calibration during which a progress bar is displayed The prompt Press j to cancel is displayed below the progress bar If you press j the scre...

Page 23: ...sh The default value is Chinese LOGO Set LOGO to enable or disable the startup logo When you select Off the startup logo is not displayed upon power on When you select On the startup logo is displayed...

Page 24: ...signal Monitor Info Tap Monitor Info to view the basic monitor model resolution serial number firmware version product use duration and backlight use duration All Settings Reset Tap All Settings Rese...

Page 25: ...ed that the connection cables delivered with the LCD monitor be used Restart the PC The image is abnormal Check whether the output resolution of the graphics card is proper Tap All Reset to restore al...

Page 26: ...es emitted by power supply equipment may affect the use of the LCD monitor and damage it Install the LCD monitor in an environment free of electromagnetic wave interference If the LCD monitor generate...

Page 27: ...mponents containing harmful substances Environmental friendly service life The environmental friendly service life identifier printed on the LCD monitor s nameplate and storage box indicates that the...

Page 28: ...accidents incorrect installation natural disasters or improper maintenance by a third party other than Hisense and authorized distributors The product ages because it has been used with brightness abo...

Page 29: ...or s brightness and its input voltage is non linear A smaller gamma value generates an image with lower contrast whereas a greater gamma value generates an image with higher contrast In Plane Switchin...

Page 30: ...ent Co Ltd Address North 3F Outsourcing Center of Software Park No 169 Songling Road Laoshan District Qingdao P R China Hisense national customer service hotline 4009940707 Hisense service supervision...

Reviews: