background image

Operational Instructions and Function Adjustment 


result. 

5)


Press 

 to return to the 

User

 menu. 

Note: 

1)


This function is available only in 

Single

 mode. 

2)


This function is available 30 minutes after the system is powered 
on. 


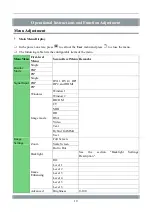
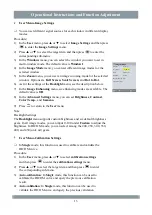
User Menu-System Settings 


In the power-on state, you can set other functions for the monitor. 

Procedure: 

1)


In the 

User


menu, press ▲ or ▼ to select 

System Settings

 and then 

press 

 to enter the 

System Settings

 menu. 

2)


Press ▲ or ▼ to select the target item and then press 

 to enter 

the corresponding sub-menu. 

3)


In the 

Menu Settings

 menu, you can set 

Language

Menu 

Location

, and 

Menu Transparency

4)


In the 

Power

 menu, you can set the power indicator brightness to 

High

Low

, or 

Off

5)


In the 

Human Sensor

 menu, you can set the human sensor to 

On

 or 

Off

6)


In the 

Ambient Light Sensor

 menu, you can set the sensor to 

On

 or 

Off

7)


In the 

Auto Awake

 menu, you can set whether to awake the 

monitor when a DP1 communication signal is coming in the 
standby state. 

8)


In the 

Monitor Info

 menu, you can view 

Version

SN

Product 

Usage Time

, and 

Backlight Usage Time

 of the monitor. 

9)


In the 

Multi-Window Settings

 menu, you can set the mode to 

Three

Four

, or 

Back to original mode

10)


In the 

Logo Set

 menu, you can set whether to display the logo upon 

power-on. 

11)


In the 

Factory Reset

 menu, you can restore the monitor parameters 

to factory defaults. 

12)


Press 

 to return to the 

User

 menu. 


Back


System Settings


Menu Settings 
 
Power 
 
Human Sensor 
 
Ambient Light Sensor 
 
Auto Awake 
 
Monitor Info 
 
Multi-Window 
Settings 
 
Logo Set 
 
Factory Reset 

Upward


Downward


Select


Low 
 
Off 
 
Off 
 
Off 


On 

Back


14 

Summary of Contents for HMD4C27S

Page 1: ...HMD4C27S User Guide Read the User Guide thoroughly before using Hisense LCD monitor and keep it properly for future reference RSAG2 025 6801SS B Version Hisense website www hisense com...

Page 2: ...manual Hisense national customer service hotline 4009940707 Hisense service quality supervision tel 0532 83091111 Only the repair personnel are allowed to repair the LCD monitor and replace its compo...

Page 3: ...and maintenance when the LCD monitor is energized Disconnect the LCD monitor power cable whenever possible Description and Maintenance of the LCD monitor The screen is a key component of the LCD moni...

Page 4: ...nse or an authorized distributor Ensure that no sundries exist in the surrounding area of mains disconnection devices such as the switch power plug and appliance coupler and that these devices are eas...

Page 5: ...or and Input Ports 7 Hanging Arm Installation 8 PC Connection 9 Operational Instructions and Function Adjustment 10 Menu Adjustment 10 Main Menu Display 10 Setting and Adjustment 12 User Menu Display...

Page 6: ...ltiple input interfaces two DVI Ds one HDMI and two DPs It supports the following functions DP daisy chain simultaneous display of two signal sources built in Picture by Picture PBP Picture in Picture...

Page 7: ...playPort connector HDMI connector Output signal connector DisplayPort connector Dimensions W x H x D System with the base 653 8 x 520 x 60 mm System without the base 653 8 x 400 x 60 mm Product qualit...

Page 8: ...software Graphics card 1 Image clip 1 Quick installation manual 1 Note The accessory list is for reference only If any component is lost or damaged promptly contact Hisense or the specified distribut...

Page 9: ...monitor is lifted to the highest position CAUTION When adjusting the height of the monitor hold the left and right sides of the monitor with both hands Do not put your hands directly under the monito...

Page 10: ...cklight brightness increases decreases Downward Back It is used to return to the previous menu When no menu is available it is used to call out the Image Enhancing function Display mode The display mo...

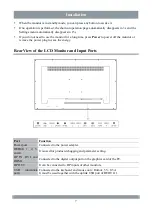
Page 11: ...monitor or remove the power plug to save the energy Rear View of the LCD Monitor and Input Ports Port Function Power port Connected to the power adapter DEBUG 1 2 3 and 4 It is used for product debug...

Page 12: ...x the base to the monitor When using the hanging arm or base install it based on the following inclination of the monitor 15 upwards and 5 downwards Connect cables after the hanging arm or base is ins...

Page 13: ...ix the connection The following takes the DVI and DP signal cables as an example 2 Insert the power adapter to the power socket and the power connector on the monitor 3 After the power is turned on th...

Page 14: ...n Menu First level Menu Second level Menu Remarks Display Mode Single PBP PIP Signal Input Single DVI1 DVI2 DP1 DP2 and HDMI PBP PIP Image Settings Windows Window 1 Window 2 Image mode DICOM CT MRI DR...

Page 15: ...o Calibration Execution Result Auto validation Execution Result System Settings Menu Settings Language Chinese and English Menu Location Bottom Left Bottom Right and Center Menu Transparency High Medi...

Page 16: ...2 Press or to select the item to be adjusted and then press The system automatically switches to the selected display mode 3 Press to return to the previous menu User Menu Signal Input You can set di...

Page 17: ...an set Brightness Contrast Color Temp and Gamma 9 Press to return to the User menu Note Backlight Settings The Backlight menu supports custom brightness and six default brightness gears In all image m...

Page 18: ...ff 5 In the Human Sensor menu you can set the human sensor to On or Off 6 In the Ambient Light Sensor menu you can set the sensor to On or Off 7 In the Auto Awake menu you can set whether to awake the...

Page 19: ...by the LCD monitor Disconnect and then reconnect the signal cable or restart the PC The image is blurred the screen displays interference stripes or characters show prominent edge colors Check whethe...

Page 20: ...waves emitted by power supply equipment may affect the use of the LCD monitor and damage it Install the device in an environment free of electromagnetic wave interference If the LCD monitor generates...

Page 21: ...taining harmful substances Environmental friendly service life The environmental friendly service life identifier printed on the LCD monitor s nameplate and storage box indicates that the LCD monitor...

Page 22: ...by a third party other than Hisense and authorized distributors The product ages because it has been used with brightness above the recommended value in the User Guide for a long time The product is...

Page 23: ...s brightness and its input voltage is non linear A smaller gamma value generates an image with lower contrast whereas a greater gamma value generates an image with higher contrast In Plane Switching...

Page 24: ...Co Ltd Address North 3F Outsourcing Center of Software Park No 169 Songling Road Laoshan District Qingdao P R China Hisense national customer service hotline 4009940707 Hisense Group service supervis...

Reviews: