background image

Operational Instructions and Function Adjustment 


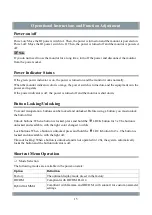
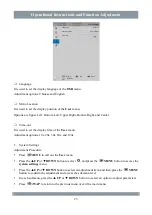
Language 

It is used to set the display language of the 

OSD

 menu. 

Adjustment options: Chinese and English 


Menu Location 

It is used to set the display position of the 

User

 menu. 

Options are Upper Left, Bottom Left, Upper Right, Bottom Right, and Center. 


Time-out 

It is used to set the display time of the 

User

 menu. 

Adjustment options: 10s, 20s, 30s, 60s, and 120s. 


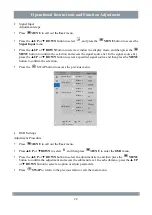
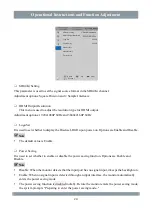
System Settings 

Adjustment Procedure 


Press 

MENU

 to call out the 

User

 menu. 


Press the ▲ 

UP


or ▼ 

DOWN

 button to select 

, and press the 


MENU

 button to access the 

system settings

 menu. 


Press the ▲ 

UP


or ▼ 

DOWN

 button to select an adjustment item, and then press the 


MENU


button to confirm the adjustment and access the submenu level. 


In each submenu

, press the ▲ 

UP


or ▼ 

DOWN

 button to select an option or adjust parameters. 


Press 

SWAP

 to return to the previous menu or exit the main menu. 

OSD Settings


Chinese 


Upper Right 

Return 

OK 

Select 

Windows 

Language 
 
Menu Location 
 
Time-out 


23 

Summary of Contents for HME8C55E

Page 1: ...HME8C55E User Manual Read the User Guide thoroughly before using Hisense LCD monitor and keep it properly for future reference RSAG2 025 7401SS B Version Website www hisense cn Hisense LCD Monitor...

Page 2: ...violations of the safety precautions and use instructions of the User Guide Hisense Group Service Hotline 4006111111 Hisense Group Installation Hotline 4008011111 Hisense service quality supervision t...

Page 3: ...r socket Use qualified sockets that have passed national safety certification Protect the power lead Put the power line in a place to prevent it from being stepped on or squeezed by objects above or a...

Page 4: ...r a long time disconnect the monitor from the power socket to avoid damage to the monitor caused by transient voltage To completely power off the monitor remove the power plug from the power socket De...

Page 5: ...rom the appearance of the actual product The information in this document is subject to change without notice This document provides instructions on correctly installing and using the LCD monitor Plea...

Page 6: ...9 Monitor Input and Output Interfaces 11 Definition of Monitor Connector Pins 12 Operational Instructions and Function Adjustment 15 Power on off 15 Power Indicator Status 15 Button Locking Unlocking...

Page 7: ...y effect more realistically Custom gamma Yc The monitor provides the function of customizing gamma curves for different scenarios UHD display The monitor resolution reaches 3840 x 2160 ensuring accura...

Page 8: ...0 1 Typical Response time 6 ms G to G typ Visible angle 178 CR 10 1 Factory default brightness 400 20 cd m2 Input signal interfaces HDMI x 1 DVI x 2 DP x 1 VGA x 1 3G SDI HD SDI x 5 Output signal inte...

Page 9: ...Pa Storage atmospheric pressure 200 1060 hPa Execution standard Q 0202RSR 631 Accessories Name Quantity Remarks User Manual 1 copy Power cable 1 Standard One HDMI cable 1 Standard Note In case of miss...

Page 10: ...ping off the bracket or support arm If the equipment is connected to a support arm do not use the equipment as a handle to move the equipment For instructions on how to move support arms connected to...

Page 11: ...achine the length of the screws M6 in the wall mounted hole in the rear shell should be 8 10 mm Too long screws will cause irreparable damages to the whole machine CAUTION Use support arms authenticat...

Page 12: ...deo sources to the corresponding video input interface of the monitor 1 HDMI IN 2 SDI IN 3 DVI 4 DP 5 VGA Output Port Connection Connect one or more available video receivers to the corresponding vide...

Page 13: ...with the monitor to the AC power supply interface of the monitor Protective Grounding Use an AWG18 wire with the maximum cable length approved by national regulations to connect the protective groundi...

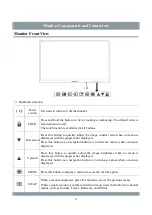
Page 14: ...ss bar displayed Press this button as a navigation button or to decrease values when a menu is displayed Upward Press this button to quickly adjust the image brightness when no menu is displayed with...

Page 15: ...signal source shortcut menu is displayed When multiple windows are displayed the window selection menu is displayed After you select a window the signal input shortcut menu is displayed after 3s RPE...

Page 16: ...IN SDI signal output interface SDI OUT HDMI signal input interface HDMI IN HDMI signal output interface HDMI OUT SDI 4K signal input and output interface SDI 4K input and output interface with four g...

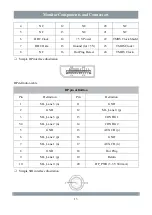
Page 17: ...a Line for DDC 3 TMDS Data2 10 TMDS Clock 17 DDC CEC ARC HEC Ground 4 TMDS Data1 11 TMDS Clock Shield 18 5 V min 0 055 A 5 TMDS Data1 Shield 12 TMDS Clock 19 Hot Plug Detect 6 TMDS Data1 13 CEC 7 TMDS...

Page 18: ...DS Clock Simple DP interface illustration DP definition table DP pin definition Pin Definition Pin Definition 1 ML_Lane 3 n 11 GND 2 GND 12 ML_Lane 0 p 3 ML_Lane 3 p 13 CONFIG1 5 4 ML_Lane 2 n 14 CONF...

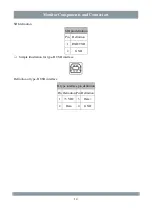
Page 19: ...I definition SDI pin definition Pin Definition 1 RXD TXD 2 GND Simple illustration for type B USB interface Definition of type B USB interface B type interface pin definition Pin Definition Pin Defini...

Page 20: ...monitor is shut down Button Locking Unlocking To avoid misoperation buttons can be locked and unlocked Before using a button you must unlock the button first Unlock buttons When a button is locked pre...

Page 21: ...Preset DICOM Hybrid GAMMA User1 User2 User3 User4 User5 and User6 Backlight 0 100 Gamma DICOM 1 8 2 0 2 2 2 4 2 6 c Color Temp 6500K 7500K 8500K 9300K Custom1 Custom2 Brightness 0 100 Contrast 0 100...

Page 22: ...Usage Time Mode Rename User modes 1 to 6 are in a list Factory Reset Confirm and Cancel CAUTION Gray items on a menu are unavailable in the current mode and state Detailed Operation Description Pictu...

Page 23: ...urve customized based on the user demands color temperature It is used to adjust the color temperature of the displayed image Adjustment option 6500K 7500K 8500K 9300K Custom1 Custom2 Note You can sel...

Page 24: ...l2 and Level3 NR This menu is used to adjust the monitor NR level Adjustment options Off N1 N2 and N3 Display Settings In the boot state this menu is used to adjust the display status of an image on t...

Page 25: ...No position change occurs in the Four Window mode During the exchange signal source positions change clockwise on the screen PIP Setting This menu is used to adjust the PIP size and positions in the...

Page 26: ...displayed in full screen mode The image may be deformed due to the difference between the image resolution and screen resolution Scale Screen The image is enlarged A horizontal or vertical blank stri...

Page 27: ...to confirm the selection Press the SWAP button to access the previous menu OSD Settings Adjustment Procedure Press MENU to call out the User menu Press UP or DOWN to select and then press MENU to ente...

Page 28: ...0s 30s 60s and 120s System Settings Adjustment Procedure Press MENU to call out the User menu Press the UP or DOWN button to select and press the MENU button to access the system settings menu Press t...

Page 29: ...lue is Enable Power Saving It is used to set whether to enable or disable the power saving function Options are Enable and Disable Note Disable When the monitor detects that the input port has no sign...

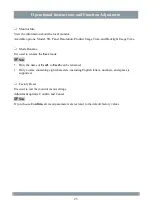
Page 30: ...ime Mode Rename It is used to rename the User mode Note Only the name of User1 to User6 can be renamed Only a name containing eight characters including English letters numbers and spaces is supported...

Page 31: ...signal source Restart your personal computer or the connected signal source equipment The image is blurred or has interference stripes or obvious color edges on characters Check whether wiring is secu...

Page 32: ...isasters or improper maintenance by a third party other than Hisense and authorized distributors The product ages because it has been used with brightness above the recommended value in the User Guide...

Page 33: ...the medical electrical system requirements of Table BBB 201 in IEC 60601 1 1 The electromagnetic waves emitted by power supply equipment may affect the use of the LCD monitor and damage it Install th...

Page 34: ...by turning on or off the equipment we recommend that you take one or more of the following measures to eliminate the interferences Adjust the direction or position of the receiving antenna Make the eq...

Page 35: ...board assembly X LCD screen X Power cable and connection cable X Non flame retardant plastics and polymer components Flame retardant plastics and polymer components Metal components X This table is p...

Page 36: ...the product has been purified If the returned product does not provide such external purification label and or such description is lost the seller or authorized service provider may refuse to receive...

Page 37: ...permission by Hisense this document or any part of it shall not be copied in any form or in any method such as images and electronic or mechanical forms including photocopying recording or informatio...

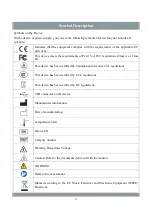
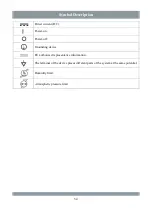
Page 38: ...A or Class B This device has been certified by Canadian and American UL regulations This device has been certified by CCC regulations This device has been certified by KC regulations USB connector on...

Page 39: ...ect current DC Power on Power off Grounding device EU authorized representative information The terminal of the device places different parts of the system at the same potential Humidity limit Atmosph...

Page 40: ...60 Hz 2048 x 1536 60 Hz 2048 x 1536 60 Hz 1080 50p 3840 x 2160 30 Hz 3840 x 2160 30 Hz 3840 x 2160 30 Hz 1080 60p 3840 x 2160p 60 3840 x 2160 60 Hz 3840 x 2160 60 Hz 3840 x 2160 60 Hz PBP Display Cha...

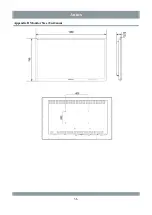
Page 41: ...Annex Appendix B Monitor Size Unit mm 36...

Page 42: ...Co Ltd Address North 3F Outsourcing Center of Software Park No 169 Songling Road Laoshan District Qingdao P R China Hisense national customer service hotline 4009940707 Service Supervisor Email of His...

Reviews: