8
4.
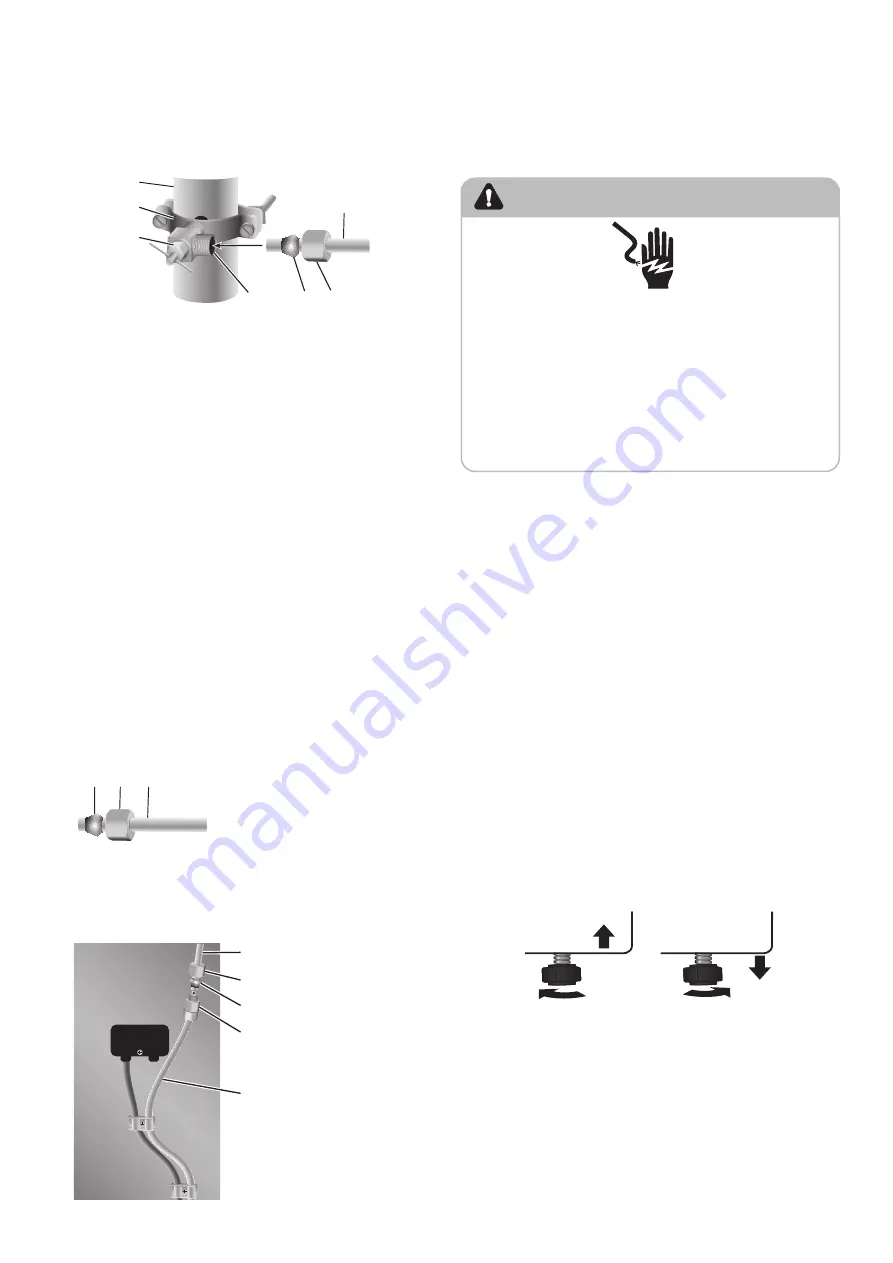
Fasten the shutoff valve to the cold water pipe
with the pipe clamp. Be sure the outlet end is
solidly in the
1/4
" drilled hole in the water pipe
and that the washer is under the pipe clamp.
Tighten the packing nut. Tighten the pipe
clamp screws slowly and evenly so the washer
makes a watertight seal. Do not overtighten.
a
g
b
c
d
e f
a
Household Supply
Line
b
Saddle Valve
c
Packing Nut
d
Shutoff Valve
e
Ferrule (Sleeve)
f
Compression Nut
g
1/4
" Water Line
5.
Slip the compression sleeve and compression
nut on the water line as shown. Insert the end
of the tubing into the outlet end squarely as far
as it will go. Screw compression nut onto outlet
end with adjustable wrench. Do not overtighten
or you may crush the water line.
6.
Place the free end of the water line into an
empty container or sink.
7.
Turn on main water supply and open
shutoff valve to flush the water line of any
contaminants. Run water until it is clear.
Connect Water Line to Refrigerator
IMPORTANT:
If you turn the refrigerator on before
the water is connected, turn off the ice maker.
1.
Unplug refrigerator or disconnect power.
2.
Close shut-off valve.
3.
Thread a brass compression nut and ferrule
(sleeve) onto the free end of the water line.
a b c
a
Ferrule (Sleeve)
b
Brass Compression
Nut
c
Water Line
4.
Insert the free end of the water line into the
brass fitting attached to the water inlet on the
back of the refrigerator.
5.
Slide the compression nut over the ferrule and
screw the nut onto the brass fitting.
a
b
c
d
e
a
Water Line
b
Brass
Compression
Nut
c
Ferrule
(Sleeve)
d
Brass Fitting
e
Water Inlet
6.
Confirm water line is secure by gently pulling
on it.
7.
Turn on water supply and check for leaks.
Correct any leaks.
Complete the Installation
WARNING
Electrical Shock Hazard
Plug into a grounded 3 prong outlet.
Do not remove the ground prong from the power
cord plug.
Do not use an adapter.
Do not use an extension cord.
Failure to do so can result in death, fire or
electrical shock.
1.
Plug into a grounded 3 prong outlet.
NOTE:
This refrigerator begins operating as
soon as it is connected to the power supply.
2.
Move the refrigerator into its final location,
making sure to maintain the recommended
clearance.
Level Refrigerator
(if needed)
The refrigerator must be level to maintain optimal
performance and appearance.
1.
Turn the leveling feet on the bottom, front of
the cabinet to raise or lower that side of the
refrigerator until the refrigerator is level side-
to-side.
2.
Turn both feet, by the same amount, to slightly
raise the front of the refrigerator. This will make
it easier for the doors to close.
NOTE:
Having someone push against the top
of the refrigerator takes some weight off the
leveling feet. This makes it easier to turn the
feet.

