background image

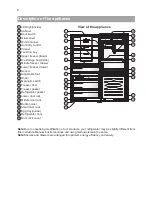
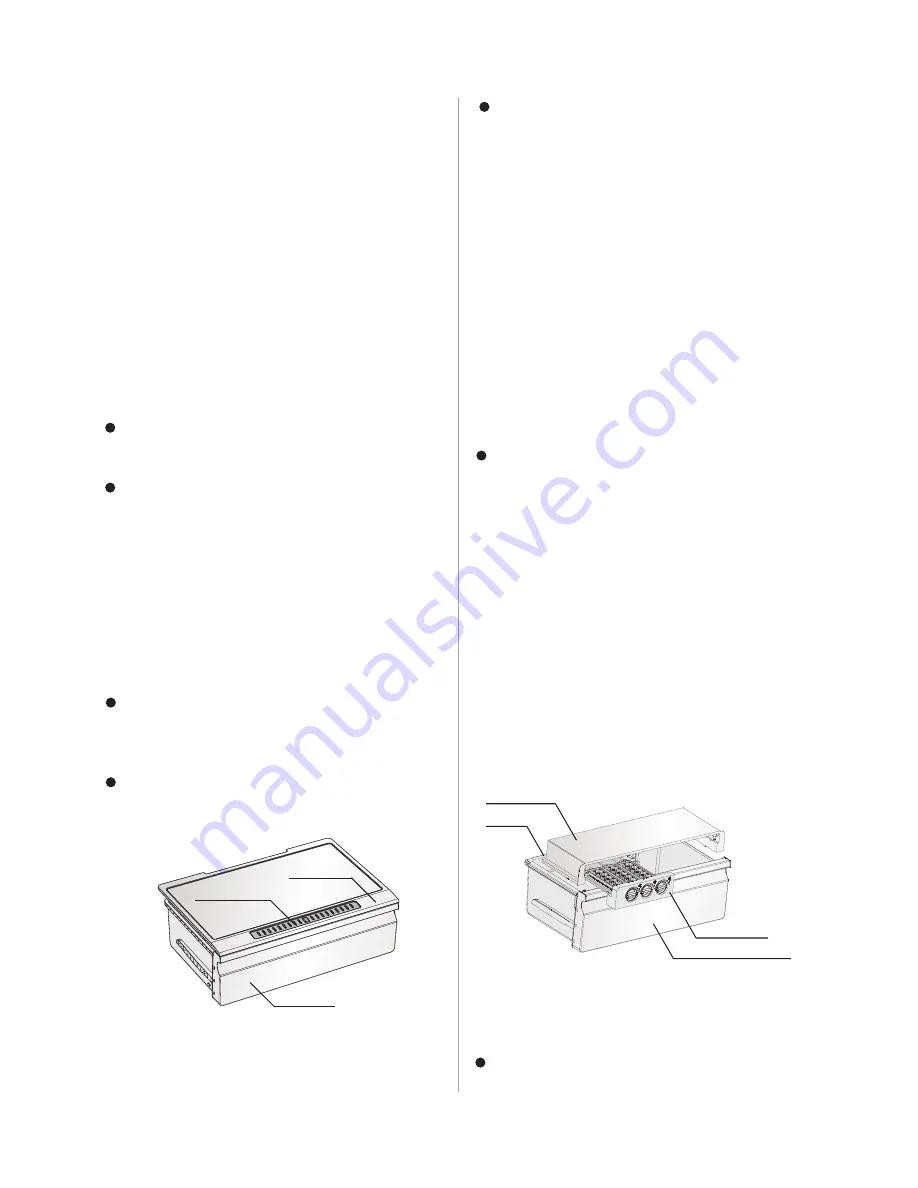
crisper cover

Humidity control

crisper

Installation bracket

Ice box

Twist ice tray

Middle freezer drawer

9

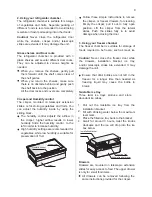
Follow  these  simple  instructions  to  remove 
the crisper, or freezer drawers, for cleaning. 
Empty  the  crisper,  pull  it  out  to  fully  open 
position.  Lift  the  crisper  from  the  lateral 
slides.  Push  the  slides  fully  in  to  avoid 
damage when closing the door.

The  freezer  chamber  is  suitable  for  storage  of 
foods  required  to  be  frozen,  such  as  meat,  ice 

Ensure  that  drink  bottles  are  not  left  in  the 
freezer  for  a  longer  time  than  needed  as 
freezing  liquid  may  cause  the  bottle  to 
break.

Pull  out  the  twistable  ice  tray  from  the 
installation bracket.
Fill  with  drinking  water  below  the  maximum 
level mark.
Place the filled ice tray back to the bracket.
Await  for  around  3  hours,  twist  the  knobs 
clockwise  and  the  ice  will  drop  into  the  ice 
box below.

Drawers

Drawers  are  mounted  on  telescopic  extension 
slides for easy access to food. The upper drawer 
is only for  small food items. 

Crisper and Humidity control

The  crisper,  mounted  on  telescopic  extension 
slides,  is  for  storing  vegetables  and  fruits.  You 
can  adjust  the  humidity  inside  by  using  the 
sliding block. 

The  humidity  control  adjusts  the  airflow  in 
the  crisper;  higher  airflow  results  in  lower 
humidity.  Slide  the  humidity  control    to  the 
left in order to increase humidity. 
High humidity settings are recommended for 
vegetables, while low humidity is suitable for 
preservation of fruit.

Caution!

  Never  close  the  freezer  door  while 

the  drawers,  installation  bracket,  ice  tray, 
and/or  telescopic  slides  are  extended.  It  may 
damage the unit.

1.

2. 

3. 
4. 

Twistable ice tray

Three  twist  ice  trays  produce  and  store 
abundant ice cubes. 

When  you  remove  the  shelves,  gently  pull 
them  forward  until  the  shelf  comes  clear  of 
the shelf guides. 
When  you  return  the  shelves,  make  sure 
there is no obstacle behind and gently push 
the shelf back into the position.
All the door racks and covers are completely 

Caution! 

Never  close  the  refrigerator  door 

while  the  shelves,  crisper  and/or  telescopic 
slides are extended. It may damage the unit.

The refrigerator chamber is suitable for storage 
of  vegetables  and  fruits.  Separate  packing  of 
different  foods is recommended to avoid losing 
moisture or flavor permeating into other foods.

Glass shelves and Door racks

The  refrigerator  chamber  is  provided  with  3 
glass  shelves  and  several  different  door  racks. 
They  can  be  adjusted  to  various  heights  as 
needed.

All  drawers  can  be  removed  following  the 
same instructions provided for the crisper.

2. Using your refrigerator chamber

3. Using your freezer chamber

Summary of Contents for HR6BMFF435

Page 1: ...USER S OPERATION MANUAL HR6BMFF435 HR6BMFF435S HR6BMFF520 HR6BMFF520S...

Page 2: ...you follow the tips below Store any food in accordance with the storage instructions from the manufacturer Don t use mechanical devices or any other means to speed up the thawing process unless they a...

Page 3: ...service engineer Only genuine spares should be used Don t use electrical appliances such as ice cream makers inside the food storage compartments of the appliance unless they are approved by the manu...

Page 4: ...nt operation Location of appliance Choose a location for your appliance that isn t too cold or too hot The best range of temperature is 10 C 43 C Stand your appliance in a dry place to avoid high mois...

Page 5: ...ed by the user If the LED light is damaged or not working please contact an authorized qualified electrician for assistance After you have successfully installed the appliance you should clean it thor...

Page 6: ...r rack Middle door rack Bottle holder Small door rack Egg tray inside Refrigerator door Door rack cover 1 2 3 5 6 4 8 9 7 10 11 12 13 14 15 16 17 18 19 20 21 22 23 24 25 26 Note Due to unceasing modif...

Page 7: ...e button to activate the super freeze function The light will come on Press Freezer to set freezer temperature between 14 C and 24 C as needed and the control panel will display corresponding value ac...

Page 8: ...m button of more than 3 seconds will retrieve the maximum temperature reached by the freezer during a power interruption The maximum temperature reading and the Alarm light will both flash for 5 secon...

Page 9: ...e airflow in the crisper higher airflow results in lower humidity Slide the humidity control to the left in order to increase humidity High humidity settings are recommended for vegetables while low h...

Page 10: ...the appliance in places with good ventilation Further details can be found in the Installing your new appliance chapter Storage tips 1 2 3 4 Remove all food Remove the power plug from the mains socke...

Page 11: ...r the sound of the motor it will need to run more when the following happen Temperature set colder than necessary Large amount of warm food stored recently The temperature outside the appliance is too...

Page 12: ...feguard and remove the door children playing from suffering an electric shock or from closing themselves inside it to prevent Packing materials Most of the packing materials are recyclable Please disp...

Page 13: ......

Page 14: ......

Page 15: ......

Page 16: ......

Page 17: ......

Reviews: