background image

İ

10mm

Hisense Refrigerator

5

Door racks

Può non funzionare correttamente se 

lasciato a una temperatura superiore o 

inferiore all'intervallo indicato per un lungo 

periodo di tempo.

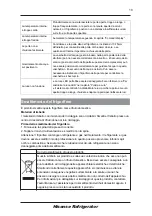
Classe climatica

Temperatura ambiente

da + 10°C a +32°C

da + 16°C a +32°C

da + 16°C a +38°C

da + 16°C a +43°C

Ɣ3RVL]LRQDUHLOIULJRULIHURLQXQDPELHQWH

asciutto per evitare elevata umidità.

Ɣ7HQHUHLOIULJRULIHURORQWDQRGDUDJJLVRODUL

diretti, pioggia o gelo. Posizionare il 

frigorifero lontano da fonti di calore come 

forni, fornelli o riscaldamenti.

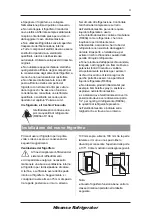
Livellamento dell'apparecchio

Ɣ3HUXQOLYHOODPHQWRVXIILFLHQWHHSHUOD

circolazione dell’aria nella parte posteriore 

bassa dell’elettrodomestico, è opportuno 

regolare il pulsante che si trova ai suoi piedi. 

Si può regolare manualmente o usando una 

chiave adatta.

Ɣ3HUIDUHLQPRGRFKHJOLVSRUWHOOLVL

chiudano soli, inclinare la parte alta verso 

dietro di circa 10mm.

Invertire la porta

Il lato verso il quale la porta si apre, può 

essere invertito, dalla parte destra (come da 

dotazione) a quella sinistra, se l’installazione 

lo richiede.

Attenzione! Quando s’inverte l’apertura, 

l’elettrodomestico non deve essere collegato 

all’impianto elettrico. Assicurarsi che la presa 

sia staccata dall’impianto.

Utensili utili

SN

ST

T

Nota: Prima di porre l’elettrodomestico 

steso a terra per lavorare sulla base, 

dovreste riporlo su un rivestimento morbido 

o materiale simile per evitare danni sulla 

parte posteriore del frigorifero. Per invertire 

la porta, è opportuno seguire i seguenti 

passi.

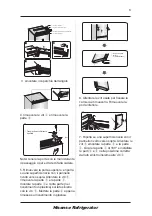
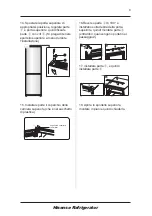
1. Mettere il frigorifero in posizione verticale. 

Aprire la porta superiore per togliere tutti gli 

scaffali (per evitare di danneggiarli) e 

chiudere la porta. 

2. aprire la parte di sopra del frigorifero 

dal lato destro e smontare la parte 

 e la 

parte

 sopra la porta nello stesso modo. 

Smontare la parte 

 e metterla a posto 

nella plastica. 

Chiave a tubo di 8mm

Cacciavite sottile a taglio

Chiave di 8mm

Cacciavite a croce

Summary of Contents for RB403N4EC1

Page 1: ...BENUTZERHANDBUCH Bevor Sie dieses Gerät in Betrieb nehmen lesen Sie dieses Handbuch bitte aufmerksam durch und bewahren Sie es für den späteren Gebrauch auf Deutsch ...

Page 2: ... GHQ HEUDXFK LP Haushalt und bei ähnlichen Anwendungen vorgesehen wie z B Personalküchen Bereichen in Läden Büros und anderen Arbeitsumgebungen Landhäusern Hotels Motels und anderen Unterkünften 6ROOWHQ 6LH GHU QVLFKW VHLQ GDVV GDV HUlW nicht richtig funktioniert so lesen Sie bitte den Abschnitt Fehlerbehebung für Hilfe Sollten Sie weiterhin Zweifel haben so kontaktieren Sie die Kundenservice Hotl...

Page 3: ...UNVDPHU X OHVHQ DOW GLH HO IWXQJV IIQXQJHQ IUHL YRQ LQGHUQLVVHQ 3DFNHQ 6LH GDV HUlW DXV XQG EHUSU IHQ 6LH HV 6ROOWHQ 6LH LUJHQGHLQHQ 6FKDGHQ IHVWVWHOOHQ VWHFNHQ 6LH GDV HUlW QLFKW HLQ VRQGHUQ NRQWDNWLHUHQ 6LH XPJHKHQG GHQ DGHQ LQ GHP 6LH GDV HUlW JHNDXIW KDEHQ HZDKUHQ 6LH LQ GLHVHP DOO DOOHV 9HUSDFNXQJVPDWHULDO DXI LU HPSIHKOHQ KQHQ YLHU 6WXQGHQ X ZDUWHQ EHYRU 6LH GDV HUlW DQVFKOLH HQ GDPLW GDV KO...

Page 4: ...W ZLUG Ɣ HQQ GDV HUlW LVR XWDQ 5 D lOWHPLWWHO HQWKlOW GDV XPZHOWIUHXQGOLFK DEHU EUHQQEDU LVW VLFKHU XVWHOOHQ GDVV 5RKUH GHV UHLVODXIHV YRP lOWHPLWWHO EHL 7UDQVSRUW XQG QVWDOODWLRQ QLFKW EHVFKlGLJW LVW XP UDQGJHIDKU GXUFK DXVODXIHQGHV KOPLWWHO X YHUPHLGHQ Ɣ DOWHQ 6LH EUHQQHQGH HU HQ DPSHQ XQG DQGHUH HJHQVWlQGH PLW RIIHQHQ ODPPHQ XQG QGTXHOOHQ IUHL YRP HUlW XQG O IWHQ 6LH GHQ 5DXP JU QGOLFK XP GDV 5...

Page 5: ...e an der die Tür öffnet kann geändert werden von der rechten Seite wie mitgeliefert an der linken Seite wenn der XIVWHOORUW GLHV HUIRUGHUW FKWXQJ HLP 5 FNZlUWVIDKUHQ GHU 7 U GDUI GDV HUlW QLFKW DQ GDV 6WURPQHW angeschlossen werden Stellen Sie sicher dass der Stecker aus der Steckdose entfernt werden HUN HXJH GLH 6LH EUDXFKHQ LQZHLV HYRU 6LH VWDUWHQ GHQ Kühlschrank auf dem Rücken zu legen um den Zu...

Page 6: ...läche mit seiner Verkleidung nach oben Lose Schrauben Trennteil und Teil installieren Sie dann Teil und einen anderenTeil in den Plastikbeutel auf die linke Seite mit Schrauben Setzen Teil gerade zurück zu Kunststoffbeutel Lose Schrauben werden verwendet um das mittlere Scharnier zu befestigen und Mitte Scharnier zu entfernen Dann entfernen Sie die untere Tür 7 Legen Sie die untere Tür auf einer g...

Page 7: ...nd dann vermasseln die Befestigungsscheibe 11 Montieren gerade wieder zu dem Schritt 9 ändern Teil nach links und nach rechts und dann Teil befestigen Sie sie mit Schrauben Installieren Teil schließlich 12 Bewegen Sie die untere Tür und stellen den Standpunk um das untere Loch und oberen Scharnierachse auszurichten Drehen Sie das mittlere Scharnier um 180 ändern Sie die Scheibe auf der Achse auf d...

Page 8: ...Installation 15 Installieren Sie den oberen Teil Scharnierabdeckung die in der Kunststoffbeutel ist Oberer Hing e Abdeckung links 16 Wenden Teil um 180 und installieren Sie sie auf der rechten Ecke der oberen Tür dann montieren Teil beide in Schritt 2 entnommen 17 Installieren Teil und installieren Sie Teil 18 Öffnen Sie die obere Tür montieren Tür mit der Zahnstange und schließen Sie es dann ...

Page 9: ......

Page 10: ......

Page 11: ...ratur einstellen stellen Sie eine Durchschnittstemperatur für das gesamte Kühlschrankfach ein Die Temperaturen in jedem einzelnen Fach können von den auf dem Bedienfeld angegebenen Temperaturen abweichen abhängig davon wie viele Nahrungsmittel Sie lagern und wo diese gelagert sind Eine hohe oder niedrige Raumtemperatur kann sich ebenfalls auf die tatsächliche Temperatur im Inneren des Gerätes ausw...

Page 12: ...nnen Sie Superfrost Funktion GXUFK U FNHQ GHU PLWWOHUHQ 7HLO GHV Taste abschalten und die Gefriertemperatur Einstellung auf die vorherige Einstellung zurückkehren 4 Urlaub HQQ 6LH I U HLQH ODQJH Zeit verlassen können Sie diese Funktion durch U FNHQ GHU PLWWOHUHQ 7HLO des Taste für 3 Sekunden aktivieren bis das Licht aufkommt Ɣ HQQ GLH 8UODXEVIXQNWLRQ DNWLYLHUW ist wird die Temperatur des Kühlschra...

Page 13: ...e das Bild unten Frischere Abdeckung V LVW XU 6WHXHUXQJ GHU 7HPSHUDWXU GHV Gemüsefachs und zur Vermeidung der HXFKWLJNHLWVYHUOXVW Frischeres der Kühlschrank Kammer V LVW I U GLH DJHUXQJ YRQ 2EVW XQG HP VH geeignet Feuchtigkeit 0 Kühl nur RB403N4EC2 zutreffend RUW LVW GLH 7HPSHUDWXU HWZD QLHGULJHU als in den Kühlschrankskammer V ZLUG YHUZHQGHW XP LVFK OHLVFK XQG DQGHUH HEHQVPLWWHO HURGLEOH X VSHLFK...

Page 14: ... DQJHJHEHQHQ 1DKUXQJVPLWWHOODJHU HLWHQ XQG Haltbarkeitsdaten HNRFKWH 1DKUXQJVPLWWHO NDOWH 6SHLVHQ XVZ LHVH VLQG DE XGHFNHQ XQG DXI HLQHP beliebigen Regalboden zu stellen 2EVW XQG HP VH LHVH VLQG LQ GHP VSH LHOOHQ YRUKDQGHQHQ DFK DXI XEHZDKUHQ 0LOFKIODVFKHQ 6ROOWHQ PLW HLQHP HFNHO YHUVFKORVVHQ VHLQ XQG sind im Türfach aufzubewahren Hinweise zum Einfrieren DVVHQ 6LH GDV HUlW EHL GHU HUVWHQ Inbetrieb...

Page 15: ...können Verwenden Sie zur Reinigung keine Verdünnungsmittel Autoreinigungsmittel Bleichmittel ätherischen Öle Scheuermittel oder organischen Lösungsmittel wie Benzin Diese können die Oberfläche des Gerätes beschädigen und Feuer verursachen Innenreinigung Sie sollten das Geräteinnere regelmäßig reinigen Es ist einfacher zu reinigen wenn die Menge an gelagerten Nahrungsmitteln gering ist Wischen Sie ...

Page 16: ...rden 1 Ziehen Sie das Gerät ab 2 Entfernen Sie die Lichtabdeckung indem Sie diese hochdrücken und abnehmen 3 Halten Sie die LED Abdeckung mit einer Hand und ziehen Sie diese mit der anderen Hand während Sie das Kontaktblech drücken 4 Tauschen Sie die LED Leuchte aus und rasten Sie sie wieder richtig ein Fehlerbehebung Sollten Sie ein Problem mit Ihrem Gerät haben oder sollte das Gerät nicht richti...

Page 17: ...HOQGHV HUlXVFK ZLH EHL NRFKHQGHP DVVHU Ein poppendes Geräusch während des automatischen Abtauvorgangs LQ NOLFNHQGHV HUlXVFK EHYRU GHU RPSUHVVRU VWDUWHW Andere ungewöhnlichen Geräusche können aus folgenden Gründen auftreten Diese sind zu überprüfen und gegebenenfalls sind Maßnahmen zu ergreifen Das Gehäuse ist nicht eben LH HUlWHU FNVHLWH EHU KUW GLH DQG Flaschen oder Behälter sind umgekippt oder r...

Page 18: ...elassen wurde Schließen und öffnen Sie die Tür erneut um die Beleuchtung einzuschalten Entsorgung des Gerätes Es ist verboten dieses Gerät als Hausmüll zu entsorgen Verpackungsmaterial 9HUSDFNXQJVPDWHULDO PLW GHP 5HF FOLQJ 6 PERO LVW UHF FHOEDU QWVRUJHQ 6LH 9HUSDFNXQJVPDWHULDO LQ HLQHP JHHLJQHWHQ EIDOOVDPPHOEHKlOWHU XP HV X UHF FHOQ Vor der Entsorgung des Gerätes 1 Ziehen Sie den Stecker aus der S...

Page 19: ......

Page 20: ...milar applications such as Staff kitchen areas in shops offices and other working environments Farmhouses by clients in hotels motels and other residential types of environment B e d a n d b r e a k f a s t t y p e o f environments If you feel that the appliance is not operating correctly please check the Troubleshooting page for assistance If still in doubt contact the customer service help line ...

Page 21: ...ck or overheat and even cause a fire Do not insert the mains plug if the socket is loose there is a risk of electric shock or fire Don t place hot items near the plastic components of this appliance Frozen food must not be refrozen once it has been thawed out Don t store bottled or canned drinks especially carbonated drinks in the freezer compartment Bottles and cans may explode Do not consume ice...

Page 22: ... of ignition away from the appliance and ventilate the room thoroughly to avoid the risk of fire and eye injury should any leakage of refrigerant R600a exist Do not store products which contain flammable propellants e g spray cans or explosive substances in the appliance The room space must be at least 1m per 8g of refrigerant R600a The amount of refrigerant in your appliance is indicated on the r...

Page 23: ...be changed from the right side as supplied to the left side if the installation site requires Warning When reversing the door the appliance must not be connected to the mains Ensure that the plug is removed from the mains socket Tools you will need 8mm socket wrench Cross shaped screwdriver 8mm wrench Thin blade screwdriver Note Before you start lay the refrigerator on its back in order to gain ac...

Page 24: ...en install part and another part in the plastic bag to the left side with screws Put part just detached back to plastic bag 6 Loose screws used to fix the middle hinge and remove middle hinge Then remove the lower door 1 2 3 3 Special flange self tapping screws Stop block Self tapping screws Door holder Hisense Refrigerator 6 part 1 7 Place the lower door on a smooth surface with its panel upwards...

Page 25: ...r Lower hinge part left Note washer may stick to lower door Washer 11 Just remount to the step 9 change part to left and part to right and then fix them with screws Finally install part 12 Move the lower door and adjust its position to align lower hole site and upper hinge axis Turn the middle hinge by 180 change the washer on the axis to the upper side adjust the middle hinge to the appropriate p...

Page 26: ...15 Install part the upper hinge cover which is in the plastic bag 16 Reverse part by 180 and install it onto the right corner of upper door then mount part both of which are taken down in step 2 18 Open the upper door mount door racks and then close it upper hing e cover left 1 2 1 1 2 Hisense Refrigerator 17 install part and then install part 8 ...

Page 27: ...dge door seal 18 Freezer door seal 19 Freezer door 1 View of the appliance RB403N4EW1 RB403N4EY1 RB403N4EC1 RD 44WC4SQB CPA1 Hisense Refrigerator Note Due to unceasing modification of our products your refrigerator may be slightly different from this instruction manual but its functions and using methods remain the same To get more space in the freezer you can remove drawers except lower freezer d...

Page 28: ...15 Fridge door 16 Egg tray in the shelf 17 Middle fridge door shelf 18 Lower fridge door shelf 19 Fridge door seal 20 Freezer door seal 21 Freezer door 1 View of the appliance RB403N4EC2 RD 44WC4SQB CLA2 Hisense Refrigerator Note Due to unceasing modification of our products your refrigerator may be slightly different from this instruction manual but its functions and using methods remain the same...

Page 29: ...e the appliance Use your appliance according to the following control regulations your appliance has the corresponding functions and modes as the control panels showed in the pictures below When the appliance is powered on for the first time the backlighting of the icons on display panel starts working If no buttons have been pressed and the doors are closed the backlighting will turn off Hisense ...

Page 30: ...Hisense Refrigerator 3 Super Freeze Super Freeze will quickly lower the temperature within the freezer so food will freeze vitamins and 4 Holiday middle part of button for 3 seconds until the light comes on When the holiday function is activated the temperature of the refrigerator is automatically switched to 15 to minimize the energy consumption Important Do not store any food in the fridge durin...

Page 31: ...r and they can be taken out to be cleaned Hisense Refrigerator Folded shelf It is made up of fixed part and flexible part It can be adjusted and folded to achieve different storage volume as you need See the picture below Crisper of refrigerator chamber It is suitable for the storage of fruits and vegetable Moisture 0 Cool only applicable to RB403N4EC2 The temperature there is about 2 3 lower than...

Page 32: ... new appliance chapter If the diagram shows the correct combination for the drawers crisper and shelves do not adjust the combination as this is designed to be the most energy efficient configuration Hints for fresh food refrigeration Do not place hot food directly into the Hisense Refrigerator film wrap Milk bottles Should have a lid and be stored in the door racks Hints for freezing When first s...

Page 33: ...side of the fridge freezer with a weak solution of bicarbonate of soda and then rinse with warm water using a wrung out sponge or cloth Wipe completely dry before replacing the shelves and baskets 2 Remove the power plug from the mains socket 3 Clean and dry the interior thoroughly 4 Ensure that all the doors are wedged open slightly to allow air to circulate Switching off your appliance If the ap...

Page 34: ...nd pull it with the other hand while pressing the connector latch 4 Replace LED light and snap it correctly in place Door seals cleaning Take care to keep door seals clean Sticky food and drinks can cause seals to stick to the cabinet and tear when you open the door Wash seal with a mild detergent and warm water Rinse and dry it thoroughly after cleaning Caution Only after the door seals are compl...

Page 35: ... to frequently hear the sound of the motor it will need to run more when in following circumstances Temperature setting is set colder than necessary Large quantity of warm food has recently been stored within the appliance The temperature outside the appliance is too high Doors are kept open too long or too often After your installing the appliance or it has been switched off for a long time A lay...

Page 36: ... Before disposal of the appliance 1 Pull out the mains plug from the mains socket 2 Cut off the power cord and discard with the mains plug Warning Refrigerators contain refrigerant and gases in the insulation Refrigerant and gases must be disposed of professionally as they may cause eye injuries or ignition Ensure that tubing of the refrigerant circuit is not damage prior to proper disposal Correc...

Page 37: ...Español MANUAL DE INSTRUCCIONES Antes de poner en marcha la unidad lea atentamente el manual y consérvelo para referencia futura ...

Page 38: ...uarios O HOHFWURGRPpVWLFR HVWi FRQFHELGR SDUD un uso doméstico y aplicaciones similares como Zonas de cocina para el personal en tiendas oficinas y otros entornos de trabajo clientes de hoteles moteles y otros tipos de entornos residenciales Servicios de alojamiento y desayuno 6L FRQVLGHUD TXH HO HOHFWURGRPpVWLFR QR funciona correctamente busque ayuda en la página de localización de averías Si las...

Page 39: ...H VH LQGLFDQ PiV DGHODQWH VHJ UHVH GH OLPSLDU ODV VDOLGDV GH YHQWLODFLyQ HVHPEDOH UHYLVH HO HOHFWURGRPpVWLFR 6L DSUHFLDVH DOJ Q GDxR QR FRQHFWH HO HOHFWURGRPpVWLFR SyQJDVH LQPHGLDWDPHQWH HQ FRQWDFWR FRQ OD WLHQGD GRQGH OR DGTXLULy RQVHUYH WRGR HO PDWHULDO GH HPEDODMH HQ OD FDMD H UHFRPHQGDPRV TXH HVSHUH KRUDV DQWHV GH FRQHFWDU HO HOHFWURGRPpVWLFR SDUD TXH HO UHIULJHUDQWH IOX D SRU HO FRPSUHVRU O H...

Page 40: ... UHVH GH TXH OD FDxHUtD GHO FLUFXLWR GH UHIULJHUDFLyQ QR KD D VXIULGR GDxRV GXUDQWH HO WUDQVSRUWH PRQWDMH SDUD HYLWDU SHOLJUR GH LQFHQGLR SRU IXJDV GH UHIULJHUDQWH Ɣ Q FDVR IXJD GHO UHIULJHUDQWH 5 PDQWHQJD DOHMDGR GHO HOHFWURGRPpVWLFR YHODV HQFHQGLGDV OiPSDUDV REMHWRV FRQ OODPDV GHVSURWHJLGDV RWUDV IXHQWHV GH FDORU GHPiV YHQWLOH OD KDELWDFLyQ DGHFXDGDPHQWH SDUD HYLWDU LQFHQGLRV OHVLRQHV RFXODUHV Ɣ...

Page 41: ... de apertura El lado de apertura de la puerta se puede cambiar del lado derecho como sale de IiEULFD DO ODGR L TXLHUGR VL OR H LJLHVH HO OXJDU GH PRQWDMH Advertencia Cuando cambie el lado de DSHUWXUD HO HOHFWURGRPpVWLFR GHEHUi HVWDU GHVFRQHFWDGR GH OD UHG HOpFWULFD VHJ UHVH GH TXH HO HQFKXIH QR HVWi GHQWUR GH OD WRPD 6H QHFHVLWDQ ODV VLJXLHQWHV KHUUDPLHQWDV 1RWD H UHFRPHQGDPRV TXH DQWHV GH DSR DU ...

Page 42: ...acia arriba Afloje los tornillos saque la pieza y la pieza A continuación monte la pieza y la otra pieza que está en la bolsa de plástico en el lado izquierdo usando los tornillos Meta la pieza recién quitada en la bolsa de plástico 6 Afloje los tornillos que sujetan la bisagra del medio y desmóntela A continuación desmonte la puerta inferior 7 Coloque la puerta inferior en una superficie blanda c...

Page 43: ...agra inferior cámbiela al orificio contiguo y a continuación atorníllela con la arandela 11 Retome el paso 9 Cambie la pieza a la izquierda y la pieza a la derecha A continuación sujételas con los tornillos Por último monte la pieza 12 Desplace la puerta inferior y ajuste su posición para alinearla con el orificio de abajo y el eje de la bisagra superior Gire la bisagra central 180º cambie la aran...

Page 44: ... mano durante el montaje 15 Monte la tapa de la bisagra superior está en la bolsa de plástico tapa de la bisagra superior izquierda 16 Gire la pieza 180 y móntela en la esquina superior derecha de la puerta A continuación monte la pieza estas piezas se desmontaron en el paso 2 17 Monte la pieza y a continuación monte al pieza 18 Abra la puerta superior coloque los estantes y a continuación ciérrel...

Page 45: ......

Page 46: ......

Page 47: ...r la temperatura siga las instrucciones que se indican a continuación Precaución Cuando ajuste una temperatura dicho ajuste se aplicará a todo el compartimento del frigorífico Las temperaturas interiores de cada compartimento podrían variar con respecto a las temperaturas indicadas en el panel Ello dependerá de la cantidad de alimentos que haya almacenado Las altas o bajas temperaturas ambientales...

Page 48: ...er congelado podrá apagarla pulsando la parte central del botón el ajuste de temperatura del congelador volverá al valor anterior 4 Vacaciones Si va a estar ausente durante un periodo de tiempo largo le UHFRPHQGDPRV TXH active esta función Para ello mantenga pulsada la parte central del botón durante 3 segundos hasta TXH VH HQFLHQGD OD OX Ɣ XDQGR HVWp DFWLYDGD OD IXQFLyQ GH vacaciones la temperatu...

Page 49: ...tILFR WLHQH estantes que se pueden quitar para limpiarlos Estante plegable Ɣ VWD IRUPDGR SRU XQD SLH D ILMD RWUD PyYLO Ɣ 6H SXHGH DMXVWDU SOHJDU SDUD TXH WHQJD GLIHUHQWHV YRO PHQHV GH DOPDFHQDPLHQWR VHJ Q ODV QHFHVLGDGHV GH XVR RQVXOWH OD VLJXLHQWH LPDJHQ Tapa del cajón para verduras 6LUYH SDUD FRQWURODU OD WHPSHUDWXUD GHO FDMyQ SDUD YHUGXUDV HYLWDU TXH ODV YHUGXUDV SLHUGDQ KXPHGDG Cajón para verd...

Page 50: ...cima del cajón SDUD ODV YHUGXUDV 7HQJD VLHPSUH HQ FXHQWD ORV GtDV GH FRQVHUYDFLyQ ODV IHFKDV GH caducidad de los alimentos OLPHQWRV FRFLQDGRV SODWRV IUtRV HWF 6H GHEHQ WDSDU VH SXHGHQ FRORFDU HQ cualquier estante UXWDV YHUGXUDV 6H GHEHQ JXDUGDU HQ HO FDMyQ TXH VH proporciona para tal fin 0DQWHTXLOOD TXHVR 6H GHEHQ HQYROYHU FRQ SOiVWLFRV KHUPpWLFRV R ILOP SDUD DOLPHQWRV RWHOODV GH OHFKH Las parrill...

Page 51: ...jetos puntiagudos ya que podrían rayar la superficie No limpie con decapante jabón para coches lejía de color aceite de éter productos de limpieza abrasivos o disolventes como bencina Dichos productos podrían dañar la superficie del electrodoméstico y provocar un incendio Limpieza interior Debe limpiar el electrodoméstico por dentro regularmente Será más fácil de limpiar si hay pocos alimentos den...

Page 52: ...seguir los siguientes pasos 1 Desconecte el electrodoméstico 2 Quite la tapa de la luz presionando hacia arriba y hacia afuera 3 Sujete la tapa de la luz LED con una mano y saque la luz presionando el pestillo del conector 4 Vuelva a colocar la luz LED y presiónela hasta que encaje en el sitio Localización de averías Si experimenta algún problema con el electrodoméstico o está preocupado porque no...

Page 53: ...el compartimento del congelador u otros compartimentos XUEXMHR VLPLODU DO DJXD KLUYLHQGR 6RQLGR KXHFR GXUDQWH HO GHVFRQJHODGR DXWRPiWLFR 6RQLGR GH FOLF DQWHV GH TXH DUUDQTXH HO FRPSUHVRU Existen otros ruidos no habituales que se deben a las causas expuestas a continuación y deberá revisarlos y tomar las acciones necesarias El compartimento no está a nivel La parte trasera del electrodoméstico toca...

Page 54: ...ficultad Hay gotas de agua en el suelo La luz no funciona VWi SURKLELGR HOLPLQDU HO HOHFWURGRPpVWLFR FRPR EDVXUD GRPpVWLFD Materiales de embalaje Los materiales con el símbolo de reciclaje son reciclables Deposite el material de embalaje en el contenedor de residuos adecuado para su reciclaje Antes de la eliminación del electrodoméstico 1 Saque el enchufe de la toma de corriente 2 Corte el cable d...

Page 55: ...MODE D EMPLOI POUR L UTILISATEUR Avant faire fonctionner cet appareil s il vous plaît lisez attentivement ce manuel et conservez le pour référence ultérieure Français ...

Page 56: ...O HVW FRQoX SRXU XQH XWLOLVDWLRQ domestique ou applications similaires telles que dans les zones cuisine du personnel au sein de boutiques bureaux et autres environnements de travail dans des fermes hôtels motels et autres environnements résidentiels des environnements de type chambres d hôtes 6L YRXV SHQVH TXH YRWUH DSSDUHLO QH fonctionne pas correctement veuillez consulter OD SDJH pSDQQDJH SRXU ...

Page 57: ...consignes de VpFXULWp HQ PDWLqUH G pOHFWULFLWp SUpVHQWpHV FL GHVVRXV 0DQWHQLU OD ERXFKH j YHQWLODWLRQ VDQV obstruction pEDOOH O DSSDUHLO HW H DPLQH OH 6L YRXV remarquez des dommages évidents ne EUDQFKH SDV O DSSDUHLO HW FRQWDFWH LPPpGLDWHPHQW OH PDJDVLQ R YRXV O DYH DFKHWp DQV FHWWH VLWXDWLRQ FRQVHUYH WRXV OHV pOpPHQWV G HPEDOODJH 1RXV YRXV UHFRPPDQGRQV G DWWHQGUH KHXUHV DYDQW GH FRQQHFWHU O DSSDU...

Page 58: ...UpIULJpUDQW TXL HVW YHUW HW LQIODPPDEOH HW DVVXUH TXH OH WXEH GH FLUFXLW UpIULJpUDQW QH SDV rWUH HQGRPPDJp DX FRXUV GH WUDQVSRUW HW GH O LQVWDOODWLRQ HQ pYLWDQW ULVTXH G LQFHQGLH FDXVpH SDU OHV IXLWHV GH UpIULJpUDQW Ɣ DLVVHU GHV ERXJLHV HQIODPPpHV GHV ODPSHV HW OHV DXWUHV DUWLFOHV DYHF IODPPHV HW VRXUFHV GX IHX ORLQ GH O DSSDUHLO W OD YHQWLODWLRQ FRPSOqWHPHQW SRXU pYLWHU OD ULVTXH G LQFHQGLH HW EO...

Page 59: ...UWXUH GH OD SRUWH SHXW rWUH FKDQJpH GH GURLWH VHORQ IRXUQLV j JDXFKH VL OH VLWH LQVWDOOp H LJp YHUWLU 4XDQG RQ WRXUQH OD SRUWH O DSSDUHLO QH SDV SHXW VH FRQQHFWHU G pOHFWULFLWp W DVVXHUH GH GpEUDQFKHU O DOLPHQWDWLRQ pOHFWULTXH HV RXWLOV QpFHVVDLUHV SRXU YRXV 5HPDUTXH YDQW GH FRPPHQFHU j PHWWUH OH UpIULJpUDWHXU VXU OH GRV DILQ G DYRLU DFFqV j OD EDVH YRXV GHYULH OH PHWWUH VXU O HPEDOODJH de souple ...

Page 60: ...achez la partie et la partie puis installez la partie et Vis autotaraudeuses du bride spéciale La partie une autre partie dans le sac de plastique sur le côté gauche avec les vis Mettez la partie détachez justement dans le sac de plastique 6 Des vis mal serrées sont utilisées pour fixer la charnière du milieu et retirer la charnière centrale Ensuite retirez la porte inférieure 7 Placez la porte in...

Page 61: ... l apporter près de place de trou et puis vissez et mettez la rondelle 11 Remonter justement à l étape 9 changez la partie à gauche et la partie à droite et puis les fixer avec les vis Enfin installez la partie 12 Déplacez la porte inférieure et ajuster sa position pour aligner la place du trou inférieur et monter l axe de la charnière supérieure Tournez la charnière du milieu de 180 changez la ro...

Page 62: ... vous plaît 15 Installez la partie du couvercle de la charnière supérieure qui est dans le sac de plastique couvercle de la charnière supérieure à gauche 16 Reversez la partie de 180 et l installez sur le coin droit de la porte supérieure puis monter la partie qui sont tous les deux descendus à l étape 2 17 installez la partie et puis installez la partie 18 Ouvrez la porte supérieure montez les pl...

Page 63: ......

Page 64: ......

Page 65: ...tion Lorsque vous réglez une température vous réglez une température moyenne pour l ensemble du réfrigérateur Les températures à l intérieur de chaque compartiment peuvent varier par rapport aux températures affichées sur le panneau et en fonction de la quantité de nourriture que vous y mettez et où vous le placez La température ambiante élevée ou faible peut influencer la température réelle à l i...

Page 66: ...p YRXV SRXYH désactiver la fonction de super FRQJpODWLRQ HQ DSSX DQW VXU OD SDUWLH centrale de bouton et la température du congélateur va revenir au réglage précédent 4 Vacances 6L YRXV DOOH rWUH DEVHQW pour une longue période GH WHPSV YRXV SRXYH activer cette fonction en DSSX DQW VXU OD SDUWLH FHQWUDOH GH bouton pendant 3 secondes jusqu à ce que la lampe s allume Ɣ RUVTXH OD IRQFWLRQ GH YDFDQFHV ...

Page 67: ... rWUH UHWLUpV SRXU rWUH QHWWR pV Etagère pliée O HVW FRPSRVp G XQH SDUWLH IL H HW XQH SDUWLH flexible O SHXW rWUH DMXVWp HW SOLp SRXU DWWHLQGUH XQ volume de stockage différent que vous avez besoin Voir l image ci dessous couvercle du cabinet O HVW GHVWLQp j FRPPDQGHU OD WHPSpUDWXUH GX FDELQHW HW j pYLWHU OD SHUWH G KXPLGLWp YpJpWDOH chambre de cabinet du réfrigérateur O HVW DGDSWp SRXU OH VWRFNDJH...

Page 68: ...2EVHUYH OHV périodes de conservation et les dates de limites GH FRQVRPPDWLRQ VXJJpUpHV SDU OHV IDEULFDQWV OLPHQWV FXLVLQpV SODWV IURLGV HWF OV GRLYHQW rWUH FRXYHUWV HW SHXYHQW rWUH SODFpV VXU Q LPSRUWH TXHOOH WDEOHWWH UXLWV HW OpJXPHV OV GRLYHQW rWUH VWRFNpV GDQV OH EDF SUpYX j FHW HIIHW HXUUH HW IURPDJH RLYHQW rWUH HPEDOOpV KHUPpWLTXHPHQW DYHF GX SDSLHU DOXPLQLXP RX XQ ILOP SODVWLTXH RXWHLOOHV GH...

Page 69: ...tibles de rayer la surface N utilisez pas de diluant de détergent pour voiture de Clorox de nettoyants abrasifs ni de solvants organiques tels que du Benzène Ils peuvent abîmer la surface de l appareil et présentent un risque d incendie Nettoyage intérieur Il faut nettoyer l intérieur de l appareil régulièrement Il sera plus facile de le nettoyer s il contient peu de nourriture Essuyez les parois ...

Page 70: ... Débranchez votre appareil 2 Retirez le couvercle de la lampe en le soulevant et en le tirant 3 Tenez le couvercle de la LED d une main et tirez la de l autre tout en appuyant sur l attache du connecteur 4 Remplacez le voyant LED et enclenchez le correctement Dépannage Si vous rencontrez un problème avec votre appareil ou si vous pensez que l appareil ne fonctionne pas correctement vous pouvez eff...

Page 71: ...és par les raisons ci dessous et peuvent nécessiter que vous preniez les mesures nécessaires L armoire n est pas à niveau L arrière de l appareil est en contact avec le mur Des bouteilles ou des récipients sont tombées ou roulent Il est normal d entendre le bruit du moteur fréquemment il devra fonctionner plus fort dans les circonstances suivantes La température est réglée sur une valeur plus bass...

Page 72: ...ctionne pas Mise au rebut de l appareil Il est interdit de mettre cet appareil au rebut comme n importe quel autre déchet ménager Matériaux d emballage Les matériaux d emballage portant le symbole de recyclage sont recyclables Jetez l emballage dans le conteneur à déchets approprié pour le recycler Avant la mise au rebut de l appareil pEUDQFKH O DOLPHQWDWLRQ pOHFWULTXH 2 Coupez le cordon d aliment...

Page 73: ...ISTRUZIONI PER L USO Le raccomandiamo di leggere attentamente questo manuale d uso e di conservarlo per futuro riferimento Italiano ...

Page 74: ...ltazione e consegnarlo a eventuali futuri utenti Ɣ 4XHVWR DSSDUHFFKLR q VWDWR FRQFHSLWR SHU uso domestico e applicazioni simili come UHH DGLELWH D FXFLQD SHU LO SHUVRQDOH LQ negozi uffici e altri ambienti di lavoro Case coloniche Utilizzo da parte di clienti in hotel motel e altri ambienti di tipo residenziale Ɣ 6H VL ULWLHQH FKH LO IULJRULIHUR QRQ IXQ LRQL correttamente controllare la pagina Riso...

Page 75: ...UWXUH GHOOD YHQWLOD LRQH OLEHUH GD RJQL RVWDFROR Ɣ 5LPXRYHUH LO IULJRULIHUR GDOO LPEDOOR H FRQWUROODUOR FRQ DWWHQ LRQH Q FDVR GL GDQQL HYLGHQWL QRQ FROOHJDUH LO IULJRULIHUR PD FRQWDWWDUH LPPHGLDWDPHQWH LO QHJR LR GD FXL OR VL q DFTXLVWDWR Q TXHVWR FDVR FRQVHUYDUH WXWWR LO PDWHULDOH GL LPEDOOR Ɣ 6L UDFFRPDQGD GL DWWHQGHUH RUH SULPD GL FROOHJDUH LO IULJRULIHUR SHU FRQVHQWLUH DO UHIULJHUDQWH GL IOXLU...

Page 76: ...ente ma è LQILDPPDELOH DVVLFXUDUVL FKH LO WXER GHO refrigeratore non sia stato danneggiato durante il trasporto e l istallazione per HYLWDUH LO ULVFKLR G LQFHQGLR FDXVDWR GDOOD perdita di liquido refrigerante Ɣ 7HQHUH ORQWDQR GDOO DSSDUHFFKLR FDQGHOH lampade o altri oggetti con fiamme libere o potenziali fonti d incendio e ventilare scrupolosamente la stanza per evitare il ULVFKLR G LQFHQGLR H GL ...

Page 77: ...rte alta verso dietro di circa 10mm Invertire la porta Il lato verso il quale la porta si apre può essere invertito dalla parte destra come da dotazione a quella sinistra se l installazione lo richiede Attenzione Quando s inverte l apertura l elettrodomestico non deve essere collegato all impianto elettrico Assicurarsi che la presa sia staccata dall impianto Utensili utili SN ST T Nota Prima di po...

Page 78: ... una superficie liscia con il pannello rivolto verso sopra Allentare le viti rimuovere la parte e la parte montare la parte e l altra parte nel rivestimento in plastica sul lato sinistro con le viti Mettere la parte appena rimossa sul rivestimento in plastica 6 Allentare le viti usate per fissare la cerniera e rimuoverlo Rimuovere la porta inferiore 7 Riporla su una superficie liscia con il pannel...

Page 79: ...nferiore metterlo nella parte del foro e avvitare e montare la rondella 11 Appena eseguito il passaggio 9 spostare la parte sulla sinistra e la parte a destra e poi fissare i l tutto con le viti In fine montare la parte 12 Spostare la porta inferiore e regolarne la posizione per allineare sito foro inferiore e l asse cerniera superiore Ruotare il cardine centrale di 180 cambiare la rondella sull a...

Page 80: ...durante l installazione 15 Installare parte il coperchio della cerniera superiore che è nel sacchetto di plastica superiore e copertura a sinistra 16 Reverse parte di 180 e installarlo sulla destra della porta superiore quindi montare parte entrambi i quali vengono portati nel passaggio 2 17 installare parte e quindi installare parte 18 Aprire lo sportello superiore montare i ripiani e quindi chiu...

Page 81: ......

Page 82: ......

Page 83: ...are la temperatura procedere come segue Attenzione Quando si imposta una temperatura si imposta la temperatura media per l intero frigorifero Le temperature interne a ciascuno scomparto possono variare rispetto ai valori della temperatura visualizzati sul pannello a seconda di quanti alimenti sono conservati e dove sono posti Anche la temperatura ambiente alta o bassa può influenzare la temperatur...

Page 84: ...DUH OD IXQ LRQH Super Freeze premendo la parte centrale del tasto e l impostazione GHOOD WHPSHUDWXUD GHO IUHH HU WRUQHUj all impostazione precedente 4 vacanza Se avete intenzione di stare lontano per un lungo SHULRGR GL WHPSR q SRVVLELOH DWWLYDUH TXHVWD funzione premendo la parte centrale della pulsante per 3 secondi fino D TXDQGR OD OXFH VL DFFHQGH Ɣ 4XDQGR YLHQH DWWLYDWD OD IXQ LRQH ferie la tem...

Page 85: ... di frigorifero e possono essere estratto da pulire Scaffale piegato Ɣ 6L FRPSRQH GL XQD SDUWH ILVVD H SDUWH flessibile Ɣ 3Xz HVVHUH UHJRODWR H SLHJDWR D raggiungere un volume di archiviazione diverso di cui hai bisogno Vedere l immagine qui sotto Copertura crisper È per controllare la temperatura del crisper ed evitando il perdente umidità vegetale Frutta e verdura della camera frigorifero È adat...

Page 86: ...ssetto per le verdure Seguire sempre i tempi di conservazione degli alimenti e usarli entro la data indicata dal produttore Ɣ Alimenti cotti piatti freddi ecc Dovrebbero essere coperti e posti su qualsiasi ripiano Ɣ Frutta e verdura Dovrebbero essere conservati nel cassetto speciale previsto Ɣ XUUR H IRUPDJJLR Dovrebbero essere avvolti in pellicola ermetica o di pellicola di plastica Ɣ RWWLJOLH GL...

Page 87: ...cie Non usare diluenti detergenti per auto Clorox oli eterei detergenti abrasivi o solventi organici come benzene per la pulizia Essi potrebbero danneggiare la superficie del frigorifero e causare un incendio Pulizia intera Pulire con regolarità l interno del frigorifero Sarà più facile pulire con un minor quantitativo di alimenti presente all interno Pulire l interno del frigorifero congelatore c...

Page 88: ...iti 1 Staccare la spina 2 Rimuovere il coperchio luce spingendo verso l alto e fuori 3 Tenere il coperchio LED con una mano e tirarla con l altra mano mentre premendo il fermo del connettore 4 Sostituire luce LED e scattare correttamente in posizione Risoluzione dei problemi Nel caso in cui si dovessero riscontrare un problema con il vostro frigorifero o si ha la sensazione che il frigorifero non ...

Page 89: ...dalla piccola ventola del motore nello scomparto del congelatore o in altri scomparti Ɣ Un gorgoglio simile all acqua che bolle Ɣ Scoppiettio durante lo scongelamento automatico Ɣ Clic prima che il compressore parte Altri rumori insoliti sono dovuti ai motivi seguenti e possono richiedere di controllare e agire La struttura non è a livello Il retro del frigorifero tocca il muro Bottiglie o conteni...

Page 90: ...si chiudono facilmente Gocciolamento di acqua sul pavimento La luce non funziona È proibito smaltire questo frigorifero come rifiuto domestico Materiali di imballo I materiali di imballo con il simbolo del riciclaggio sono riciclabili Smaltire l imballo presso un centro di raccolta di rifiuti idoneo al loro riciclaggio Prima dello smaltimento del frigorifero 1 Rimuovere la spina dalla presa di cor...

Page 91: ...GEBRUIKSAANWIJZING Voordat u het apparaat gebruik deze gebruiksaanwijzing aandachtig doorlezen en bewaren voor toekomstig gebruik Nederlands ...

Page 92: ...s LW DSSDUDDW LV YRRU KXLVKRXGHOLMN JHEUXLN en vergelijkbare toepassingen zoals Personeelsruimten en keuken in winkels kantoren en andere werkomgevingen Boerderijen voor gasten in hotels motels en andersoortige residentiële omgevingen Bed and Breakfast type omgevingen OV X GHQNW GDW KHW DSSDUDDW QLHW FRUUHFW werkt raadpleegt u dan de pagina Troubleshooting voor hulp In geval van twijfel neemt u co...

Page 93: ... DSSDUDDW XLW HQ FRQWUROHHU DOOHV 0RFKW HU VFKDGH GXLGHOLMN LMQ VWHHN KHW DSSDUDDW GDQ QLHW LQ PDDU QHHP GLUHFW FRQWDFW RS PHW GH ZLQNHO ZDDU X KHW DSSDUDDW JHNRFKW KHHIW RXG LQ GLW JHYDO DOOH YHUSDNNLQJVPDWHULDDO LM DGYLVHUHQ X XXU WH ZDFKWHQ YRRUGDW X KHW DSSDUDDW DDQVOXLW RP KHW NRHOPLGGHO WHUXJ WH ODWHQ VWURPHQ QDDU GH FRPSUHVVRU HW DSSDUDDW PRHW ZRUGHQ DDQJHVORWHQ RS a 9 ZLVVHOVWURRP OV GH VS...

Page 94: ... NRHOPLGGHO EHYDW GDQ LV GLH PLOLHXYULHQGHOLMN PDDU EUDQGEDDU RUJ HUYRRU GDW GH EXLV YDQ KHW NRHOPLGGHO FLUFXLW QLHW EHVFKDGLJG ZRUGHQ WLMGHQV WUDQVSRUW HQ LQVWDOODWLH RP EUDQGJHYDDU GRRU OHNNHQG NRHOPLGGHO WH YHUPLMGHQ Ɣ RXG EUDQGHQGH NDDUVHQ ODPSHQ HQ DQGHUH YRRUZHUSHQ PHW YXXU HQ RQWVWHNLQJVEURQQHQ XLW GH EXXUW YDQ GH WRHVWHO HQ YHQWLOHHU GH UXLPWH JURQGLJ RP KHW ULVLFR YDQ EUDQG WH YHUPLMGHQ H...

Page 95: ...NDQ YHUDQGHUG ZRUGHQ YDQ GH UHFKWHUNDQW R PHHJHOHYHUG WRW GH OLQNHUNDQW DOV GH opstelplaats nodig is Waarschuwing Bij het omkeren van de GHXU PDJ KHW DSSDUDDW QLHW DDQJHVORWHQ ZRUGHQ RS KHW OLFKWQHW RUJ HUYRRU GDW GH stekker verwijderd wordt uit het stopcontact werktuigen die u nodig hebt 2SPHUNLQJ 9RRUGDW X GH NRHONDVW RS LMQ DFKWHUNDQW EHJLQW WH HWWHQ RP WRHJDQJ WRW GH EDVLV WH NULMJHQ PRHW X KH...

Page 96: ...chroeven los deel en deel installeer vervolgens deel en een ander deel Speciale flens self tikken schroeven deel in de plastic zak aan de linkerkant met bouten Zet deel net terug naar plastic zak 6 Er wordt losse schroeven gebruikt om het midden scharnier te bevestigen en dan verwijder het midden scharnier Dan verwijder de onderste deur 7 Plaats de onderste deur op een gladoppervlak met zijn panee...

Page 97: ...et in het dichtbij gat plaats en dan verpest het en installeer de wasser 11 Gewoon terugkeren op het stap 9 verander deel naar links en een deel naar rechts en zet ze dan vast met schroeven Tenslotte installeer deel 12 Verplaats de onderste deur en stel de positie aan om onderst gat af te stemmen met het bovenste scharnier as Draai het middelste scharnier in 180 wijzigt de wasser op de as aan de b...

Page 98: ...eur vast met handen bij installatie 15 Installeer een deel van het bovenste scharnier deksel die in de plastic zak zit bovenst scharnier deksel links 16 Reverse deel 180 en installeer het op de rechterhoek van de bovenste deur en monteer dan deel Die beide in stap 2 worden genomen 17 Installeer deel en installeer vervolgens deel 18 Open de bovenste deur zet deur racks en sluit het op ...

Page 99: ......

Page 100: ......

Page 101: ...temperatuur wilt wijzigen volg de onderstaande instructies Let op Als u een temperatuur instelt stel een gemiddelde temperatuur voor de hele koelkast Temperaturen in elk compartiment kan afwijken van de temperaturen op het paneel getoond afhankelijk van hoeveel voedsel je kunt opslaan en waar u deze plaatst Hoge of lage kamertemperatuur kunnen ook invloed hebben op de werkelijke temperatuur in het...

Page 102: ...r freeze functie uitschakelen door op de middelste deel van knop te drukken en de instelling van vriestemperatuur zal naar de vorige instelling terugkeren 4 Vakantie OV X QLHW LQ GH EXXUW gedurende een lange periode kunt u deze functie activeren door op de middelste deel van knop 3 seconden drukken totdat het licht brandt Ɣ OV GH YDNDQWLH IXQFWLH JHDFWLYHHUG is wordt de temperatuur van de koelkast...

Page 103: ...st die gereinigd kunnen worden Gevouwde plank HW EHVWDDW XLW YDVW HQ IOH LEHO RQGHUGHHO HW NDQ DDQJHSDVW HQ JHYRXZG ZRUGHQ LQ verschillend opslagvolume als je het nodig hebt Zie hieronder de foto s Scherper deksel HW FRQWUROHHUW GH WHPSHUDWXXU YDQ KHW scherper en het vermijdt om het vocht van groenten te verliezen Scherper van koelkast kamer HW LV JHVFKLNW YRRU GH RSVODJ YDQ IUXLW HQ groente Vocht...

Page 104: ...Q DDQJHUDGHQ WLMGHQ HQ KRXGVEDDUKHLGVGDWXPV YRRU voedselopslag HNRRNW YRHGVHO NRXGH JHUHFKWHQ HWF H H PRHWHQ ZRUGHQ JHGHNW HQ NXQQHQ RS HONH SODQN JHSODDWVW ZRUGHQ URHQWHQ HQ IUXLW Deze moeten worden opgeslagen in de speciale bijgeleverde lade RWHU HQ NDDV 0RHWHQ OXFKWGLFKW YHUSDNW ZRUGHQ LQ OXFKWGLFKWH IROLH RI SODVWLF IROLH 0HONIOHVVHQ 0RHWHQ HHQ GHNVHO KHEEHQ HQ RSJHVODJHQ worden in de deur Tip...

Page 105: ...at die krassen kunnen maken op het oppervlak Gebruik geen verdunner autowasmiddel Clorox etherische olie schuurmiddelen of organisch oplosmiddel zoals benzeen voor het reinigen Deze kunnen schade veroorzaken aan de oppervlakte van het toestel en kunnen brand veroorzaken Binnenkant reinigen U moet de binnenkant van het apparaat regelmatig reinigen Het is eenvoudiger schoonmaken als de voedselvoorra...

Page 106: ... het stopcontact 2 Verwijder het beschermkapje van het lampje door het omhoog te drukken en er uit te nemen 3 Houd het beschermkapje van het ledlampje met één hand vast en trek het met de andere hand terwijl u op het verbindingsmechanisme drukt 4 Vervang het ledlampje en klik het terug op zijn plaats Als u een probleem met uw apparaat heeft of bent bezorgd dat het apparaat niet naar behoren functi...

Page 107: ...GHQ YRRUGDW GH FRPSUHVVRU VWDUW Andere ongewone geluiden zijn te wijten aan de onderstaande redenen moet u controleren en u moet actie te ondernemen De kast staat niet waterpas De achterkant van het apparaat raakt de muur Flessen of verpakkingen gevallen of rollen Het is normaal om regelmatig het geluid van de motor te horen meer in de volgende gevallen 7HPSHUDWXXULQVWHOOLQJ ODJHU GDQ QRGLJ URWH K...

Page 108: ...W ZHUNW QLHW Verwijdering van het apparaat HW LV YHUERGHQ YRRU GH YHUZLMGHULQJ YDQ GLW DSSDUDDW DOV KXLVKRXGHOLMN DIYDO Verpakkingsmaterialen 9HUSDNNLQJVPDWHULDOHQ PHW GH UHF FOH V PERRO LMQ UHF FOHEDDU RRL GH YHUSDNNLQJ LQ HHQ JHVFKLNWH DIYDO FRQWDLQHU WH UHF FOHUHQ Voor de verwijdering van het apparaat 1 Trek de stekker uit het stopcontact 2 Snijd het snoer af en gooi met de stekker weg Waarschu...

Page 109: ...MANUAL DE OPERAÇÃO DO UTILIZADOR Português Antes de operar esta unidade leia minuciosamente este manual e guarde o para referência futura ...

Page 110: ...til estejam devidamente informados quanto à sua utilização correcta e segurança Ɣ VWH DSDUHOKR IRL IHLWR SDUD VHU XVDGR HP casas Cozinha de staff em lojas oficinas e outros ambientes de trabalho Quintas de clientes em hotéis motéis e outros tipos de moradias Ambientes do tipo Cama e 3HTXHQR OPRoR Ɣ DVR R DSDUHOKR QmR HVWLYHU IXQFLRQDQGR corretamente verifique o tópico Soluções para ajuda Se mesmo ...

Page 111: ...DUHOKR HOpFWULFR UHFRPHQGDPRV TXH YRFr SUHVWH EHP DWHQomR jV LQVWUXo HV VREUH HOHFWULFLGDGH DEDL R Ɣ 0DQWHQKD DV DEHUWXUDV GH YHQWLODomR VHP REVWUXo HV Ɣ 5HWLUH R DSDUHOKR GD HPEDODJHP H YHULILTXH R 6H HVWLYHU GDQLILFDGR QmR OLJXH R DSDUHOKR FRQWDFWH LPHGLDWDPHQWH D ORMD RQGH R FRPSURX 1HVWH FDVR JXDUGH WRGRV RV PDWHULDLV GH HPEDODPHQWR Ɣ e DFRQVHOKiYHO DJXDUGDU QR PtQLPR TXDWUR KRUDV DQWHV GH OLJ...

Page 112: ... UHIULJHUDQWH LVREXWHQR 5 D TXH p HFROyJLFR PDV LQIODPiYHO DVVHJXUH VH GH TXH D WXEDJHP GR circuito de refrigeração não é danificado durante o transporte e a instalação para HYLWDU R ULVFR GH LQFrQGLR FDXVDGR SRU IXJDV de refrigerante Ɣ 0DQWHQKD YHODV DFHVDV OkPSDGDV H RXWURV itens com chamas nuas e fontes de ignição ORQJH GR DSDUHOKR H YHQWLOH D VDOD FRPSOHWDPHQWH SDUD HYLWDU R ULVFR GH incêndio ...

Page 113: ...versibilidade da porta O lado para o qual a porta abre pode ser alterado do lado direito como fornecido SDUD R ODGR HVTXHUGR VH R ORFDO GH instalação o exigir YLVR 4XDQGR LQYHUWHU D SRUWD R DSDUHOKR GHYH HVWDU OLJDGR j FRUUHQWH HUWLILTXH VH GH TXH D ILFKD p UHWLUDGD GD WRPDGD As ferramentas de que precisa 1RWD QWHV GH FRPHoDU FRORTXH R UHIULJHUDGRU GH FRVWDV SDUD WHU DFHVVR j EDVH GHYH FRORFi OD Q...

Page 114: ... Desaperte os parafusos separe a parte e a parte e depois instale e outra parte no saco plástico para o lado esquerdo com os parafusos Coloque a parte que acabou de separar no saco plástico 6 Desaperte os parafusos usados para fixar a dobradiça do meio e remova a dobradiça do meio Depois remova a porta inferior 7 Coloque a porta inferior numa superfície macia com o painel virado para cima Desapert...

Page 115: ...ferior 10 Desaperte a dobradiça inferior mude a para o sítio do orifício próximo e depois aperte e fixe a arruela 11 Basta retomar o passo 9 mudar a parte para a esquerda e a parte para a direita e depois fixá las com parafusos Por fim instale a parte 12 Mova a porta inferior e ajuste a sua posição para alinhar o local do orifício inferior e o eixo da dobradiça superior Vire a peça da dobradiça do...

Page 116: ...m a mão quando instalar 15 Instale a tampa da dobradiça superior que está num saco de plástico Tampa da dobradiça superior esquerda 16 Inverta a parte 180 e instale a no canto direito da porta superior depois instale a parte ambas são retiradas no passo 2 17 instale a parte e depois instale a parte 18 Abra a porta superior instale as prateleiras da porta e depois feche a ...

Page 117: ......

Page 118: ......

Page 119: ...tura siga as instruções abaixo Atenção Quando definir uma temperatura define uma temperatura média para todo o frigorífico As temperaturas no interior de cada compartimento podem variar dos valores de temperatura mostrados no painel dependendo da quantidade de comida armazenada e do local onde a coloca A temperatura alta ou baixa também pode afetar a temperatura real no interior do aparelho 1 Frig...

Page 120: ...R D IXQomR 6XSHU RQJHODomR está ligada pode desligá la premindo a parte do meio do botão Super Congelação ou Congelador e a definição de temperatura do congelador voltará à definição anterior 4 Férias Se ficar muito tempo fora pode ativar esta função premindo o a parte do meio do botão durante 3 segundos até a luz acender Ɣ 4XDQGR D IXQomR pULDV HVWi ativada a temperatura do frigorífico muda se au...

Page 121: ... GH UHIULJHUDomR H podem ser retiradas para serem limpas Prateleira dobrada Ɣ e FRPSRVWD SRU XPD SDUWH IL D H XPD SDUWH IOH tYHO Ɣ 3RGH VHU DMXVWDGD H GREUDGD SDUD REWHU XP volume de armazenamento diferente conforme SUHFLVDU 9HU D LPDJHP DEDL R Cobertura do compartimento refrescante Serve para controlar a temperatura do compartimento refrescante e evitar que os vegetais percam humidade Compartimen...

Page 122: ... SUDWHOHLUD GH vidro acima da gaveta de verduras Respeite as datas de armazenamento dos alimentos Ɣ RPLGD FR LQKDGD SUDWRV IULRV HWF HYHP VHU FREHUWDV H SRGHP VHU colocadas em qualquer prateleira Ɣ UXWDV H YHUGXUDV HYHP ILFDU QD JDYHWD GH IUXWDV H YHUGXUDV Ɣ 0DQWHLJD H TXHLMR HYHP VHU HPEDODGR HP HPEDODJHP D vácuo ou película plástica Ɣ DUUDIDV GH OHLWH Devem ser tampadas e colocadas na grade Cons...

Page 123: ...sivos como benzina Eles podem danificar a superfície do aparelho e causar incêndio Limpeza interior Limpe o interior regularmente Assim fica mais fácil limpar quando o estoque de comida for pequeno Limpe o interior do freezer com uma solução fraca de bicarbonato de sódia e depois lave com água morna utilizando uma esponja ou pano Seque minunciosamente antes de recolar as prateleiras e gavetas Sequ...

Page 124: ...tra mão enquanto pressiona a patilha do conetor 4 Substituir a lâmpada LED e encaixá la corretamente no sítio Troubleshooting Se você estiver tendo problemas com o seu aparelho ou está preocupado que ele não esteja funcionando correctamente faça uma inspeção antes de chamar um revendedor autorizado Importante As reparações feitas ao aparelho só podem ser feitas por engenheiros de serviço qualifica...

Page 125: ...U IHLWR SHOR SHTXHQR YHQWLODGRU GR freezer ou de outro compartimento Ɣ 6RP GH iJXD IHUYHQGR Ɣ 6RP GXUDQWH R GHVFRQJHODPHQWR DXWRPiWLFR Ɣ 6RP GH FOLTXH DQWHV TXH R FRPSUHVVRU FRPHFH D IXQFLRQDU Outros ruídos invulgares são devido aos motivos abaixo e podem precisar ser de alguma atitude O aparelho não está nivelado O aparelho toca a parede Garrafas e embalagens caindo ou rolando É normal ouvir o so...

Page 126: ...e e abra a porta novamente para acionar as luzes Eliminação do aparelho É proibido eliminar este aparelho no lixo doméstico Material da embalagem Os materiais de embalamento com o símbolo de reciclagem são recicláveis Coloque a embalagem num recipiente de recolha adequado para a reciclar Antes de eliminar o aparelho HVOLJXH D ILFKD GH DOLPHQWDomR HOpFWULFD GD WRPDGD 2 Corte o cabo de alimentação e...

Page 127: ......

Reviews: