background image

Hisense Refrigerator

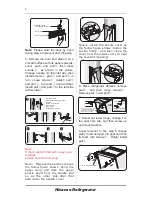
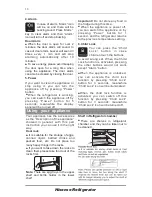
12.  Connect  electrical  connector

①  

in 

accordance with step 3 and then install 
part

②(

which is in the plastic bag).

upper


hinge cover(left)

13.Reverse part

① 

by 180°and install it 

onto  the  right  corner  of  the  door

then 

mount part

②. 

(both of which are taken 

down in step 2)

1

2

14.  Take  the  reed  switch  out  of  the 
coping block(part

in step 3)and mount 

it  on  another  block  for  use  (which  is 
with  mark  “R”  in  the  plastic  bag).  Put 
the  coping  block  just  removed  back  to 
the plastic bag.

15. 

connector

,  and  then  install  part

③ .

Install


part

  ①  

connect  the  wire

16.  Open  the  door,  mount  door  racks 
and then close it

.

Note

Be


sure


character


side


of


reed switch fits well with coping block.

1

2

2

3

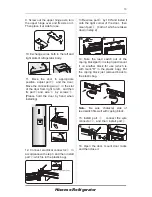
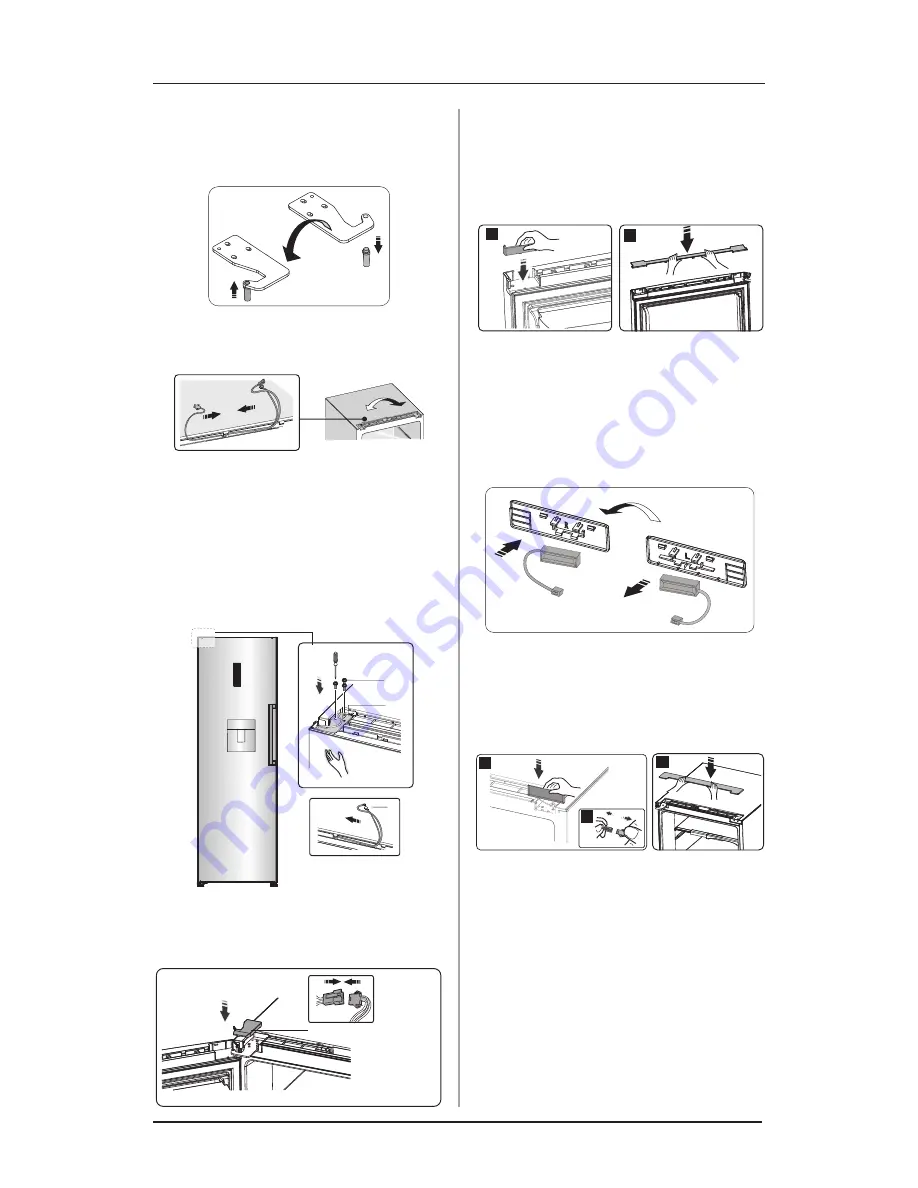
9. Screw out the upper hinge axis, turn 
the upper hinge over and fix axis on it. 
Then place it at side for use.

10. Exchange wires both in the left and 
right slots of refrigerator body. 

11.  Move  the  door  to  appropriate 
position,  adjust  part

①  

and  the  door, 

Move the connecting wire

② 

in the slot 

of the door from right to left

and then 

fix  part

and  wire

②  

by  screws

③ . 

(Please  hold  the  door  by  hand  when 
installing)

10

Summary of Contents for RL462N4EC1

Page 1: ...RL462N4EC1 ...

Page 2: ...liance if it is moved or sold so that anyone using it throughout its life will be properly informed on usage and safety notices For the safety of life and property keep the precautions of these user s instructions as the manufacturer is not responsible for damages caused by omission Safety for children and others who are vulnerable This appliance can be used by children aged from 8 years and above...

Page 3: ...retail or commercial environments WARNING Do not store explosive substances such as aerosol cans with a flammable propellant in this appliance WARNING If the supply cord is damaged it must be replaced by the manufacturer its service agent or similarly qualified persons in order to avoid a hazard WARNING Keep ventilation openings in the appliance enclosure or in any built in structure clear of obst...

Page 4: ...maged Avoid naked flames and sources of ignition Thoroughly ventilate the room in which the appliance is situated It is dangerous to alter the specifications or modify this product in any way Any damage to the cord may cause a shortcircuit fire and or electric shock damaged power plug may overheat and cause a fire 3 Make sure that you can access the main plug of the appliance 4 Do not pull the mai...

Page 5: ...nated or fizzy drinks in the freezer compartment as it creates pressure on the container which may Cause it to explode resulting in damage to the appliance Frozen food can cause frost burns if consumed straight from the freezer compartment Do not place the appliance in direct sunlight Keep burning candles lamps and other items with naked flames away from the appliance The appliance is only intende...

Page 6: ...not connect the appliance if it is damaged Report possible damage immediately to your retailer In this case please retain packing It is advisable to wait at least four hours before connecting the appliance to avoid damaging the compressor Adequate air circulation should be provided around the appliance To achieve sufficient ventilation Please follow the instructions relevant to installation Wherev...

Page 7: ...nce out of direct sunlight rain or frost Stand the appliance away from heat sources such as stoves fires or heaters Leveling of appliance For sufficient leveling and air circulating in the lower rear section of the appliance the bottom feet may need to be adjusted You can adjust them manually by hand or by using a suitable spanner To allow the doors to self close tilt the top backwards by about 10...

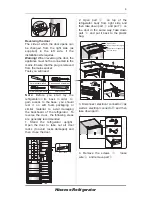
Page 8: ... rest it on soft foam packaging or similar material to avoid damaging the backboard of the refrigerator To reverse the door the following steps are generally recommended 1 Stand the refrigerator upright Open the door to take out all door racks to avoid racks damaged and then close the door 2 Open part on top of the refrigerator body from right side and then take down part and part on the door in t...

Page 9: ... Remove the handle cover as the follow figure shows bend the upper wing and take the upper buckle apart from the handle and so as the other side after that take down the handle cover buckle buckle 6 Place refrigerator flatwise remove part and then loose screws Remove part and part Note washer may stick to door washer Front foot fixed board Self tapping screws Adjustable bottom feet part Lower hing...

Page 10: ...g block just removed back to the plastic bag 15 connector and then install part Install part connect the wire 16 Open the door mount door racks and then close it Note Be sure character side of reed switch fits well with coping block 1 2 2 3 9 Screw out the upper hinge axis turn the upper hinge over and fix axis on it Then place it at side for use 10 Exchange wires both in the left and right slots ...

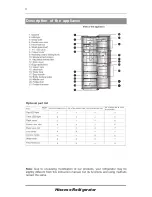
Page 11: ...Hisense Refrigerator Description of the appliance 11 RS 47WL4SIB CLA1 002 RL462N4EC1 ...

Page 12: ...hting of the icons on display panel starts working If no buttons have been pressed and the doors are closed the backlighting will turn off 3 Holiday longer period Press Super Cool button to activate this function The light will be illuminated Super cool automatically switches off after 6 hours and the refrigerator temperature setting displays 2 C When super cool function is on you can switch it of...

Page 13: ...s meanwhile Child Lock icon will be turned off to avoid wrong set When the Child Lock function is activated pressing the other buttons would not work except Alarm button When the appliance is unlocked you can activate the child lock function by pressing Child Lock button for 3 seconds meanwhile Child Lock icon will be illuminated Important Do not store any food in the fridge during this time When ...

Page 14: ...ld fill water into it as steps bellow 1 Rotate the small lid anticlockwise then remove the small lid 2 Fill water into the water tank through the hole on the large lid with a kettle or any kind of other containers Filling water 1 2 3 Dispenser Pad Valve Water Tank Large lid Small lid 1 2 Crisper cover It is for controlling the temperature of the crisper and avoiding the vegetable losing moisture M...

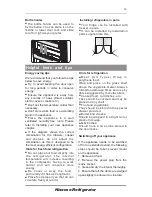
Page 15: ...ss relatively More air hole opening means less humidity and less means more humidity We recommend that you store vegetables with more humidity and fruits less humidity Dispenser lever Suggested position You should use the correct cups to receive water underneath the water dispenser Receiving Water Hisense Refrigerator 15 When you remove the crisper pull them forward then lift the crisper off the s...

Page 16: ... can circulate freely around it Hints for refrigeration M e a t A l l Ty p e s W r a p i n polythene food Wrap and place on the glass shelf above the vegetable drawer Always follow food storage times and use by dates suggested by manufacturers Cooked food cold dishes etc They should be covered and may be placed on any shelf Fruit and vegetables They should be stored in the special drawer provided ...

Page 17: ...LED light the below steps can be followed 1 Unplug your appliance 2 Remove light cover by pushing up and out 3 Hold the LED cover with one hand and pull it with the other hand while pressing the connector latch 4 Replace LED light and snap it correctly in place Clean the doors handles and cabinet surfaces with a mild detergent and then wiped dry with a soft cloth dry all surfaces and removable par...

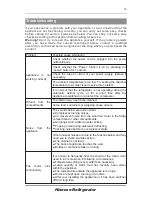
Page 18: ...osting Clicking noise before the compressor starts Other unusual noises are due to the reasons below and may need you to check and take action The cabinet is not level The back of appliance touches the wall Bottles or containers fallen or rolling It is normal to frequently hear the sound of the motor it will need to run more when in following circumstances Temperature setting is set colder than ne...

Page 19: ...be damaged Refer to replace LED lights in cleaning and care chapter The control system has disabled the lights due to the door being kept open too long close and reopens the door to reactivate the lights Temperature inside is too cold Doors can t be closed easily Water drips on the floor The light is not working 19 Temperature inside is too warm You may have left the doors open too long or too fre...

Page 20: ...se eye injuries or ignition Ensure that tubing of the refrigerant circuit is not damage prior to proper disposal Correct Disposal of this product This marking indicates that this product should not be disposed with other household wastes throughout the EU To prevent possible harm to the environment or human health from uncontrolled waste disposal recycle it responsibly to promote the sustainable r...

Page 21: ......

Reviews: