background image

Installing Your N

Positioning: 

Position

 the appliance away rom sou

of  stoves,  radiators,  direct sunlig t

tc.

Maximum  performance  and sa ty ar

guaranteed  by  maintaining t

corr ct

indoor  temperature  for  the class o unit

concerned as specified on t

rating plat .

This  appliance  performs  w ll

ST

. The appliance may not work prop rly

if left at a temperature abov or b low t

indicated range. 

Climate class 

Ambient temperature

SN 

+10°C to +32°C

+16°C to +32°C

ST 

+16°C to +38°C

+16°C to +43°C

Appliance must not be expos d

Sufficient  air must  be  allow d to circulat

in  the  lower  rear  section  of

poor air circulation can affect p r ormanc

Built-in  appliance  should  b

position d

away  from  heat  sources  suc

as stov s,

fires or heaters. 

Installation instructions:

Before  installing,  carefully

r ad

t

instruction  in  order  to  avoid a c rtain

number of problems.   

This is Dimensions of mounting slot

New Appliance 

away from sources 

dir ct  sunlight  etc. 

Maximum p r ormanc

and  safety  are 

guarant

d by maintaining  the  correct 

indoor t mp ratur

or the  class  of  unit 

conc rn d as sp ci i d on the rating plate. 

p r orms well  from 

SN  to 

may not work properly 

i l t at a t mp ratur above or below the 

Ambient temperature 

+10°C to +32°C 

+16°C to +32°C 

+16°C to +38°C 

+16°C to +43°C 

b

xposed to rain. 

Su ici nt air must b allowed  to  circulate 

in t

low r r ar s ction of  appliance,  as 

poor air circulation can a ect performance. 

s ould  be  positioned 

away rom

at sourc s such  as  stoves, 

Installation instructions: 

installing,

car ully  read  the 

instruction in ord r to avoid  a  certain 

Dim nsions o mounting slot. 

Follow  the  steps  in  the

guide provided. 

Note: 

Your  product  is  design d and

for  domestic  household  us

only. T

product  must  be  correctly

install d,

located  and  operated  in  accordanc

wit

the  instructions  contained in

Instructions guide provided.

Reversing the fridge door

The  side  at  which  the  door op ns can b

changed, from the right side (as suppli d) to

the left side, if the installation sit r quir s.

Warning!  When  reversing  t

door,

appliance  must  not  be  conn ct d to t

mains. Ensure that the plug is r mov d

the mains socket.. 

Tools you will need(Not provid d):

Philips  Screwdriver  & 

Slotted Screwdriver 

Wr nc (

Note:


When required, tilt the refrig rator back

order  to  gain  access  to  t

bas , you

should  rest  the  appliance

packaging  or  similar  mat rial to avoid

damaging 

the 

backboard

o

t

refrigerator.  To  reverse  t

door, t

following 

steps 

are

g n rally

recommended. 

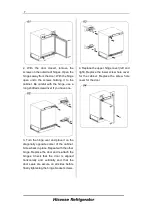
1. Stand the refrigerator uprig t. Op n t

door,  remove  the  upper  hing

cov r

and  right).


Remove  the  low r scr w

ol

cover  for  the  cabinet.  Remov

t

scr w

hole cover for the door. 

in the  installation 

Your product is designed  and  built 

or dom stic

ous

old  use  only.  The 

b

correctly  installed, 

locat d and op rat d in accordance  with 

t

instructions contained  in  the  User 

provid d. 

door 

T

sid

at w ic

t

door  opens  can  be 

c ang d, rom t

rig t side (as supplied) to 

t

l t sid , i t

installation site requires. 

Warning! W

n r v rsing  the  door,  the 

applianc

must not b

connected  to  the 

mains. Ensur t at t

plug is removed from 

Not provided): 

Wrench(8mm) 

W

n r quir d, tilt t

r frigerator back in 

ord r to gain acc ss to  the  base,  you 

t

appliance  on  soft  foam 

packaging or similar material  to  avoid 

damaging

t

backboard 

of 

the 

r rig rator. To r v rs   the  door,  the 

ollowing

st ps

are 

generally 

1. Stand t

r rig rator upright. Open the

r mov

t

upp r hinge  cover  (left 

R mov

t

lower  screw  hole 

Remove  the  screw 

Summary of Contents for RUL178D4AW1

Page 1: ...2 RUL178D4AW1 ...

Page 2: ...8 years and above and persons with reduced physical sensory or mental capabilities or lack of experience and knowledge if they have been given supervision or instruction concerning use of the appliance in a safe way and understand the hazards involved Children shall not play with the appliance Cleaning and user maintenance shall not be made by children without supervision According to IEC standard...

Page 3: ...ing gas are flammable When disposing of the appliance do so only at an authorized waste disposal centre Do not expose to flame WARNING When positioning the appliance ensure the supply cord is not trapped or damaged WARNING Do not locate multiple portable socket outlets or portable power supplies at the rear of the appliance WARNING To avoid a hazard due to instability of the appliance it must be f...

Page 4: ... than 350W to the fridge The fridge must employ a special power socket instead of common one with other electric appliances Its plug must match the socket with ground wire Daily use Do not store flammable gas or liquids in the appliance There is a risk of an explosion Do not operate any electrical appliances in the appliance e g electric ice cream makers mixers etc When unplugging always pull the ...

Page 5: ...e and check if there are damages on it Do not connect the appliance if it is damaged Report possible damages immediately to the place you bought it In this case retain packing It is advisable to wait at least four hours before connecting the appliance to allow the oil to flow back in the compressor Adequate air circulation should be around the appliance lacking this leads to overheating To achieve...

Page 6: ...de provided Note Your product is design d and for domestic household us only T product must be correctly install d located and operated in accordanc wit the instructions contained in Instructions guide provided Reversing the fridge door The side at which the door op ns can b changed from the right side as suppli d to the left side if the installation sit r quir s Warning When reversing t door appl...

Page 7: ...over and place it on the diagonally opposite comer of the cabinet Screw back in place Repeat with the other hinge Replace the door and re attach the hinges Check that the door is aligned horizontally and vertically and that the door seals are secure on all sides before finally tightening the hinge bracket screws 4 Replace the upper hinge cover left and right Replace the lower screw hole cover for ...

Page 8: ...le door rack 7 Lower door rack 8 Egg tray Description of the Appliance Du to unc asing modi ication of our products your refrigerator may be slig tly di r nt rom t is instruction manual but its functions and using methods remain th sam To g t t b st n rgy fficiency of this product please place all shelves draw rs and bask ts on t ir original position as the illustration above Du to unc asing modi ...

Page 9: ...n on or W n t pow r unction is on the display I no buttons have t display board will turn t power function mak sur t display board is lighting up IF not you can pr ss any button to light up W n t power function is tops cooling Do not stor any ood in the fridge during use the refrigerator pl as pull the plug t ood quicker and ood r s or a long period This can nutrients of fresh food and keep food f...

Page 10: ...e shelve replace it ppliance tion t lls you ow to use most of the useful features We recomm nd t at you r ad t roug t m car ully before using the appliance or t storage of eggs cann d liquid bottl d drinks and packed ood tc Do not plac too many heavy To adjust gradually pull the rack in the dir ction o t arrows until it comes free t n r position as r quir d door rack Install t door rack Refrigerat...

Page 11: ...l surfaces and removable parts before putting them back into place Although this appliance automatically defrosts a layer of frost may occur on the fridge compartment s interior walls if the fridge door is opened frequently or kept open too long If the frost is too thick choose a time when the fridge is nearly empty and proceed as follows 1 Remove existing food and accessories baskets unplug the a...

Page 12: ...k harder and will consume more energy Do cover or wrap the food particularly if it has a strong flavor Place food properly so that air can circulate freely around it Hints for refrigeration For Meat all types wrap in cling wrap and place on the glass shelf above the vegetable drawer Always follow food storage times and use by dates suggested by manufacturers Cooked food cold dishes etc They should...

Page 13: ...wer supply replace if necessary The ambient temperature is too low Try setting the chamber temperature to a colder level to solve this problem It is normal that the freezer is not operating during the defrost cycle or for a short time after the appliance is switched on to protect the compressor Odours from the compartments The interior may need to be cleaned Some food containers or wrapping cause ...

Page 14: ...o warm You may have left the doors open too long or too frequently or the doors are kept open by some obstacle or the appliance is located with insufficient clearance at the sides back and top Temperature inside is too cold Increase the temperature by following the Display Controls chapter Doors can t be closed easily Check whether something inside is preventing the doors from closing The light is...

Page 15: ...nd fish in suitable containers in the refrigerator so that it is not in contact with or drip onto other food Two star frozen food compartments are suitable for storing pre frozen food storing or making icecream and making ice cubes One two and three star compartments are not suitable for the freezing of fresh food Order Compartments TYPE Target storage temp Appropriate food 1 Fridge 2 8 Eggs cooke...

Page 16: ...c 7 days below 0 and above 0 is recommended for consumption within that day preferably no more than 2 days Seafood less than 0 for 15 days it is not recommended to store above 0 8 Fresh Food 0 4 Fresh pork beef fish chicken cooked food etc Recommended to eat within the same day preferably no more than 3 days 9 Wine 5 20 red wine white wine sparkling wine etc Note please store different foods accor...

Page 17: ...Hisense UK Ltd Unit 2 Meadow Court Leeds Millshaw Lane LS11 8LZ ...

Reviews: