-
4
-
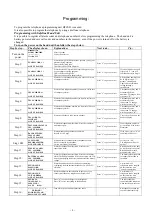
Programming:
To program the telephone a programming unit HT99-H is needed.
It is also possible to program the telephone by using a dialtone telephone.
Programming with Safeline Hand Unit
It is possible to register all alarm codes and telephone numbers before programming the telephone. The hand unit is
battery powered and saves all codes and numbers in the memory, even if the power is turned off or the battery is
changed.
Turn on the power on the hand unit than follow the steps below.
Step by step… The display shows:
Explanation:
Next to do:
Tip:
Turn on the
power
Handunit for
Safeline 1000/2000
-----------------
Version 1.15
After 3 seconds
Comes the next text
Step 2:
_
ALARM CODE 1 =
#=NEXT D=HELP
Write the 8-digits P100 alarm-code given to you by your
alarm-receiving operator.
This is the "Primary code"
This code to be used for lift alarm.
Press ”#” to go to next text
Step 3:
_
ALARM CODE 2 =
#=NEXT D=HELP
Write the second 8-digits P100 alarm-code given to you
by your alarm-receiving operator.
This is the "Secondary code"
This code to be used for battery alarm.
Press ”#” to go to next text
If you anytime between all
steps press "C" you will
continue directly to Step15.
Step 4:
_
TEL.NUMBER 1 =
#=NEXT D=HELP
Write the 1:st telephone number you want to call in case
of emergency alarm.
Press ”#” to go to next text
All telephone numbers can
be 16 digits long. A "*"
means 1 second pause.
That can be useful when
calling through a
switchboard.
Step 5:
_
TEL.NUMBER 2 =
#=NEXT D=HELP
Write the 2:nd telephone number you want to call in case
of emergency alarm.
Press ”#” to go to next text
Telephone number 1 and 2
are normally P100-
numbers. To change Alarm
type press "B".
Step 6:
_
TEL.NUMBER 3 =
#=NEXT D=HELP
Write the 3:rd telephone number you want to call in case
of emergency alarm.
Press ”#” to go to next text
Telephone number 3 and 4
are normally voice
connection. To change
Alarm type press "B".
Step 7:
_
TEL.NUMBER 4 =
#=NEXT D=HELP
Write the 4:th telephone number you want to call in case
of emergency alarm.
Press ”#” to go to next text
Telephone number 3 and 4
are normally voice
connection. To change
Alarm type press "B".
Step 8:
_
TEL.CODE TO
MINICALL
#=NEXT D=HELP
Write the code that is to be sent to a beeper.
Press ”#” to go to next text
This code will show on the
beeper's display.
Step 9:
_
TESTALARM/STATUS
TEL. NUMBER.
#=NEXT D=HELP
Write the telephone number that will receive test alarm
and status report.
Press ”#” to go to next text
If no telephone number is
given, there will be no test
alarm sent
Step 10:
_
DAYS BETWEEN
TEST ALARM
#=NEXT D=HELP
Write amount of days between test alarms.
It could be 1-99 days.
Press ”#” to go to next text
If the value is set to "0" no
test alarm will be sent
Steg 10B:
CALLTONES
BEFORE ANSWER
#=NEXT D=HELP
Write number of calltones before telephone answers
00-16 is accepted by telephone,
2 digits must always be written.
Press ”#” to go to next text
If it is set to ”00”
The telephone will never
answer.
Step 11:
_
SUPERV. ALARM
TEL. NUMBER.
#=NEXT D=HELP
Write the telephone number that will receive the
supervision alarm
Press ”#” to go to next text
Breakdown alarm can only
be sent if there is a special
Breakdown alarm card
mounted in the unit *
Step 12:
_
BATTERY ALARM
TEL. NUMBER.
#=NEXT D=HELP
Write the telephone number that will receive the battery
alarm. The battery condition is check once per week. It is
done by discharging the battery and measures the battery
voltage.
Press ”#” to go to next text
The battery alarm sends the
secondary alarm-code as
identifier.
Step 13:
_
SET/CHANGE
PASSWORD
#=NEXT D=HELP
Write the password to be used when programming/
configuring from an external telephone or with our PC-
software *
Press ”#” to go to next text
A maximum of 9
telephones can be coupled
on the same line with
"cascade connections".
Step 14:
_
SET/CHANGE
UNIT ADDRESS
#=NEXT D=HELP
Write the address to the telephone in question, if you
connect more than one telephone on the same line.
Press ”#” to go to next text
A maximum of 9
telephones can be coupled
on the same line with
"cascade connections".
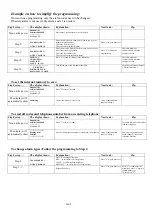
Step 15:
SEND ALL
CHANGES TO
SAFELINE ?
A=YES B=NO
Press "A" to send all changes to the telephone.
Press "B" to save everything in the hand unit.
The cable should be
connected to the telephone
when the changes are sent.
Step 16:
<--------------------------->
FINISHED !
POWER OFF AND
DISCONNECT CABLE
Turn off the power and disconnect the cable.
After about 8 seconds the
text will start from Step1.


