background image

-7-

MN1-1014 Rev. 14

1-2-3. Washing, disinfection and sterilization precautions

 Warning

Wear protective gloves and other protective gear during washing, disinfection and sterilization.

Handling of the equipment with your bare hands before disinfection or sterilization can result in an 

infection.
After soaking in cleaning agents, thoroughly wash the equipment with running water.

Residual cleaning agents can cause an adverse reaction on the bodies of the operator or patient.

After chemical disinfection and sterilization,

 thoroughly wash the equipment with sterilized water.

Residual chemicals can cause an adverse reaction on the bodies of the operator or patient.
Perform aeration completely after gas disinfection and sterilization.

Residual gas can cause an adverse reaction on the bodies of the operator or patient.

Do not wash, disinfect or sterilize using procedures other than those specified in this manual.

Infection could result due to incomplete washing disinfection or sterilization. It can also result in 

damage to the equipment or reduced performance. The equipment cannot withstand autoclave 

sterilization or boiling and other types of sterilization at temperatures exceeding 60°C (140°F).
For details on the usage conditions of chemicals and sterilization procedures, refer to the 

documentation supplied with the respective chemical or sterilization equipment.

Infection could result due to incomplete disinfection or sterilization. 

This could also cause deterioration of the equipment.

 Caution

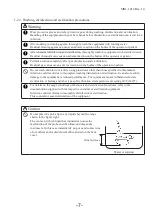
Do not place the probe tip in any liquids beyond the range 

shown in the figure right.

The connector which liquid has intruded can cause the 

malfunction of the probe and the ultrasound diagnostic 

instrument. In this case immediately stop use and contact one 

of our offices and/or distributor's offices listed on the back 

cover.

Water or solution

60 mm or less

Summary of Contents for UST-9113P-3.5

Page 1: ...i MN1 1014 Rev 14 MN1 1014 Rev 15 Puncture Electronic Convex Probe UST 9113P 3 5 Instruction Manual MN1 1014 Rev 15 ...

Page 2: ...MN1 1014 Rev 14 ii ...

Page 3: ...ury that can occur when failing to observe the displayed safety information are indicated in four levels Danger Warning Caution and Note Danger Indicates an imminently hazardous situation which if not avoided will result in death or serious injury to the operator or patient Warning Indicates a potentially hazardous situation which if not avoided could result in death or serious injury to the opera...

Page 4: ... Names of each parts 16 2 5 Environmental conditions 17 2 5 1 Operating environmental conditions 17 2 5 2 Storage environmental conditions 17 2 6 Classification of ME equipment 17 3 Preparations for Use 3 1 Start up check of the probe 19 3 1 1 Visual check 19 3 1 2 Verification of washing disinfection and sterilization 19 3 1 3 Verification of operation 19 3 2 Start up check of the puncture adapte...

Page 5: ...1 Ensuring safety of patients 32 4 9 2 Handling the instrument 32 5 Washing Disinfection and Sterilization 5 1 Washing 34 5 1 1 Probe tip and accessories 34 5 1 2 Cable and connector 34 5 2 Disinfection 35 5 2 1 Chemical disinfection 35 5 2 2 Gas disinfection 36 5 3 Sterilization 37 5 3 1 Ethylene oxide gas EOG sterilization 37 5 3 2 Liquid sterilization 38 6 Storage 6 1 Actions before storing 39 ...

Page 6: ...surement tolerances 44 8 2 1 Conducting tests 44 8 2 2 Result judgment 44 8 3 Safety tests of the puncture adapter 45 9 Configuration 9 1 Standard configuration 47 9 2 Option 47 10 Disposal of the Device 49 This Instruction Manual contains the main body of 50pages and 6pages until the CONTENTS ...

Page 7: ...rmation are indicated in four levels Danger Warning Caution and Note Danger Indicates an imminently hazardous situation which if not avoided will result in death or serious injury to the operator or patient Warning Indicates a potentially hazardous situation which if not avoided could result in death or serious injury to the operator or patient Caution Indicates a potentially hazardous situation w...

Page 8: ...isted on the back cover to request repair Clean disinfect and sterilize before using the equipment as necessary Perform properly wash disinfect and sterilize after use Otherwise there is a risk of infection Note that the equipment is not sterilized at the factory Before using the equipment first be sure to wash disinfect and sterilize it as required Wear medical gloves during examination Conductin...

Page 9: ...ry to the patient or operator and damage to this equipment and the other equipment Scan for the minimum length of time necessary for the diagnosis and at the lowest suitable output Overuse can adversely affect the internal tissues of the patient For details about the acoustic output please refer to the documentation supplied with the ultrasound diagnostic instrument Regularly perform maintenance i...

Page 10: ...m can cause an infection on the patient Check that the gauge size of the puncture needle that is used matches the gauge size of the puncture adapter Using when the gauge sizes of the puncture needle and puncture adapter do not match can result in puncturing of an unintended body part Also even if the gauge size is the same the diameters may vary between different puncture needle manufacturers and ...

Page 11: ... and disposal of puncture needles follow the instructions in the documentation supplied with the puncture needles Reuse of puncturing needles that are not reusable or improper disposal could result in an infection Do not use the equipment fallen on to floor Otherwise there is a risk of infection Stop the operation and perform the procedure in section 5 Washing Disinfection and Sterilization sectio...

Page 12: ...to the operator or patient Check beforehand if the patient has any allergic reactions to metals When using the puncture needle made of the stainless steel if the patient has a metal allergy of stainless steel the puncture needle may be hazardous for patient as an allergic risk Note Before carrying out a puncture operation on the patient check the relative safety not only of the equipment directly ...

Page 13: ...disinfect or sterilize using procedures other than those specified in this manual Infection could result due to incomplete washing disinfection or sterilization It can also result in damage to the equipment or reduced performance The equipment cannot withstand autoclave sterilization or boiling and other types of sterilization at temperatures exceeding 60 C 140 F For details on the usage condition...

Page 14: ... 8 MN1 1014 Rev 14 MHz RELEASE LOCK 3 5 MH z R E L E A S E L O C K 3 5 MH z R E L E A S E L O C K 3 5 Label 3 Label 2 Label 1 Label 1 Electronic convex probe mark Frequency 1 2 5 Labels 1 Probe unit ...

Page 15: ...Specifications Type BF applied part Do not waste the instrument as general waste Comply with a local regulation See section 10 Manufacturer Model Serial No Safety warning sign Biohazard See section 5 Follow the instruction manual to operate this instrument If not avoided may result in injury property damage or the equipment trouble IPX7 ...

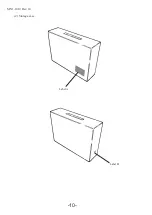
Page 16: ... 10 MN1 1014 Rev 14 2 Storage case Label A Label B ...

Page 17: ... 11 MN1 1014 Rev 14 MN1 1014 Rev 15 Label A Model Serial No Label B 2012 This equipment complies with Directive 93 42 EEC relating to Medical Device DATE OF MANUFACTURE in case of 2012 MANUFACTURER 2012 ...

Page 18: ... 12 MN1 1014 Rev 14 ...

Page 19: ...nic waves into the body part contacting the transducer or into liquid or other medium 2 The emitted ultrasonic waves are reflected by boundaries with different acoustic characteristics acoustic impedance within the body 3 The transducer is also used to receive reflected ultrasonic waves The transducer vibrates mechanically due to the received ultrasonic vibrations and uses an electro mechanical co...

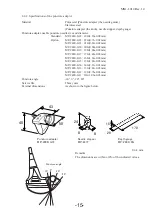
Page 20: ... of view 60 Frequency 3 5 MHz Cable length 2 0 m Weight 1060 g Service life Three years Range of applied part Ultrasonic irradiation area see the section 2 4 Parts treated as applied parts Probe tip itself and 1 m of the cable near the probe tip IPX7 range As shown in the figure below External dimensions As shown in the figure below Unit mm Remarks The dimensions and weight are within 10 of the in...

Page 21: ... 0 88 0 02mm MP 2480 G19 19G 1 06 0 02mm MP 2480 G17 17G 1 48 0 02mm MP 2480 G16 16G 1 61 0 02mm MP 2480 G15 15G 1 81 0 03mm MP 2480 G14 14G 2 11 0 03mm MP 2480 G13 13G 2 41 0 03mm MP 2480 G12 12G 2 76 0 03mm MP 2480 G11 11G 3 06 0 03mm Puncture angle 10 0 20 40 Service life Three years External dimensions As shown in the figure below 8 8 24 針ストッパ MP 2477 170 20 1 5 深さゲージ MP 2416U DG 43 40 50 Punc...

Page 22: ...r This is the part that connects the ultrasound diagnostic instrument and probe Follow the instructions in section 4 6 Cable This cable propagates the ultrasonic signals that are sent and received Ultrasonic irradiation area This incorporates an electronic convex transducer Probe tip This area is held during operation Depth gauge Needle stopper This is use for setting a puncture needle depth into ...

Page 23: ...lfur or other corrosive substances Locations where chemical substances are stored or where gases are generated Storage in these locations can result in a breakdown or reduced performance Avoid rapid temperature change which may cause condensation Avoid using in locations where condensation or water droplets can form Condensation can occur when moving the equipment from a cool location to a warm on...

Page 24: ... 18 MN1 1014 Rev 14 ...

Page 25: ...agnostic instrument and check that the selected probe match the convex display and the displayed frequency and check the image for errors Remarks For details on the displayed screens see the documentation supplied with the ultrasound diagnostic instrument Warning Be sure to preparations for use Using the equipment without noticing an abnormal condition can result in injury to the operator or patie...

Page 26: ...evere discoloration 3 2 2 Mechanical inspection Check that the puncture adapter mechanism while attached to the probe The puncture adapter is firmly attached to the probe Remarks See Section 4 2 Attaching of the puncture adapter 3 2 3 Verification of operation When puncturing under the ultrasonic guide for safety reason it is also recommended that you have a full understanding of ultrasound diagno...

Page 27: ...needle has no bending or other defects 3 Connect the probe to the ultrasound diagnostic instrument Turn on the ultrasound diagnostic instrument to display the puncture guide line on the monitor screen Remarks For details of the puncture guide line refer to the instruction manual of the ultrasound diagnostic instrument Caution Use warm water at 40 C 104 F in the check of the needle echo In the actu...

Page 28: ...e needle stopper and the depth gauge See section 5 Washing Disinfection and Sterilization 2 Wash and disinfect or sterilize the probe to be used in accordance with its usage purpose Warning The equipment must be washed and sterilized before use Be sure to always properly wash and sterilize after use Failure to do so could result in an infection Note that the equipment is not sterilized when shippe...

Page 29: ...e than necessary can cause injury to the patient Scan for the minimum length of time necessary for the diagnosis and at the lowest suitable output There is the possibility that the patient s internal tissues could be affected For details about the acoustic output please refer to the documentation supplied with the ultrasound diagnostic instrument Do not touch the connector terminal pin of the prob...

Page 30: ...on the monitor screen to the target puncture region Use the puncture guide distance measurement function of the ultrasound diagnostic instrument Remarks For details on the method of measuring the distance using the displayed puncture guide line and calipers see the instruction manual of the ultrasound diagnostic instrument Reference point of the puncture guide line Target puncture region Image on ...

Page 31: ...ert the puncture needle into the V groove of the needle stopper 7 Move the tip of the puncture needle to the scale position corresponding to the distance a measured in step 3 above 8 Tighten the knob of the needle stopper to lock the needle stopper to the puncturing needle Needle stopper Knob Puncture needle Depth gauge 6 5 4 V groove Notch Groove Puncture needle Needle stopper Knob a 7 8 ...

Page 32: ...nce a Distance from the reference point on the puncture guide line to the target puncture region The 0 index line on the depth gauge corresponds to the reference point of the puncture guide line Distance b Distance from the end of the needle locking base on the puncture adapter to the reference point on the puncture guide line On the depth gauge this corresponds to the distance from the 0 index li...

Page 33: ...kwise Then remove the knob from the needle guide by pulling out the knob tip from the needle guide hole 3 Immediately wash and sterilize the puncture adapter the needle guide and the knob the needle stopper and the depth gauge after it is removed from the probe 4 4 Leaving the needle The probe and the puncture adapter can be removed from the puncture needle during puncturing 1 Turn the knob counte...

Page 34: ...c instrument is frozen Before inserting the probe into the probe connector check that the connector pins are not bent 1 Turn the connector lock lever to align the mark on the lever with the RELEASE position 2 Firmly insert the connector into the probe connector 3 Turn the lock lever clockwise by 1 4 turn until the mark is aligned with the LOCK position 4 Check that the connector is firmly inserted...

Page 35: ... when in one of the following states The power switch is set to OFF The image displayed on the ultrasound diagnostic instrument is frozen 1 Turn the connector lock lever to align the mark on the lever with the RELEASE position 2 Firmly grasp the connector unit and pull it out from the probe connector This completes the removal of the probe After use perform washing disinfection and sterilization o...

Page 36: ...oustic medium can cause an infection on the patient Check that the gauge size of the puncture needle that is used matches the gauge size of the puncture adapter Using when the gauge sizes of the puncture needle and puncture adapter do not match can result in puncturing of an unintended body part Also even if the gauge size is the same the diameters may vary between different puncture needle manufa...

Page 37: ...terilization section 3 1 Start up check and section 3 2 Checking the needle echo When inserting an RFA Radio Frequency Ablation needle do not insert while bending the needle Inserting while bending the needle can break the insulation membrane covering the RFA needle and could cause burns to the patient Before using a needle cannula with the puncture adapter as a guide first check that the cannula ...

Page 38: ... treatment 4 9 2 Handling the instrument Turn off the ultrasound diagnostic instrument remove its plug from the AC socket and sterilize if it is contaminated For details refer to the instruction manual for the ultrasound diagnostic instrument Caution Do not use a equipment where a problem has been found Using a equipment in an abnormal state can cause injury to the patient Contact one of our offic...

Page 39: ...t or sterilize using procedures other than those specified in this manual Infection could result due to incomplete washing disinfection or sterilization It can also result in damage to the equipment or reduced performance The equipment cannot withstand autoclave sterilization or boiling and other types of sterilization at temperatures exceeding 60 C 140 F For details on the usage conditions of che...

Page 40: ...unning water Wash off blood mucus and other substances adhering to the equipment using a sponge or gauze or Soaking in cleaning agent Minimize the soaking time Water rinsing Sufficiently rinse the equipment using running water to remove all traces of chemicals Warning After soaking in cleaning agents thoroughly wash the equipment with running water Residual cleaning agents can cause an adverse rea...

Page 41: ...DETERGICIDE Practical liquid 0 2W V Yufu Itonaga Co Ltd Benzethonium chloride HYAMINE Practical liquid 0 1W V DAIICHI SANKYO Co Ltd Disinfection procedure Washing Be sure to wash and fully dry the probe before disinfection See section 5 1 Soaking in chemical solution Soak the probe tip in a chemical solution at the shortest time where effective disinfection can be achieved Water rinsing Sufficient...

Page 42: ...n Disinfection the following conditions Temperature Room temperature Humidity Normal humidity Atmospheric pressure Normal pressure Aeration Aerate the following conditions to ensure that no gases remain Temperature 10 C to 60 C 50 F to 140 F Humidity 30 to 85 Compression to 101 175kPa Decompression to 100 000kPa Period 5 days natural aeration Warning Perform full aeration after gas disinfection Re...

Page 43: ...ocedure Washing Be sure to wash and fully dry the equipment before sterilization See section 5 1 EOG sterilization Sterilize the following conditions Temperature 10 to 60 50 F to 140 F Humidity 30 to 85 Compression to 101 175kPa Decompression to 100 000kPa Aeration Aerate the following conditions to ensure that no gases remain Temperature 10 C to 60 C 50 F to 140 F Humidity 30 to 85 Compression to...

Page 44: ...olution at the shortest time where effective sterilization can be achieved Be sure to wash and fully dry the equipment before sterilization See section 5 1 General name Trade name Manufacturer Hydrogen peroxide PERASAFETM Practical liquid 1 62W V ANTEC INTERNATIONAL Warning After chemical sterilization thoroughly wash the equipment with sterilized water Residual chemicals can cause an adverse reac...

Page 45: ...escribed in section 5 Washing Disinfection and Sterilization and then store it in its storage case Wash and sterilize the puncture adapter the needle stopper and the depth gauge and store in sterile 6 2 Environmental conditions for storage For details about the storage environmental conditions see section 2 5 2 Storage environmental conditions ...

Page 46: ... 40 MN1 1014 Rev 14 ...

Page 47: ... for transportation Store in the storage case after performing the procedure in section 5 Washing Disinfection and Sterilization and then put the storage case in a cardboard box for additional protection 7 4 Environmental conditions during transportation Ambient temperature 10 C to 50 C 14 F to 122 F Relative humidity 10 to 90 Atmospheric pressure 700 hPa to 1060 hPa Note This equipment is a preci...

Page 48: ... 42 MN1 1014 Rev 14 ...

Page 49: ...k probes in saline solution beyond the IPX7 range provided in section 2 2 2 Test of patient leakage current caused by an external voltage on the patient connection of an F type applied part Using the measuring instruments which usable to the requirement of IEC 60601 1 2005 conduct the test as shown in Fig 16 of IEC 60601 1 2005 Soak the probe tip in saline solution and measure the leakage current ...

Page 50: ...ow gaps between them for confirming the resolution This enables you to check the level of detail that images can be viewed on the display For phantoms with no targets the resolution determines the fineness of the displayed textures The sensitivity can be determined by examining the luminance of ultrasonic images Other factors that affect the resolution include the type of connected probe gain focu...

Page 51: ... Checking the needle echo Also conduct the safety tests for the probe that is used Warning Be sure a safety tests at least once a year Failure to notice an abnormal condition while using the equipment can result in an injury to the operator or patient If a problem is found in the inspection immediately stop use and contact one of our offices and or distributor s offices listed on the back cover ...

Page 52: ... 46 MN1 1014 Rev 14 ...

Page 53: ... MP 2480 DG 1 piece Storage case CB UST 1 P2 1 set Instruction manual MN1 1014 1 copy 9 2 Option Puncture adapter The following puncture adapter is available to match the various sized needle 11G MP 2480 G11 12G MP 2480 G12 13G MP 2480 G13 14G MP 2480 G14 15G MP 2480 G15 16G MP 2480 G16 17G MP 2480 G17 19G MP 2480 G19 20G MP 2480 G20 21G MP 2480 G21 22G MP 2480 G22 ...

Page 54: ... 48 MN1 1014 Rev 14 ...

Page 55: ...on measures Disposal of the equipment without taking the proper preventative measures can lead to infection Waste Electrical and Electronic Equipment WEEE Directive This products is a duty of the display of WEEE marking is imposed into the European Union EU In case you dispose this product in the EU member nation please contact any of the offices or agencies should follow the law of each country o...

Page 56: ... shi Tokyo 181 8622 Japan TEL 81 422 45 6049 URL http www hitachi aloka com Hitachi Medical Ultrasound Logistics Zweigniederlassung der Hitachi Medical Systems Europe Holding AG Carl Zeiss Strasse 5 D 72555 Metzingen Germany Distributor MN1 1014 Rev 15 12 04 01 ...

Reviews: