background image

English   

- 11 -

  Inserting Batteries into the 
Remote Control

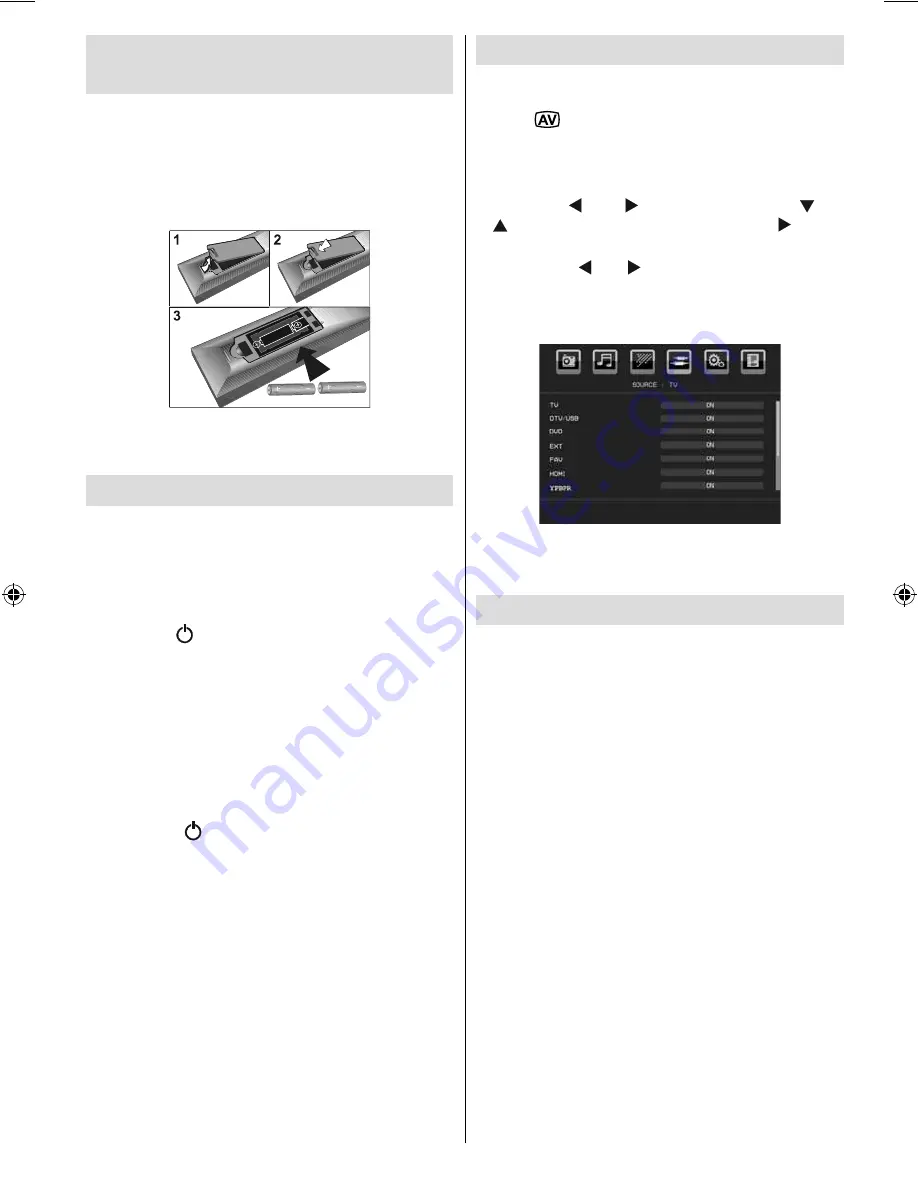
  • Remove the battery cover located on the back of 

the remote control by gently pulling backwards from 
the indicated part.

  • Insert two  

AAA/R3

  or equivalent type batteries 

inside. 

Observe the correct polarity (+/-) when 

inserting batteries and replace the battery cover.


  Note : Remove the battery from remote control when it is not 
to be used for a long period. Otherwise it can be damaged 
due to any leakage of batteries. 


Switching the TV On/Off

 To Switch the TV On

 • Connect the power cord to the 220-240V AC 50 

Hz.  

 • Then the standby LED lights up. 

 • To switch on the TV from standby mode either:

  • Press the “

” button,  

P+

  /  

P-

  or a numeric button 

on the remote control. 

 • Press the  

-P/CH 

 or  

P/CH+ 

 button on the TV. The TV 

will then switch on. 

  Note : If you switch on your TV via PROGRAMME UP/DOWN 
buttons on the remote control or on the TV set, the programme 
that you were watching last will be reselected. 

 By either method the TV will switch on. 

 To Switch the TV Off

  • Press the “

” button on the remote control or 

press the STANDBY switch, so the TV will switch 
to standby mode.

 •  

To power down the TV completely, unplug the 
power cord from the mains socket.


Note: When the TV is switched to standby mode, 
standby LED can blink to indicate that features such 
as Standby Search, Over Air Download or Timer is 
active.    

    Input Selection

  Once you have connected external systems to your 
TV, you can switch to different input sources. 

 • Press “

” button on your remote control for directly 

changing sources. 

 or

  • Select “

Source

” option from the main menu 

by using “ ” or “ ” button. Use then “

” or 

” button to highlight an input and press “ ” button 

to select. 

  Note : With the 

“ ” or “ ”

 buttons you can set Off or On. 

When Off is selected; this source does not appear in the OSD 
when you press the AV / Source button of the remote control. 
(except for the TV source). 


Note : YPbPr mode can be used only when you connect a 
device that has a YPbPr output through the PC-VGA input with 
YPbPr to PC cable (YPbPr cable is not supplied).

  Basic Operations


 You can operate your TV using both the 
remote control and onset buttons.

 Operation with the Buttons of the TV 

Main menu OSD cannot be displayed via control 
buttons. “

+/-

” buttons will function as volume up/down 

as default. Even if you set other functions for these 
buttons, “

+/-

” buttons will perform as default after a 

short while.

 Volume Setting 

 • Press “

+/-

” buttons to increase or decrease volume, 

so a volume level scale (slider) will be displayed 
on the screen. 

 Programme Selection 

 • Press P/V/AV button once and then use “

+/-”

 buttons 

to select the next or previous programme. 


 AV Mode 

 • Hold the 

“P/V/AV  ”

 button, source OSD will be 

displayed.Use 

“+/-”

 buttons to select the desired 

source. 

  Operation with the Remote Control 

 • The remote control of your TV is designed to control 

all the functions of the model you selected. The 

00_MB46_[GB]_1205UK_IDTV_NICKEL15_19841W_10070633_50178292.indd   11

00_MB46_[GB]_1205UK_IDTV_NICKEL15_19841W_10070633_50178292.indd   11

06.10.2010   08:28:30

06.10.2010   08:28:30

Summary of Contents for 19LD3560U

Page 1: ...19LD3560UA Instructions for use GB ...

Page 2: ...ce 4 Moisture and Water 4 Cleaning 4 Heat and Flames 4 Lightning 4 Replacement Parts 4 Servicing 4 Waste Disposal 4 Information for Users in European Union Countries 5 Headphone Volume 5 Installation 5 LCD Screen 5 Connection to a Television Distribution System Cable TV etc from Tuner 5 Overview of the Remote Control 6 LCD TV and Operating Buttons 7 Viewing the Connections Back Connectors 7 Viewin...

Page 3: ...Plug Play for Windows 98 ME 2000 XP Vista Windows 7 Game Mode Introduction Thank you for choosing this product This manual will guide you for the proper operation of your TV Before operating the TV please read this manual thoroughly Please do keep this manual in a safe place for future references This device is intended to receive and display TV programs The different connection options make an ad...

Page 4: ...tilation leave a free space of at least 10 cm all around the set To prevent any fault and unsafe situations please do not place any objects on top of the set Use this device in moderate climates 10 cm 10 cm 10 cm Safety Precautions Please read the following recommended safety precautions carefully for your safety SOME DOS AND DON TS ON THE SAFE USE OF EQUIPMENT This equipment has been designed and...

Page 5: ...may be dangerous and do not place objects filled with liquids such as flower vases on top Avoid from dripping or splashing If any solid object or liquid falls into the cabinet unplug the TV and have it checked by qualified personnel before operating it any further Cleaning Before cleaning unplug the TV set from the wall outlet Do not use liquid or aerosol cleaners Use soft and dry cloth Ventilatio...

Page 6: ...ected to the protective earthing of the building installation through the mains connection or through other apparatus with a connection to protective earthing and to a television distribution system using coaxial cable may in some circumstances create a fire hazard Connection to a cable distribution system has therefore to be provided through a device providing electrical isolation below a certain...

Page 7: ...mode 10 Programme down Page up in DTV mode Numeric buttons 11 Exit in DTV mode 12 Hold in TXT mode 13 Update in TXT mode 14 Index page in TXT mode Electronic 15 Programme Guide EPG in DTV mode Reveal in TXT mode Switch from TV to PC 16 Picture menu Page down Subtitle on off in 17 DTV mode Sound menu Page up Channel list in DTV 18 mode Menu on off 19 OK Select analogue TV mode Channel list 20 in DT...

Page 8: ... YPbPr signal connection with a device that has component output Connect the YPbPr to PC cable between the PC INPUT on the TV and the component video outputs of your device S PDIF Coaxial Out 3 outputs digital audio signals of the currently watched source Dolby D Audio is bypassed while in media browser mode only RF Input connects to an antenna or a cable system 4 Note that if you use a media reco...

Page 9: ...bPr sound connection in such a case use an appropriate audio cable between the connected device s audio outputs and the TV s audio inputs Note If you connect a device to the TV via the VIDEO or PC YPbPr cable you should also connect your device with an audio cable to the AUDIO INPUTS of the TV to enable audio Headphone jack is used for connecting an external headphone to the system 5 Connect to th...

Page 10: ...y using the USB input of the TV This feature allows you to display play music photo or video files stored in a USB stick It is possible that certain types of USB devices e g MP3 Players may not be compatible with this TV You may back up your files before making any connections to the TV set in order to avoid any possible data loss Note that manufacturer will not be responsible for any file damage ...

Page 11: ...socket Use a SCART cable as shown below HDMI input Scart socket YPbPr to PC cable optional Component audio inputs DVD Player Note These methods of connection perform the same function but in different levels of quality It is not necessary to connect by all three methods Using Side AV Connectors You can connect a range of optional equipment to your LCD TV Possible connections are shown below Note t...

Page 12: ...ir Download or Timer is active Input Selection Once you have connected external systems to your TV you can switch to different input sources Press button on your remote control for directly changing sources or Select Source option from the main menu by using or button Use then or button to highlight an input and press button to select Note With the or buttons you can set Off or On When Off is sele...

Page 13: ...or No option highlight the item by using or buttons and press the OK button The IDTV will automatically tune to the UHF or VHF for EU countries transmission channels searching for digital terrestrial TV broadcasts and displaying the names of channels found This process will take about a few minutes After Automatic Search is completed the following message asking for analogue channel search appears...

Page 14: ...age option is set pressing the button causes the following warning message display on the screen for UK only Digital Teletext for UK only Press the button The digital teletext information appears Operate it with the coloured buttons cursor buttons and OK button The operation method may differ depending on the contents of the digital teletext Follow the instructions displayed on digital teletext sc...

Page 15: ...t Press or buttons to select the channel that will be moved Press or buttons to select the Move item on Channel List menu Following OSD will be displayed next to OK item to indicate that enter a number by using the numeric buttons on the remote control and press OK to confirm Note If you enter the same programme number of the channel that you want to move channel services will be replaced Do you w...

Page 16: ...ourites To set a favourite you should highlight the Favourites item at the bottom of the Channel List menu Then press OK button and Edit Favourite List menu appears on the screen How to Add a Channel to a Favourites List By pressing or buttons highlight the channel that you want to add to the favourite list By pressing OK button the highlighted channel is added to the Favourite List F icon indicat...

Page 17: ...s until the card is activated Some CAMs may require the following set up Please set the CAM by entering the IDTV menu Conditional Access then pressing the OK button CAM set up menu is not displayed when it is not required To see the viewing contract information enter IDTV press the M button then highlight Conditional Access and press the OK button When no module is inserted No Conditional Access m...

Page 18: ...splayed The key is set to 0000 initially Enter PIN If it is incorrect Wrong Pin OSD will be displayed If it is correct the Parental Control menu will be displayed Maturity Lock optional If you set Country option as UK in the first time installation Maturity Lock option will not be visible This setting is available only for EU countries When set this option gets the maturity information from the br...

Page 19: ...ilable Otherwise the current settings will be used Audio by pressing or keys change the audio language Subtitle alter the subtitle language with or keys The chosen language will be seen in subtitles Movie Subtitle optional In order to display subtitles properly use this setting to select a movie subtitle language By pressing or button select the desired language option Guide By pressing or buttons...

Page 20: ... the programme numbers and names assigned to the programmes Channel Search In manual channel scan the number of the multiplex is entered manually and only that multiplex is searched for the channels For each valid channel number signal level and signal quality are shown on the screen In both manual and auto search any existing channel in the database is not re stored to avoid redundant duplicates ...

Page 21: ...Select YES by pressing or button and press OK button Media browser will be displayed You can play music picture and video files from a USB memory stick Note If you plug USB stick while in analogue mode the TV will automatically switch to digital TV mode Note Some USB compliant devices may not be supported Note If the USB stick is not recognized after power off on or First Time Installation first p...

Page 22: ...u should set a Movie Subtitle language See the section Movie Subtitle in Language Settings for selecting Movie Subtitle language Press BLUE button to switch back to previous menu Analogue TV Menu System Picture Menu Mode For your viewing requirements you can set the related mode option Press or button to select Mode Press or button to choose from one of these options Natural Cinema User and Dynami...

Page 23: ...lance level can be adjusted between 50 and 50 Headphone Mute Press or button to select Headphone Mute Press or button to set Headphone Mute as On or Off If you want to mute Headphone sound please change to Headphone Mute function to On Also when the TV is in mute you can use this feature to activate or deactivate headphone sound Sound Mode Press or button to select Sound Mode Using or button you c...

Page 24: ...Turk Gre Arabic or Persian Ext Out Press or button to select Ext Out Use or button to set the Ext Out as On or Off Note For copying from a DVD or VCR device you should choose desired source from source menu and turn On to EXT Out from feature menu Ext Out should be On in order to use Timers function in the DTV mode Auto Tv Off Press or button to select Auto Tv Off Use or button to set the Auto Tv ...

Page 25: ...sing or button Press to display Program Table By moving the cursor in four directions you can reach 20 programmes in the same page You can scroll the pages up or down by pressing the navigation buttons to see all the programmes in TV mode except for the AV modes By cursor action programme selection is done automatically Name To change the name of a programme select the programme and press the RED ...

Page 26: ... resolution and scan frequency that you input to the TV set you may see a hazy or noisy picture on the screen In such a case you can use this item to get a clear picture by trial and error method Select Phase item by using or buttons Use or button to adjust the value Dot Clock Dot Clock adjustments correct the interference that appear as vertical banding in dot intensive presentations like spreads...

Page 27: ...reen For 16 9 aspect ratio pictures that have been squeezed into a normal picture 4 3 aspect ratio use the 16 9 mode to restore the picture to its original shape 4 3 Use to view a normal picture 4 3 aspect ratio as this is its original size Teletext Teletext system is available if your broadcaster supports Teletext system transmits information such as news sports and weather on your TV Note that i...

Page 28: ...ay degrade when two peripherals are connected to the TV at the same time In such a case disconnect one of the peripherals No Picture Is the aerial connected properly Are the plugs connected tightly to the aerial socket Is the aerial cable damaged Are suitable plugs used to connect the aerial If you are in doubt consult your dealer No Picture means that your TV is not receiving a transmission Have ...

Page 29: ... Ver Ver Hz Hor KHz 1 640 480 60 31 5 VESA 2 640 480 72 37 9 VESA 3 640 480 75 37 5 VESA 4 800 600 56 35 2 VESA 5 800 600 60 37 9 VESA 6 800 600 70 43 8 7 800 600 72 48 1 VESA 8 800 600 75 46 9 VESA 9 832 624 75 49 7 MAC 10 1024 768 60 48 4 VESA 11 1024 768 70 56 5 VESA 12 1024 768 72 57 7 13 1024 768 75 60 0 14 1152 864 75 67 5 VESA 15 1152 870 75 68 9 MAC 16 1280 768 60 47 7 VESA 17 1366 768 60 ...

Page 30: ...60Hz O HDMI 1 480I 60Hz O 480P 60Hz O 576I 50Hz O 576P 50Hz O 720P 50Hz O 720P 60Hz O 1080I 50Hz O 1080I 60Hz O 1080P 24Hz X 1080P 25Hz X 1080P 30HZ X 1080P 50HZ O 1080P 60HZ O X Not Available O Available Note In some cases a signal on the LCD TV may not be displayed properly The problem may be an inconsistency with standards from the source equipment DVD Set top box etc If you do experience such ...

Page 31: ... 422 420 Grayscale Progressive JPEG Up to 4 Mega pixel Support format 444 440 422 420 Grayscale External Subtitles srt Support Text File Format but do not support Picture File Format smi sub psb ass Note Necessary bitrates for some video types are higher than USB limits For this reason some video types cannot be played Products Battery Information for Users on Disposal of Old Equipment and Batteri...

Page 32: ...on COFDM with 2K 8K FFT mode FEC all DVB modes Video MP ML PAL 4 3 16 9 Audio MPEG Layer I II 32 44 148kHz NUMBER OF PRESET CHANNELS 200 CHANNEL INDICATOR On Screen Display RF AERIAL INPUT 75 Ohm unbalanced OPERATING VOLTAGE 220 240V AC 50 Hz AUDIO German Nicam Stereo AUDIO OUTPUT POWER WRMS 10 THD 2 x 2 5 POWER CONSUMPTION W 45 W max 1 W Standby PANEL 19 wide display Panel Contrast 1000 1 DIMENSI...

Page 33: ...facture we cannot guarantee compatibility with future DVB transmissions due to changes that may be implemented in broadcast signals and technologies Some digital television functions may not be available in all countries We continually strive to improve our products therefore specifications may change without prior notice For advice on where to purchase accessories please contact the store where y...

Page 34: ...R Aerial RF Socket wall socket wall socket Aerial RF Lead Aerial RF Lead It is recommended that a scart lead should be fitted between your TV and VCR to enhance your picture and sound quality Scart leads are essential if you have a stereo TV and VCR and wish to obtain stereo sound from your equipment These leads can be purchased from your Hitachi dealer or any good High Street electrical retailer ...

Page 35: ...onnector lead Device to TV wall socket Aerial RF Lead Aerial RF Socket High Definition Your LCD Television is capable of displaying High Definition pictures from devices such as a High Definition Satellite Receiver or DVD Device These devices must be connected via the HDMI or VGA Socket VGA input can be used via VGA to YPbPr cable TFT LCD TV Scart Lead to AV 1 on TV Note These three methods of con...

Page 36: ...d is connected to mains socket the set will be in standby and the indicator on the front of the set will illuminate SIDE VIEW RGB2 Programme Up Volume Up Volume Down Programme Down To select a programme number To enter the main menu For navigation of the menus EXIT GUIDE WIDE ABC DEF GHI JKL MNO PQR STU VWX YZ M P P TV DTV i I II INFO V P PP 0 1 2 3 4 5 6 7 8 9 PC OK Operate Standby RC 1205 ...

Page 37: ...he first time the menu for the language selection appears on the screen The message Welcome please select your language is written in all language options sequentially in the menu on the screen By pressing or buttons highlight the language you want to set and press OK After the language selection menu the following message appears on the screen Do you want to start an automatic channel scan To sta...

Page 38: ...omething about your appliance which you do not understand and you live in the UK you can phone our helpline during normal hours on 0844 8009595 COMET HELPLINE Calls are charged at standard rates Guarantor Comet Group plc Comet House Three Rivers Court Rickmansworth Hertfordshire WD3 1FX ...

Reviews: