background image

GB

Instructions for use

22LD4500

Summary of Contents for 22LD4500

Page 1: ...GB Instructions for use 22LD4500 ...

Page 2: ...nnections 64 PC INPUT TYPICAL DISPLAYMODES 65 Tips Troubleshooting Guide 66 On Digital mode 66 On TV and monitor mode 66 Specifications 68 UK Guarantee 69 Wiring The Plug 2 Remote Control Buttons 3 Control Panel 4 Preparation 6 Features 8 Safety Precautions 9 Before Switching on your TV 11 Power connection 11 Aerial Connections 11 How to connect other devices 11 Inserting batteries in the remote c...

Page 3: ...mains WIRING INSTRUCTIONS Your TV is designed to operate on 220 to 240V 50Hz current only Connecting it to another power source may damage the TV The wires in the mains lead are coloured as follows Blue Neutral Brown Live IMPORTANT The colours of the wires in the mains lead from your TV may not be the same as the coloured markings identifying the terminals in your plug So please follow these instr...

Page 4: ...ramme P CH Programme Up Volume DTV TV TV DTV mode External Source AV 1 AV 2 AV 3 S VIDEO PC Yellow FEATURE Feature Menu Blue INSTALL Installation Menu Hold Update PAP AP GUIDE Index Page Reveal PC Switch from TV to PC Expand WIDE Aspect ratio PIP on PIP off Teletext Time Red SOUND Sound Menu Page up Green PICTURE Picture Menu Page down Mute I II Mono Stereo Dual I II Volume P CH Programme Down Per...

Page 5: ...4 Control Panel VOLUME P Ch MENU POWER LED INFRARED RECEIVER VOLUME P Ch MENU TV AV SPEAKER TV AV FOOT TOP COVER PC INPUT DC 15V PC AUDIO ANT 75 W 2 1 ...

Page 6: ...INPUT L AUDIO INPUT R VIDEO INPUT S VIDEO INPUT SCART SOCKET 1 AV 1 A B C D E F G H I J K DC 15 V PC AUDIO INPUT AERIAL PC INPUT HEADPHONE AV 3 S VHS PC I NPUT DC 1 5V PCAUD IO A NT 7 5 W 2 1 PC INPUT DC 15V PC AUDIO ANT 75 W 2 1 ...

Page 7: ...les found on the back of the monitor chassis Secure the bracket with the same four 4 4 mm head screws Step 2 Choose the wall where the monitor would be located Level and mark with a pencil the four 4 mounting points found on the wall bracket Drill pilot holes for the plastic an chors then secure the wall bracket with the four 4 L 32 mm x D 5 mm screws supplied Step 3 Raise the monitor with the mou...

Page 8: ...7 Mounting bracket Wall bracket 2 Plastic anchors 3 D 4mm x L 10mm screws 2 L 32mm x D 5mm screws 1 D 4mm x L 10mm screws WALL STRUCTURE LCD MONITOR preparation ...

Page 9: ...Forward or backward automatic tuning Sleep timer Child lock Auto 4 3 16 9 Cinema Subtitle Zoom and Panorama modes are available at TV and AV WSS is available with Auto 4 3 16 9 and Cinema modes Auto 4 3 and 16 9 modes are available at PC Automatic sound mute when no transmission No Signal Standby Mode NTSC Playback Universal power supply range is a standard feature on this model PAP picture and pi...

Page 10: ... if you are in any doubt about it working normally or if it is dam aged in any way switch off withdraw the mains plug and consult your dealer DON T place water filled vessels on top of T V cabi nets DON T remove any fixed cover as this may expose dangerous voltages DON T leave equipment switched on when it is unat tended unless it is specifically stated that it is de signed for unattended operatio...

Page 11: ...required be sure the service technician has used replacement parts which are specified by the manufacturer or have the same specifications as the original one Unauthorised sub stitutions may result in fire electrical shock or other hazards 8 Servicing Please refer all servicing to qualified personnel Do not remove cover as this may result in electric shock 9 Naked Flame Sources Do not place naked ...

Page 12: ...rder or satellite receiver you should connect the aerial or cable plug to this device first and then connect the RF out socket on the de vice to the aerial socket on the TV see P27 for more details How to connect other devices IMPORTANT Switch off the TV before connecting any external device Sockets for external connections are at the back of the TV For connection of other devices via Eurocon nect...

Page 13: ...igit key on the remote control so that a pro gramme number is selected or Press P Ch or P Ch key at the top of the TV or press P CH or P CH key on the remote control so that last switched off programme is se lected In either case the TV will switch on and the led be comes green To switch the TV off Press the stand by key on the remote control so the TV will switch to stand by mode and the GREEN LE...

Page 14: ...nutes preparation SILENCE MODE When you turn off your IDTV by pressing Stand by key on RC IDTV switches into SILENCE mode and the led on the front of IDTV starts blinking Also IDTV switches into SILENCE mode automaticallly everyday at 3 00 a m In the silence mode IDTV searches for a new software If a new software is found it is loaded onto the old s w without any warning message TV exits from stan...

Page 15: ...ision broadcasts are found the TV will display a message You should then refer to the Tips Troubleshooting Guide to establish the cause of the problem After Automatic search is finalized the following menu appears Do you want to search for analogue channels Yes No If you select Yes After A P S is completed program table is displayed on the screen See the Programming menu in terrestrial TV section ...

Page 16: ... select the first channel Similarly pressing the P CH key when the first channel is dis played will select the last channel in the channel list You can also select the required channel using its channel list number Channel num bers are entered using the number keys on the remote control handset and can be up to three digits long Hint The channel list numbers are as signed by the broadcasters Be ca...

Page 17: ...he pro gramme data If the name and times of the programme is not available then No Information Available is displayed in the information banner The information banner gives a number of facts on the channel selected and the programmes on it The name of the channel is displayed along with its channel list number and an indication of the strength of the signal received on this tuning channel The name...

Page 18: ... CH keys are used to move to an other unlocked channel CHANNEL LIST You can also select the required channel directly from the on screen channel list First bring up the menu with the M key on the remote control handset Using the or keys on the re mote control make sure that the first item Channel List is highlighted in yel low and press the SELECT key to display the channel list SELECT i ...

Page 19: ...nnel When you leave the Channel List screen by pressing M key the channel showing on the quarter screen is selected for normal viewing on the whole screen ELECTRONIC PROGRAMME GUIDE The fourth way of selecting a channel is with the electronic programme guide or EPG The EPG is accessed by pressing the GUIDE key Like the Channel List the EPG screen displays a list of the stored channels in pages of ...

Page 20: ...g with the start and finish times are displayed at the top left inside the dark blue text window Hint Not all channels broadcast all the programme information data Some channels do not provide the current and next event data and or the programme details In this case the programme names and or the details are not displayed This is not a fault with your TV Moving the highlight through the list of ch...

Page 21: ...for the cur rent or next event is too long to fit into the text window on the EPG screen a scroll bar appears on the right hand side of the window and the text can be scrolled up or down using the YEL LOW and BLUE keys on the remote control Using Red or Green keys will display the next previous 5 channels in the list Pressing the SELECT key while the next event details are displayed will set a rem...

Page 22: ... use the or keys to highlight the Language line and press SELECT key Use the or keys to highlight the soundtrack language required and press SELECT key Normal viewing with the required language soundtrack can be resumed by pressing the M key If the programme has no alternative language soundtrack broadcast the Lan guage Menu will not be available but a message No Multi Language Available is displa...

Page 23: ... require the teletext keys to be pressed to activate the digital teletext pages In both cases moving through the different pages of information is ac complished in a variety of ways dependent on the individual broad casters but including use of the and SE LECT keys to select items from on screen menus and the co loured keys to jump directly to par ticular pages You can exit any digital teletext ch...

Page 24: ...not changed by pressing DTV TV key scart mode will be automatically detected For example if a dvd player is connected to VCR scart and powered on then the IDTV will immediately switch to VCR mode The IDTV will switch to TV mode if dvd player is switched off DTV TV KEY If there is no connected VCR de vice The DTV TV key is used to toggle TV and DIGITAL TV modes When the IDTV is in TV mode the TV sc...

Page 25: ...ore than one lan guage This function selects which language soundtrack you will hear when switching to a channel broad casting with multiple soundtracks See also Everyday operation Audio Control Highlight the Audio Language line in the Configuration menu and use the or keys to cycle through the language options Return to normal TV viewing by pressing the M key i Digital terrestrial television chan...

Page 26: ...ge is activated subtitle will be displayed on the screen if any matching subtitles are available Digital teletext and subtitles can not be activated at the same time When you set the subtitle language from the configuration menu and try to activate digital teletext by pressing or colour buttons the following message appears Therefore if you want to activate the digital teletext you should set the ...

Page 27: ...IDTV is left in standby mode Both automatic upgrade methods result in standby mode either upgraded or not If the automatic upgrade is set to Disable then this function will not work Manual upgrade starts if the Search for New Version button is pressed After pressing the Search for New Version button the IDTV tunes to each frequency that have been stored in its database and looks for the new softwa...

Page 28: ...th a percentage button will indicate the status User can cancel the upgrade any time by pressing the M key If the upgrade is cancelled or any error is occurred during the loading process a warning message is displayed and user is asked to press the SELECT key for returning the last watched channel advanced operation Software Upgrade Completed searching for upgrade No new sotware was found New soft...

Page 29: ...y it will be written permanently This situation will be shown displaying a message When the upgrade is finished a message box indicating this will appear and the IDTV will go to standby in order the changes to take place advanced operation 75 ...

Page 30: ...29 advanced operation ...
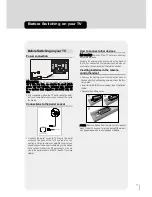
Page 31: ...isplay the Channel List The Channel List screen displays the list of channels in the TV s memory with a quarter screen image window showing the selected channel and can be used to change channels for viewing delete channels from the memory edit the name of the chan nel as it appears in the list and on screen lock a channel against view ing by younger members of the family and set up favourite chan...

Page 32: ... unrecognis able You can edit the names to suit your preferences with the Edit Name function Highlight the channel to be renamed highlight the EDIT NAME button at the base of the screen using the or keys and press SELECT key The highlighted channel name appears on the right of the screen with the first character highlighted by a cursor Any of the 16 characters that make up a channel name can be hi...

Page 33: ... 10 channels in one jump using Red or Green keys Now select the LOCK button at the base of the screen with the or keys and press SE LECT key A window requesting the PIN code is displayed and the four digit code should be entered using the num ber keys on the remote control fol lowed by the SELECT key A lock icon is then displayed along side the channel name in the chan nel list Hint The PIN is fac...

Page 34: ...the Installation Menu setting locks only the Installation menu see Advanced operation Re installation and the Disabled set ting allows free access to any of the menus You must return to normal TV view ing by pressing the M key three times to activate the lock Now any attempt to access the locked menus will display the PIN request window and the menus will only be displayed on entry of the correct ...

Page 35: ...annels only and the EPG will list the favourite channels only other channels can still be accessed by channel list number or from the Channel List menu screen Any channel can be a favourite channel and the Channel List menu is used to label those channels you want as favourites Display the Channel List menu screen by highlighting Channel List on the Main Menu and pressing SELECT key Use the or key...

Page 36: ...vated if one or more channels in the channel list are marked as favourites Similarly if the favourite status is removed from all the channels in the Channel List the favourite mode is turned off auto matically PROGRAMME REMINDERS AND TIMERS With the greatly extended channel choice that digital terrestrial television brings it is all too easy to miss a favourite programme The TV has two facilities ...

Page 37: ...set and each is displayed in the Timer screen showing the event number the channel to be selected the start time end time date and the mode whether that event is active and will be acted on or not To set an event highlight its mode button using the or keys and press SELECT key to display the timer entry window Here the five settings of chan nel name start time end time date and frequency mode can ...

Page 38: ... terrestrial TV at the time the timer event starts a message is flashed onto the screen announcing that the TV is Switching to timer channel so you understand what is happening While watching Analog TV broadcasting you can get Digital TV broadcasting from EXT 2 For this option you must set Av 2 Output in Feature menu to DIGITAL mode See Analog TV section Feature menu Start and end time of Digital ...

Page 39: ... wish to reinstate a channel previously deleted from the channel list or you want to watch new channels which have started broad casting Press the M key to display the Main Menu and using the or keys highlight the Installation line and press SELECT key to display the Installation Menu You can either perform a First Time Installation effectively resetting the TV to its ex factory condition or just ...

Page 40: ...on Tuning In ADD CHANNELS Your TV can search for channels automatically searching all the broadcast fre quencies for free to air channels or manually searching one specified broad cast frequency only for any channels to be found there Press the M key to display the Main Menu and using the or keys highlight the Installation line and press SELECT key to display the Installation Menu Highlight the Ad...

Page 41: ... analogue channel occupies that broadcast frequency If the signal quality bar is high as well then it is a digital frequency and digital channels will probably be found Again channels which duplicate those already in the channel list are ignored However the manual channel search will find all channels on the broadcast fre quency When either search is finished press the M key to return to normal br...

Page 42: ...annel is found you should then refer to the Troubleshoot er Guide to establish the cause of the problem When you have finished watching digital terrestrial TV you may wish to switch the IDTV to standby to save power even when the television is turned off without harm to the television or itself The IDTV is returned to standby by pressing the key on the remote control handset Hint In standby the TV...

Page 43: ...mes are selected for demostration so you may see different names on this Common Interface menu Our IDTV has two slots for insertion of modules however you can see up to two names of modules in this menu option Common Interface Common Interface Figure 1 Common Interface Menu with modules inserted into the slots Figure 2 Common Interface without any module inserted The user can choose one of the but...

Page 44: ...he common interface module can display a list of items channel list subscrip tion information module information etc and an inquiry message for pin control changing module ratings etc You can see List box and Inquiry box taken from the Viaccess module This section can only demonstrate a few of the modules informa tion and for each of the module you want to use you will see different names but tons...

Page 45: ...Menu and the key to highlight Language then press SELECT key to display the Language menu screen Then using the or keys on the remote control make sure that the selected language is highlighted in yellow and press the SELECT key to change the lan guage Return to the Main Menu by pressing the M key advanced operation TV SETUP To be able to go through TV menu functions you can use this item The digi...

Page 46: ...d in accordance with the menu system of your TV Functions of the menu system are described in Menu System section Volume Setting Press key to increase volume Press key to decrease volume A volume level scale slider will be displayed at the middle of the bottom on the screen Programme Selecting Previous or next programme Press P CH key to select the previous pro gramme Press P CH key to select the ...

Page 47: ...ance to the left When balance control is in mid position the cursor is displayed with one arrow 2 1 3 5 4 6 8 7 9 0 MenuSystem Your TV has been designed with a menu system to provide an easy manipulation of a multi function sys tem The TV is controlled by choosing the com mands which are displayed on the screen Press the M key The main menu will be displayed at the middle of the screen Menu To sel...

Page 48: ...d effect is set ON then the sound will be heard as if it is Stereo If the current sound system is Stereo switching this effect on will give a more spa tial sound Sound On To Change Headphone Sound Settings Using or key select Headphone Press or key or directly press OK key on Headphone to enter the Headphone menu This is a sub menu of Sound menu and all options in this menu are working as the same...

Page 49: ...the predefined options the Mode must be switched to User option The 5 items below the Mode are available to adjust the sound settings in 5 frequency values 120 Hz 500 Hz 1 5 kHz 5 kHz and 10 kHz To change the values of 5 frequency options select one of the options by or key and then press key to increase the value or key to decrease the value In mid position cursor is displayed with one arrow To s...

Page 50: ... Picture Setting Contrast Using or key select Contrast Press key to increase contrast level Press key to decrease contrast level Picture Setting Colour Using or key select Colour Press key to increase colour level Press key to decrease colour level Picture Setting Sharpness Using or key select Sharpness Press key to increase peaking level Press key to decrease peaking level Picture Setting Picture...

Page 51: ...C video source is applied Oth erwise HUE option is invisible in Picture menu Using or key select Hue Press key to increase hue level Press key to decrease hue level Center value is indicated with one arrow Picture To Store the Settings When the cursor is on any item which has no sub menu press OK key on the remote control to store the settings directly or Press or OK key on Store option to store P...

Page 52: ...ature English Av 2 Output From Av 2 Output DIGITAL TV AV 1 or AV 3 can be given DIGITAL TV AV 1 or AV 3 can be chosen by pressing or key on Av 2 Output Feature TV PC Sound Mode PC sound can be chosen by pressing or key on PC Sound Mode item You can select sound that comes from TV AV 1 AV 2 AV 3 or PC to hear in PC mode Feature PC To Store Settings In Feature menu all settings are stored automatica...

Page 53: ... you are not happy about the image on the screen Use or key on Fine Tuning item until get ting the best image on the screen Normally the Fine Tuning cursor is placed next to the left side on the slider and this is indicated with one ar row Setting VCR Video Cassette Recorder Mode This item can be seen in TV AV 1 AV 2 AV 3 S VIDEO modes If you want to watch a VCR source from one of these modes then...

Page 54: ...utostore section Autostore menu will be available Name To change the name of a programme select the pro gramme and then press the RED Name key The first letter begins to blink on the selected name To change that letter or key can be used and to select the other letters or key can be used If the cursor is at the last letter of the Pro gramme Name pressing key moves the cursor at the beginning On th...

Page 55: ...r TV to AV modes by pressing di rectly AV key or by selecting in source menu from the main menu While in AV mode you can also switch your TV to TV or other AV modes by selecting in source menu from the main menu Menu In main menu firstly use or key then use or OK key to enter Source menu In source menu move the cursor by or key and then press OK key or or keys when the cursor is on the required it...

Page 56: ...ust push both numbers within 3 seconds If the sec ond number is not entered within 3 secs the display will disappear Personal Preferences PP All the preset values will be restored when pressing PP key PP Sound Indicator The alternatives of the indicator are Mono Stereo Dual I and Dual II This indicator is displayed under the programme number indicator on the screen I II key is used to select Mono ...

Page 57: ...to Standby mode unless a signal is de tected or a command is received from the remote control After a Remote Control command if No Signal Timer is active the timer stops and if no signal detected again the timer is initialized to 5 minutes and starts 3 seconds later again to count down It is not valid in AV mode 4 31 No Signal Detection PC If no valid signal detected for 5 minutes system goes to S...

Page 58: ...trol Sound Menu In the main menu select Sound using or key then enter the Sound menu pressing or OK keys The items in this menu are described at Sound menu starting page 45 Sound Picture Menu In the Main menu select Picture using or key then enter the Picture menu pressing or OK keys All adjustment in this menu except Picture Mode is identical to adjustment defined TV picture menu on page 48 Pictu...

Page 59: ...d Pic ture To remove PC and Picture layout from the screen press PC key Feature Menu In the main menu select Feature using or key then enter the Feature menu pressing or OK keys The items in this menu are described at Feature menu starting page 49 Feature PC SOUND MODE This item selects the sound source for PC mode But when the PIP is displayed and highlighted in green border sound switches to wha...

Page 60: ...igital by pressing or OK keys PIP Source Menu This menu is available when the PIP displayed In the Main menu select PIP Source using or key then select the any available source of TV AV 1 AV 2 AV 3 S Video or Digital by pressing then OK keys TV When the TV is in TV mode only Digital mode is watched in PIP window When the TV is in Digital mode TV and AV are watched in PIP window ...

Page 61: ... g 0001 If the selected subpage is not displayed in a short time press key TV programme will be dis played on the screen Teletext page number will be displayed on the upper left corner of the screen when the selected page is found Press key to display the selected Teletext page Teletext is an information system that displays text on your TV screen Using the Teletext information system you can view...

Page 62: ...t screen forward one page at a time Press P CH key to move the Teletext screen backward one page at a time For Fastext The subject heading for the information may have a particular colour Press an appropriate Red Green Yellow or Blue key in order to reach the relevant page quickly To exit Teletext Press TV or key The screen will switch to TV mode To Display the Time While watching a TV programme w...

Page 63: ...ls like vid eo recorders or decoders but the device you want to connect does not have Euroconnector you should connect it to the Aerial input of your TV set If the VCR is connected via aerial input it is suggested to use the Programme 0 Decoder Cable TV offers you a wide choice of programmes Most of them are free others are to be paid for by the viewer This means that you will need to subscribe to...

Page 64: ... L white inputs You should connect the jacks to the input in the same colour Connect the decoder to the video recorder Some video recorders have a special euroconnector for decoder Connect a eurocable to the euroconnector of your decoder and to the special euroconnector of your video recorder See also the handbook of your video recorder To connect your video recorder to the TV see TV and Video Rec...

Page 65: ... RECEI VER VI D EO H EAD PH ON E optional AU D I O ANT IN CAM ERA EXTERNAL SPEAKER optional VHF UHF 75W VHF UHF Aerial VHF Aerial Round 75 ohm coaxial cable Round 75 ohm coaxial cable Flat 300 ohm twin lead cable Rear of TV Rear of TV Outdoor Aerial Connections VHF UHF 75W ...

Page 66: ...des Horizontal Vertical Hor kHz Ver Hz Hor Ver 1 640 400 31 5 70 2 640 480 31 5 60 3 640 480 37 9 72 4 640 480 37 5 75 5 720 400 31 5 70 6 800 600 35 2 56 7 800 600 37 9 60 8 800 600 48 1 72 9 800 600 46 9 75 10 1024 768 48 4 60 11 1024 768 56 5 70 12 1024 768 60 0 75 13 1280 720 44 8 60 Sync Polarity Mode Frequency Resolution The resolution of the TFT LCD Panel is 1280 x 720 Therefore using Mode ...

Page 67: ...or mode Care of the Screen Clean the screen with a slightly damp soft cloth Do not use abrasive solvents as they may damage the TV screen coating layer Colours of image on screen are abnormal For TV Have you selected the correct TV system Is your TV set or house aerial located too close to the loudspeakers non earthed audio equipment or neon lights etc Mountains or high buildings can cause double ...

Page 68: ...ly and correctly con nected to the 15 pin Video Connector on the rear panel of the Computer Check that Video Card is firmly seated in card slot of Computer motherboard Check that the Brightness and or the Contrast adjustments of the Display have not been turned down to minimum levels Sound You can not hear any sound Did you perhaps interrupt the sound pressing key Are external speakers connected t...

Page 69: ...onnector 15 pin mini D cable PANEL Size 22 56 cm diagonal Displayable Resolution 1280 x 720 maximum Non interlaced Active Display Area 487 68 mm horizontal x 274 32 mm Vertical NUMBER OF PRESET CHANNELS 100 CHANNEL INDICATOR On Screen Display RF AERIAL INPUT 75 Ohm unbalanced OPERATING VOLTAGE For adaptor 220 240 V AC 50 Hz For TV 15 V DC AUDIO Nicam Stereo AUDIO OUTPUT POWER 2 x 3 WRMS 10 THD POW...

Page 70: ... modified by any person other than an Hitachi authorised engineer iii The product serial number has not been removed or altered This guarantee does not apply to product acquired second hand or for commercial or communal use This guarantee does not cover the replacement of exhausted batteries the adjustment of user con trols or aerial alignment Any parts replaced under this guarantee shall become t...

Page 71: ...47 Milano Italia ITALY Tel 39 02 487861 Tel 39 02 38073415 Servizio Clienti Fax 39 02 48786381 2 Email customerservice italy hitachi eu com HITACHI Europe AB Box 77 S 164 94 Kista SWEDEN Tel 46 0 8 562 711 00 Fax 46 0 8 562 711 13 Email csgswe hitachi eu com HITACHI EUROPE S A S Lyon Office B P 45 69671 BRON CEDEX FRANCE Tel 33 04 72 14 29 70 Fax 33 04 72 14 29 99 Email france consommateur hitachi...

Reviews: