background image

English

   - 26 -

For any help concerning set up and use of your TV please call the Customer Helpline: 

0345 604 0105 

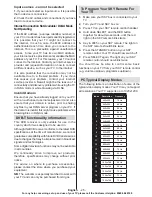
21

1024x768

85Hz

22

1152x864

60Hz

23

1152x864

70Hz

24

1152x864

75Hz

25

1152x864

85Hz

26

1152x870

75Hz

27

1280x768

60Hz

28

1360x768

60Hz

29

1280x768

75Hz

30

1280x768

85Hz

31

1280x960

60Hz

32

1280x960

75Hz

33

1280x960

85Hz

34

1280x1024

60Hz

35

1280x1024

75Hz

36

1280x1024

85Hz

37

1400x1050

60Hz

38

1400x1050

75Hz

39

1400x1050

85Hz

40

1440x900

60Hz

41

1440x900

75Hz

42

1600x1200

60Hz

43

1680x1050

60Hz

44

1920x1080

60Hz

45

1920x1200

60Hz

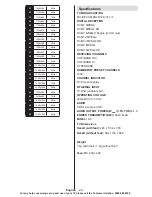
Specifications 

TV BROADCASTING

PAL/SECAM B/G D/K K’ I/I’ L/L’

DIGITAL RECEPTION

DVB-T MPEG2
DVB-T MPEG4 HD

DVB-T MHEG-5 Engine (for UK only)

DVB-T2 MPEG2
DVB-T2 MPEG4 HD
DVB-C MPEG2
DVB-C MPEG4 HD

RECEIVING CHANNELS

VHF (BAND I/III)
UHF (BAND U)
HYPERBAND

NUMBER OF PRESET CHANNELS

1000

CHANNEL INDICATOR

On Screen Display

RF AERIAL INPUT

75 Ohm (unbalanced)

OPERATING VOLTAGE

220-240V AC, 50 Hz.

AUDIO

SRS Trusurround HD

AUDIO OUTPUT POWER (W

RMS.

) (10% THD) 

2 x 8

POWER CONSUMPTION (W) 

100 W (max)

PANEL 

16:9

TV Dimensions
DxLxH (with foot): 

220 x 1134 x 705

DxLxH (without foot): 

80 x 1134 x 666

Weight

? kg (with foot) / ? kg (without foot)

Vesa: 

M6  400 x 400


Summary of Contents for 42HXT12U

Page 1: ......

Page 2: ...ng to a Wired Network 19 Connecting to a Wireless Network 19 Configuring Network Settings 20 Configuring Wired Device Settings 20 Network Type 20 Configuration Status 20 IP Address 20 Configuring Wired Network Settings in Advanced Mode 20 Configuring Wireless Device Settings Optional 20 Information 21 Connecting to your Cell Phone via WiFi Optional 21 Connectivity Troubleshooting 22 Wireless Netwo...

Page 3: ...s appliance is not intended for use by persons including children with reduced physical sensory or mental capabilities or lack of experience and knowledge unless they have been given supervision or instructions concerning use of the appliance by a person responsible for their safety Children should be supervised to ensure that they do not play with the appliance Children may not recognize dangers ...

Page 4: ...over To prevent damage to the TV do not place any objects on top of the TV Only use the TV in moderate climates Power cord and plug Do not place the set a piece of furniture etc on the power cord mains lead or pinch the cord Handle the power cord by the plug Do not unplug the appliance by pulling from the power cord and never touch the power cord with wet hands as this could cause a short circuit ...

Page 5: ...n t try to recharge non rechargeable batteries and under no circumstances throw them into fire Danger of explosion Do not use unequal batteries old and new Alkaline and carbon etc simultaneously If you will not use the device for a long time remove the batteries and store the device in a dry and dust free place Improper use of batteries may cause an explosion or leakage If the batteries have leake...

Page 6: ...ngs on the appliance and restrictions are displayed like this Read this information strictly in order to operate the system correctly and avoid damage NOTE Information about the operation and additional explanations are marked like this To be aware of such information is recommended to ensure that the functions can be used optimally The illustrations and the OSD in this operation manual are for ex...

Page 7: ...uding that lost remote control Any other technical issues you may need assistance with Call us today 0 345 604 0105 Local call rates applies Lines open 9am 8pm Monday to Saturday and 10am 4pm Sunday Calls to Argos enquiry lines may attract a charge and set up fee from residential lines depending on your call plan tariff Mobile and other providers costs may vary see www bt com pricing for details F...

Page 8: ...s highly recommended that you activate the Power Save Mode setting to reduce your annual power consumption And also it is recommended to disconnect the TV from the mains plug to save energy more when you do not use Please help us to save environment by following these steps Repair Information Please refer all servicing to qualified personnel Only qualified personnel must repair the TV Please conta...

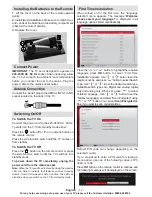
Page 9: ... up or down To change source Press the middle of the button twice the source list will appear on screen Scroll through the available sources by pushing the button up or down To turn the TV off Press the middle of the button down and hold it down for a few seconds the TV will turn into standby mode NOTE You can move the switch upward or downward to change the volume If you want to change the channe...

Page 10: ...low button 31 Subtitle on off 32 Rapid advance in media browser mode 33 Stop in media browser mode 34 Pause in media browser mode 35 Media browser 36 Launches Youtube 37 Standby button 38 Function LED Using My button 1 This button s main function is to run Youtube link However if you want to change this function you can pressMYBUTTON1 forfivesecondswhenonadesired source channel or link until the M...

Page 11: ...sing the wall mounting kit optional we recommend that you plug all your cables into the back of the TV before mounting on the wall Insert or remove the CI module only when the TV is SWITCHED OFF You should refer to the module instruction manual for details of the settings Insert the CAM and then the viewing card to the slot that is located in the terminal cover at the rear side of the TV The modul...

Page 12: ...r the TV terminal may be damaged if the CAM is forcefully inserted 4 Connect the TV to the mains supply switch on and then wait for few moments until the card is activated 5 When no module is inserted No Common Interface module detected message appears on the screen You can refer to the module instruction manual for details of the settings CAM module Standby Notifications If the TV does not receiv...

Page 13: ...dby mode To power down the TV completely unplug the power cord from the mains socket Note When the TV is switched to standby mode the standby LED can blink to indicate that features such as Standby Search Over Air Download or Timer is active The LED can also blink when you switch on the TV from standby mode First Time Installation When turned on for the first time the language selection menu appea...

Page 14: ...stallation If you mistakenly select Cable please repeat the First Time Installation which can be selected from the tuning menu and select Aerial Media Playback via USB Input You can connect a USB hard disk drive or USB memory stick to your TV by using the USB inputs of the TV This feature allows you to play files stored in a USB drive 2 5 and 3 5 inch hdd with external power supply external hard d...

Page 15: ... List to manage all stored channels Use Up or Down and OK buttons to select Edit Channel List Press Up or Down button to select the channel that will be processed Press Left or Right button to select a function on Channel List menu Use P P buttons to move page up or down Press MENU button to exit Sorting Channel List You can select broadcasts to be listed in the channel list To display specific ty...

Page 16: ...ttings Other Settings menu The TV supports also ARC Audio Return Channel feature This feature is an audio link meant to replace other cables between the TV and the audio system A V receiver or speaker system WhenARC is active TV does not mute its other audio outputs automatically So you need to decrease TV volume to zero manually if you want to hear audio from connected audio device only same as o...

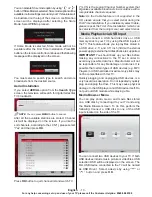
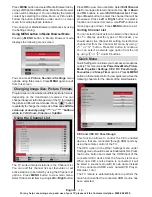
Page 17: ... Low Medium High or Off Colour Temp Sets the desired colour tone Picture Zoom Sets the picture size toAuto 16 9 Subtitle 14 9 14 9 Zoom 4 3 or Cinema HDMI True Black While watching from HDMI source this feature will be visible in the Picture Settings menu You can use this feature to enhance blackness in the picture Film Mode Films are recorded at a different number of frames per second to normal t...

Page 18: ...nd to obtain fixed output level between programmes For instance volume level of advertisements tend to be louder than programmes Dynamic Bass Enables or disables the Dynamic Bass SRS TruSurround HD Enables or disables the SRS TruSurround HD When activated some features in the Sound menu can not be altered Digital Out Sets digital out audio type Install and Retune Menu Contents Automatic Channel Sc...

Page 19: ...use this feature only if the broadcaster supports that additional narration track Auto TV Off You can set the timeout value of auto off feature After the timeout value is reached and the Tv is not operated for selected time the TV will go off Standby Search optional If you change Standby Search to Off this function will be unavailable To use Standby search please make sure that you select Standby ...

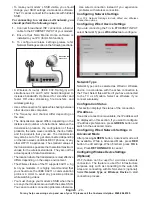
Page 20: ...nection ethernet cable to the ETHERNET INPUT of your modem Ensure that Nero Media Home software is installed to your PC for DLNA function See Appendix G for more information on the installation process Afterwards you should connect your PC to the one of your modem s LAN connectors e g LAN 1 by using a proper LAN cable Use another LAN output of your modem e g LAN 2 to enable the connection to your ...

Page 21: ... connect to the networks with hidden SSID For connecting to a wireless LAN network you should perform the following steps 1 Connect broadband ISP connection ethernet cable to the ETHERNET INPUT of your modem 2 Ensure that Nero Media Home software is installed to your PC for DLNA function 3 To configure wireless settings please refer Network Settings section in the following sections Wireless Lan A...

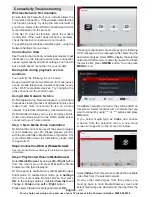
Page 22: ...isplays wi fi status as connected or not connected IP Address Displays the current IP address Network Name Connected networks name will be displayed Press GREEN button to switch to advanced mode and then press OK button to edit settings Delete Saved Wifi Profiles Saved profiles will be deleted if you press red button while wireless device selection osd is on the screen Connecting to your Cell Phon...

Page 23: ...nnected to your home network Step 1 Nero Media Home Installation DLNA function cannot be used if the server program is not installed on your PC Please prepare your PC with the provided Nero Media Home programme For more information about the installation please refer to appendix H Step2 ConnecttoaWiredorWirelessNetwork See the chapter Network Settings for detailed configuration information Step 3 ...

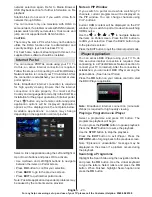
Page 24: ...n Press OK button to confirm your selection Press BACK to go to the previous screen Press EXIT to quit internet portal mode Note Possible application dependent problems may be caused by the content service provider Note on PIP Window If you switch to portal mode while watching TV channels current programme will be displayed on the PIP window You can change channels using P P buttons Current HDMI c...

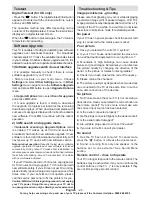
Page 25: ...nplug power for 10 minutes and re plug again TV should open with new software safely If you still can not get TV working please kindly repeat unplug and plug sequence a few times more If your set still can not operate please call the service personnel to fix the problem for you Caution While led is blinking during reboot do not unplug your TV s power Doing this may cause your TV not to re open aga...

Page 26: ...try which it was designed to be used in Although this DVB receiver conforms to the latest DVB specifications at the time of manufacture we cannot guarantee compatibility with future DVB transmissions due to changes that may be implemented in broadcast signals and technologies Some digital television functions may not be available in all countries We continually strive to improve our products there...

Page 27: ...00 60Hz 43 1680x1050 60Hz 44 1920x1080 60Hz 45 1920x1200 60Hz Specifications TV BROADCASTING PAL SECAM B G D K K I I L L DIGITAL RECEPTION DVB T MPEG2 DVB T MPEG4 HD DVB T MHEG 5 Engine for UK only DVB T2 MPEG2 DVB T2 MPEG4 HD DVB C MPEG2 DVB C MPEG4 HD RECEIVING CHANNELS VHF BAND I III UHF BAND U HYPERBAND NUMBER OF PRESET CHANNELS 1000 CHANNEL INDICATOR On Screen Display RF AERIAL INPUT 75 Ohm u...

Page 28: ...tteries including those which are heavy metal free should not be disposed of with household waste Please dispose of used battery in an environment friendly manner Find out about the legal regulations which apply in your area Don t try to recharge batteries Danger of explosion Replace batteries only with the same or equivalent type The above mark is in compliance with the Waste Electrical and Elect...

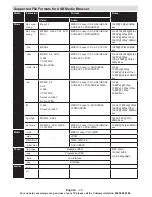
Page 29: ...25fps 1080P 50fps Other 1080P 30fps 50Mbit sec mp4 mov MPEG1 2 Layer 3 AAC HEAAC AC3 EAC3 LPCM ADPCM H 264 1080Px2 25fps 1080P 50fps Other 1080P 30fps 50Mbit sec avi MPEG1 2 4 Xvid H 264 VC1 WMV3 Sorenson H 263 Motion JPEG MPEG1 2 Layer 1 2 3 AAC HEAAC AC3 EAC3 LPCM ADPCM WMA H 264 1080Px2 25fps 1080P 50fps Other 1080P 30fps 50Mbit sec flv H 264 Sorenson H 263 MPEG1 2 Layer 3 AAC HEAAC LPCM ADPCM ...

Page 30: ... TV s connectors by using DVI converter cables not supplied you can refer to the following resolution information 56Hz 60Hz 66Hz 70Hz 72Hz 75Hz 640x400 þ 640x480 þ þ þ þ 800x600 þ þ þ þ þ 832x624 þ 1024x768 þ þ þ þ þ 1152x864 þ þ þ 1152x870 þ 1280x768 þ 1360x768 þ þ 1280x960 þ þ 1280x1024 þ þ 1400x1050 þ þ 1440x900 þ þ 1600x1200 þ 1680x1050 þ 1920x1080 þ 1920x1200 þ ...

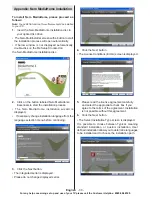
Page 31: ...e Essentials to start the installation process The Nero MediaHome installation wizard is displayed If necessary change installation language from the language selection menu before continuing 3 Click the Next button The integrated serial is displayed Please do not change displayed serial 4 Click the Next button The License Conditions EULA screen is displayed 5 Please read the license agreement car...

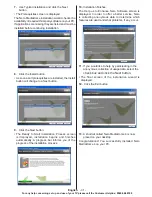
Page 32: ...e Ready to Start Installation Process screen is displayed installation begins and finishes automatically A progress bar informs you of the progress of the installation process 10 Installation finishes The Help us to Enhance Nero Software screen is displayed In order to offer a better service Nero is collecting anonymous data to determine which features are used and what problems if any occur 11 If...

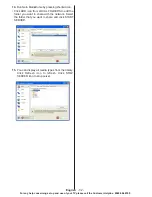
Page 33: ...un Nero MediaHome by pressing shortcut icon Click ADD icon from LOCAL FOLDERS to add the folder you want to share with the network Select the folder that you want to share and click START SERVER 15 You can display all media types from the library Click Refresh icon to refresh Click STOP SERVER icon to stop server ...

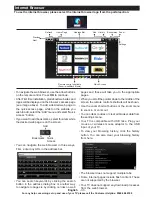
Page 34: ...s First enter any URL in the address bar You can search keywords by clicking the search button in the address dialog box or another way to navigate to pages is by clicking on links on web pages and these will take you to the appropriate pages When you scroll the pointer down to the middle of the screen the remote control s shortcuts will be shown Use the zoom shortcut buttons or the zoom menu to z...

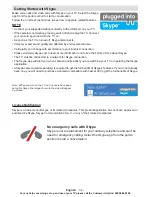
Page 35: ...ion and to see the Terms of Use about Skype The TV must be connected to a network for Skype connection The Skype app will alert you when someone calls whilst you are watching your TV or operating the Skype application A Skype camera sold separately is required to get the full benefit of Skype s features If you do not already have one you will need to purchase a camera compatible with Vesca100 to g...

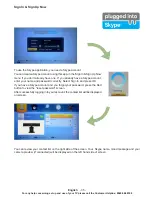
Page 36: ...ne If you already have a Skype account enter your name and password correctly Select Sign In and press OK If you have a Skype account and you forgot your password press the Red button to view the reset password screen After successfully logging in to your account the contact list will be displayed on screen You can review your contact list on the right side of the screen Your Skype name mood messa...

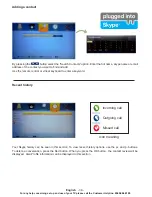
Page 37: ...he contact you want to find and add Use the remote control or virtual keyboard to enter a keyword Your Skype history can be seen in this section To view recent history options use the p and p buttons To delete a conversation press the Red button When you press the OK button the contact review will be displayed Also Profile information can be displayed in this section Recent history Incoming call O...

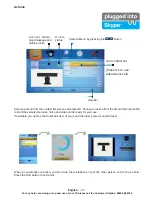
Page 38: ...lected process Voice and video call is ready for your use If available you will see the thumbnail view of yours and the other person s camera feed Help bar Your contact list Press Ok to use video voice call Select a Menu by pressing the button Online status Account Name mood message and profile picture When a conversation is active you can mute the microphone or put the other person on the line on...

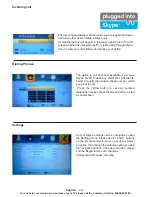
Page 39: ...ll dialog is shown when you are logged into Skype and when other users initiate a Skype call A small dialog box will appear in the lower right corner of the TV screen whether the user watches TV or is browsing through Skype Use the remote control button and choose your action Incoming call Settings All your Skype settings can be changed by using the Settings menu Please use P and P buttons on the ...

Page 40: ...t must be correctly installed and operated in accordance with the instructions contained in this manual It must be used solely for domestic purpose The guarantee will be rendered invalided if the product is re sold or has been damaged by inexpert repair Specifications are subject to change without notice The manufacturer disclaims any liability for the incidental or consequential damages The guara...

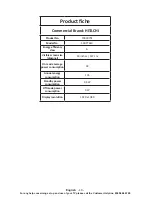
Page 41: ... Product fiche Commercial Brand HITACHI Product No 10090755 Model No 50HYT62U Energy efficiency class A Visible screen size diagonal 50 inches 127 cm On mode average power consumption 93 Annual energy consumption 135 Standby power consumption 0 5W Off mode power consumption 0 W Display resolution 1920 x 1080 ...

Page 42: ......

Page 43: ......

Page 44: ......

Page 45: ......

Page 46: ......

Page 47: ......

Reviews: