Disconnect this sensor
connector only
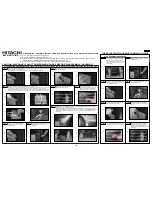
DISASSEMBLY / ASSEMBLY INSTRUCTIONS FOR HITACHI 65 INCH SPLIT PROJECTION TELEVISION
THESE INSTRUCTIONS MUST REMAIN ON UNIT
IMPORTANT POINTS:
(a)
Do not attempt to perform this work by yourself.
(b)
Request an installation specialist to install this unit.
(c)
HITACHI assumes no responsibility or liability for injury/damage as a result of consumer installation and handling. Be advised that
improper consumer installation/handling is not covered by manufacturer’s warranty.
(d)
This Projection Television weighs over 340 pounds and has many sensitive components.
1 - SEPARATION PROCEDURE (Note: read all instructions and understand how to properly and safely disassemble and assemble unit)
2 - RE-ASSEMBLY PROCEDURE
STEP 1 Before disassembling this projection TV set, you must first remove the pocket handle located
on the right side of the set (Rear View).
Remove the four (4) Phillips head screws using a No. 2 Phillips head screwdriver.
STEP 2
Caution: Make sure TV set is disconnected from main power source.
There are four (4) low voltage connectors located on the sensor board (see 2b). You will be required
to only disconnect the rear sensor connector (the connector nearest to the opening, see 2b).
Through the pocket handle opening locate the rear sensor connector (see 2a). Press the connector
locking tab and gently pull the connector upwards using your thumb and forefinger (see 2c and 2d).
STEP 3
Install the pocket handle and secure it
using the Phillips screws, which were
removed in step 1.
(a)
(b)
(a)
(b)
(c)
(a)
STEP 4
Remove the joint connector bolts (4pcs) on
each side panel using the allen key
supplied.
(a)
(d)
(Pocket Handle Opening)
STEP 5 Remove only the top five (5) screws from the lower rear cover (as shown by the “arrows” on
the rear cabinet label).
(a)
(b)
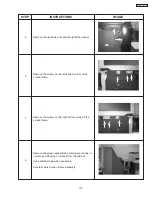
STEP 6
Carefully remove the speaker grille by
grasping the sides and pulling.
(a)
STEP 7
Remove left and right (8
1/2
” x 24”
rectangular) plastic side post by unscrewing
the two inner screws on the side post.
Remove side post by sliding it outwards.
(a)
Remove the pocket handle located on the
right side of the set (rear view), using the
same procedure as step 1.
(a)
Re-connect the sensor connector to the
sensor board (see step 2).
(a)
STEP 8
Caution: When TV is separated, top portion weights 140 lbs. Use a minimum of two (2) people to
carry top portion when separating this TV.
Remove the top cabinet by grasping the pocket handle and the bottom of the front frame and lift
upwards. Gently place the top cabinet on the flat floor. This assembly contains fragile items, such as:
glass mirror and viewing screen. Avoid any type of impact that could cause breakage of these
components.
(a)
(b)
(c)
(d)
STEP 9
To re-assemble the set, lower the top cabinet
onto the bottom cabinet, aligning the two
dowels of the bottom cabinet with the two
holes in underside of the top cabinet. Gently
lower the top cabinet until it seats flush on
bottom cabinet.
STEP 10
Re-install the joint connector bolts (4pcs).
which were removed in step 4, using the
supplied allen key.
(a)
STEP 11
Re-assemble the pocket handle to the
cabinet with all four (4) screws.
(a)
STEP 13
Re-install the top five (5) screws into the
lower rear cover, which were removed in
step 5.
(a)
STEP 14
To re-install the side post, secure it using
the screws which were removed in step 7.
(a)
STEP 15
Re-install the speaker grille. Perform the
“MAGIC FOCUS” feature (see “Set Up”
procedure in your instruction manual).
This completes the Disassembly / Assembly
instructions.
(a)
STEP 16
STEP 12
CAUTION: DISCONNECT UNIT FROM POWER SOURCE BEFORE DISASSEMBLY / ASSEMBLY
(a)
18
3
DP27/27D
Summary of Contents for 51SWX20B
Page 55: ...55 DP27 27D SIGNAL BLOCK ASSEMBLY BACK TO ADJUSTMENTS ...
Page 56: ...56 DP27 27D DEFLECTION P W B BACK TO ADJUSTMENTS ...
Page 57: ...57 DP27 27D POWER SUPPLY P W B BACK TO ADJUSTMENTS ...
Page 58: ...58 DP27 27D CPT P W B BACK TO ADJUSTMENTS ...
Page 59: ...59 DP27 27D CONTROL P W B BACK TO ADJUSTMENTS ...
Page 60: ...60 DP27 27D TROUBLE SHOOTING FLOWCHART 1 NO RASTER AND NO POWER How to check LED s Diagnosis ...
Page 61: ...61 DP27 27D TROUBLE SHOOTING FLOWCHART ...
Page 62: ...62 DP27 27D TROUBLE SHOOTING FLOWCHART ...
Page 83: ...83 DP27 27D DP2X Protection Circuit Block Diagram Deflection Power Supply ...
Page 84: ...84 DP27 27D DP1X Protection Circuit Block Diagram Signal Power Supply ...
Page 96: ......
Page 97: ......
Page 98: ......
Page 99: ......
Page 100: ......
Page 101: ......
Page 102: ......
Page 103: ......
Page 104: ......
Page 105: ......
Page 106: ......
Page 107: ......
Page 108: ......
Page 109: ......
Page 110: ......
Page 111: ......
Page 189: ...DP27 27D ...


