background image

Presetting Radio Stations ....................................................................................................................... 24
Selecting Programmed Radio Station ............................................................................................... 25
FM Display Modes ..................................................................................................................................... 25

Compatible Disc Types .......................................................................................................26
CD/MP3/WMA Operation ...................................................................................................26

Playback ........................................................................................................................................................ 26
To Pause Playback ..................................................................................................................................... 26
To Stop Playback ........................................................................................................................................ 26
Skipping to Another Track ..................................................................................................................... 26
Selecting and Album (MP3/WMA) ...................................................................................................... 27
Shuffle Playback ......................................................................................................................................... 27
Repeat Playback ......................................................................................................................................... 27
Repeat A-B ................................................................................................................................................... 27
Programme Setting .................................................................................................................................. 27
Programme Cancel ................................................................................................................................... 27
ID3 Information (MP3/WMA)................................................................................................................. 28

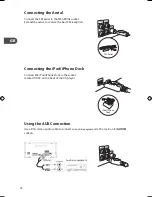
iPod/iPhone Operation ......................................................................................................28

iPod/iPhone Compatibility .................................................................................................................... 28
Inserting the iPod/iPhone and Selecting iPod/iPhone Mode ................................................... 28
Playing your iPod/iPhone ....................................................................................................................... 28
Navigating iPod/iPhone Menus ........................................................................................................... 29
Charging your iPod/iPhone ................................................................................................................... 29

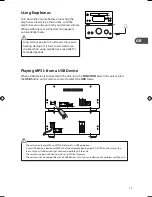
USB Operation ....................................................................................................................30
AUX Operation ....................................................................................................................30
Maintenance .......................................................................................................................31

Cleaning the Unit ...................................................................................................................................... 31
Handling Discs ............................................................................................................................................ 31
Cleaning Discs ............................................................................................................................................ 31
Storing Discs ............................................................................................................................................... 31

Hints and Tips .....................................................................................................................32
Specifications ......................................................................................................................33

AXM1205E_IB_01GB_121112_Michelle.indd   4

12/11/2012   5:48 PM

Summary of Contents for AXM1205E

Page 1: ...Instruction Manual AXM1205E Micro HI FI System with docking for iPhone iPod GB iPhone and iPod not included ...

Page 2: ......

Page 3: ...s 19 Playing MP3 s from a USB Device 19 Connecting to the Mains Supply 20 General Operation 21 Powering ON OFF 21 ECO Power Mode 21 Selecting Functions 21 Auto Setting the Clock 21 Manual Setting the Clock 21 Displaying the Clock 22 Sleep Timer 22 Setting the Daily Timer 22 Switching the Alarm off 23 Adjusting the Sound Effect 23 Adjusting the Bass 23 Adjusting the Treble 23 Selecting Super Bass 2...

Page 4: ... 27 Repeat Playback 27 Repeat A B 27 Programme Setting 27 Programme Cancel 27 ID3 Information MP3 WMA 28 iPod iPhone Operation 28 iPod iPhone Compatibility 28 Inserting the iPod iPhone and Selecting iPod iPhone Mode 28 Playing your iPod iPhone 28 Navigating iPod iPhone Menus 29 Charging your iPod iPhone 29 USB Operation 30 AUX Operation 30 Maintenance 31 Cleaning the Unit 31 Handling Discs 31 Clea...

Page 5: ...r splashing or objects filled with liquids such as vases to be placed on the equipment DON T place hot objects or naked flame sources such as lighted candles or nightlights on or close to equipment High temperatures can melt plastic and lead to fires DON T use makeshift stands and NEVER fix legs with wood screws to ensure complete safety always fit the manufacturer s approved stand or legs with th...

Page 6: ...herwise the batteries may leak and cause damage Store unused batteries in their packaging and away from metal objects which may cause a short circuit resulting in leakage or in extreme cases fire or even an explosion Never dispose of batteries in fire as this can cause them to explode Please recycle dead batteries do not put with the normal household waste Supervise children if they are replacing ...

Page 7: ...unit it can cause serious damage Switch it off at the mains immediately Withdraw the mains plug and consult your dealer Ventilation To prevent the risk of electric shock or fire hazard due to overheating ensure that curtains and other materials do not obstruct the ventilation vents Do not install or place this unit in a bookcase built in cabinet or in another confined space Ensure the unit is well...

Page 8: ...IC SHOCK DO NOT OPEN The lightning flash with arrowhead symbol within an equilateral triangle is intended to alert the user to the presence of uninsulated dangerous voltage within the unit s enclosure that may be of sufficient magnitude to constitute a risk of electric shock The exclamation point within an equilateral triangle is intended to alert the user to the presence of important operating an...

Page 9: ...ing this instruction manual so that you fully understand all the operational features it offers You will also find some hints and tips to help you resolve any issues Read all the safety instructions carefully before use and keep this instruction manual for future reference The Main Unit Instruction Manual Quick Start Guide Remote Control MENU VOL VOL MUTE SOURCE PROG RANDOM REPEAT DISPLAY DIM CLOC...

Page 10: ...ys pauses resumes playback 5 DISC EJECT Button Ejects a disc from CD compartment 6 SKIP SEARCH Button Skips forwards to the next track 7 SKIP SEARCH Button Skips backwards to the beginning of the track or to the previous track 8 LCD Display 9 Remote Control Sensor Receives signal from the remote control 10 MODE Button Repeat a track s in CD mode 11 CLOCK Button Sets up the clock Displays the curre...

Page 11: ...bbon cable between the cable socket on the CD player and the amplifier 3 Dock Socket Connects the iPod iPhone dock 4 AUX IN 1 L R Sockets Connects an external media device 5 AUX IN 2 L R Sockets Connects an external media device 6 FM Aerial Socket Connects the FM aerial 1 2 3 4 5 6 11 ...

Page 12: ...UME Dial Adjusts the volume level 4 FUNCTION Dial Switches between the DISC USB TUNER DOCK AUX1 and AUX2 modes 5 Headphones Socket 2 1 3 4 5 1 Power Cable 2 CABLE Socket Connects the ribbon cable between the cable socket on the CD player and the amplifier 3 SPEAKER OUTPUT L R Sockets Connects to speakers 1 2 3 12 ...

Page 13: ...ext track Allows fast forwarding of the current track Selects next preset radio station 6 Button Navigates down to select an item on the iPhone iPod menu screen Searches for a radio station going backwards through accessible radio frequencies Selects MP3 WMA album 7 MENU Button Return to previous menu on the iPhone iPod menu screen 8 MUTE Button Silences the unit or restores the sound Remote Contr...

Page 14: ...ks or music files 18 DISPLAY Button Displays CD playback information Displays current radio selection information 19 A B Button Repeats a section of a CD track 20 LOUDNESS Button Adjusts the bass at low volume 21 TIMER SLEEP Button Sets up an alarm Sets up a sleep timer 22 DIM Button Selects display brightness level MENU VOL VOL MUTE FUNCTION PROG SHUFFLE REPEAT DISPLAY DIM CLOCK S BASS TIMER SLEE...

Page 15: ... remote control on a wet object Do not place the remote control under direct sunlight or near sources of excessive heat Remove the battery from the remote control when not in use for a long period of time as corrosion or battery leakage may occur and result in physical injury and or property damage and or fire Removing the Plastic Strip from the Remote Control Remove the protective plastic strip f...

Page 16: ...d cause fire personal injury or damage property Install the battery correctly in the battery compartment Normally the battery s positive polarity will face up When the battery is exhausted the remote control will not function Only use the battery type indicated in this manual Do not dispose of the used battery as domestic waste Dispose of it in accordance with local regulations Small button cell b...

Page 17: ...onnect the connection cable to the cable sockets on the Amplifier and the CD player Connecting the Speakers Connect the speaker cables at the back of the speakers to the SPEAKER OUTPUT L R sockets at the rear of the unit CABLE SPEAKER OUTPUT 4Ω L R Ribbon Cable Ensure all connections are connected before connecting to the mains power socket Ribbon Cable 17 ...

Page 18: ...nect the FM aerial to the FM AERIAL socket Extend the aerial to receive the best FM reception FM ANTENNA AUXIN2 AUXIN1 L R R L DOCK FM Aerial iPod iPhone Dock FM ANTENNA AUXIN2 AUXIN1 L R R L Auxiliary equipment Red White Using the AUX Connection Use a RCA stereo audio cable to connect an auxiliary equipment to the main unit s AUX IN sockets 18 ...

Page 19: ...be compatible with the unit The unit can support USB devices with up to 32GB of memory The unit may not be compatible with all USB devices this is not an indication of a problem with the unit DOCK AUX IN2 AUX IN1 AERIAL Using Earphones Turn down the volume before connecting the earphones Slowly raise the volume with the earphones on until you reach your desired volume When earphones are connected ...

Page 20: ...damage to the unit Unwind the mains cable to its full length Connect the mains plug to a mains socket Make sure the mains plug is fully inserted into the mains socket The unit is now connected and ready to use To switch the unit off completely remove the mains plug from the mains socket Ensure all connections are connected before connecting to the mains socket 20 ...

Page 21: ...isplay will disappear after 90 seconds The STANDBY button glows red when the unit is in ECO Power mode If the unit is idle for more than 15 minutes it will automatically switch to ECO Power mode Selecting Functions Turn the FUNCTION dial on the unit or press the FUNCTION button on the remote control to switch between DISC USB TUNER DOCK AUX1 and AUX2 modes Auto Setting the Clock In TUNER mode pres...

Page 22: ...to switch the unit on and then off 1 In standby mode press and hold the TIMER SLEEP button The words TIMER SET will scroll across the display 2 Press the FUNCTION button to select DISC USB TUNER DOCK modes Then press the TIMER SLEEP button If you select TUNER mode make sure you have selected the radio station you want to be woken up to first If you have selected DISC mode make sure you have a CD i...

Page 23: ...justing the Bass Turn the BASS dial to adjust the bass level The level will show on the display Adjusting the Treble Turn the TREBLE dial to adjust the treble level The level will show on the display Selecting Super Bass To add more bass you can press the S BASS button The word BASS will be displayed To switch off Super Bass press the S BASS button again Selecting the Loudness Effect This setting ...

Page 24: ...trol repeatedly Each press will adjust the frequency by 0 05MHz If reception is still poor adjust the position of the aerial or try moving the radio to another location Audio Mode Press the SELECT button repeatedly to switch between STEREO or MONO modes The display will show FM ST for stereo mode and FM MONO for mono mode The unit will automatically switch between stereo and mono mode when stereo ...

Page 25: ...ot erase it Storing a new station in a preset location will erase the previously stored station in that location FM Display Modes Every time you press the DISPLAY button the display will cycle through the following display modes Station Name Programme Type Time Radio Text Frequency The information is displayed on the lower segment of the display Station Name When an RDS station is received the nam...

Page 26: ...tically This unit can play CD CD R CD RW MP3 WMA disc 8cm and Multi sectioned of MP3 DISCS The unit also supports Playback Transfer Rate in 32 320 kbps for MP3 and 64 320 kbps for WMA Max Readable Folders 99 and 999 tracks The unit cannot play WMA files protected by DRM FILE If there is no disc or the disc can t be read NO DISC will show on the display To Pause Playback 1 Press the button to pause...

Page 27: ...P will disappear from the display Repeat A B You can repeat a section of a track While a track is playing press the A B button This is the start point of the section you want to repeat Press the A B button again to select the end point of the repeated section The selected section will now continued to be repeated until you press A B again Programme Setting You can program up to 20 tracks in DISC m...

Page 28: ...e iPod iPhone dock 3 If the iPod iPhone is connected the display will show iPOD it will take around 5 seconds for the unit to identify the iPod iPhone 4 Press the button on the unit or the remote control to playback the current track 5 Select your desired music or videos etc and play the connected iPod iPhone as usual Playing your iPod iPhone Make sure your iPod iPhone is inserted into the dock 1 ...

Page 29: ... iPod iPhone has an internal non removable battery The battery may need to be charged if it has not been used for a while 2 During the STANDBY or ON mode you can automatically charge the iPod iPhone through the unit when it is docked The iPod iPhone battery is fully charged in about a few hours If you charge it while playing music it may take longer You can control the iPod iPhone player with the ...

Page 30: ...playback features USB Operation Insert your USB device into the USB socket at the back of the unit You can insert a USB memory stick or a USB device via a USB cable 1 Turn the FUNCTION dial or press the FUNCTION button to select USB mode 2 All the playback features are the same as if you were playing an MP3 WMA CD The unit can only play MP3 and WMA file formats in USB operation If your USB device ...

Page 31: ... Wipe the disc from the centre outwards with a soft cloth Always keep the disc clean If you cannot wipe off the dust with a soft cloth wipe the disc lightly with a slightly moistened cloth and finish with a dry cloth Do not use any type of solvent such as thinner benzine commercially available cleaners or antistatic spray They may damage the disc Storing Discs Do not store discs in places subjecte...

Page 32: ...disc correctly with the label side facing up Clean the disc PAUSE mode may be activated deactivate it A non valid disc has been inserted Condensation may have formed inside the unit due to a sudden change in temperature Wait about an hour for it to clear and try again Disc skips Make sure the unit is on a flat level surface away from vibration Vibrations or jarring can cause the disc to skip Files...

Page 33: ...be compatible with the unit Only MP3 WMA file formats are supported If any functional abnormality is encountered unplug the unit from the mains socket and reconnect it again Specifications Model AXM1205E Disc Format CD CD R CD RW MP3 WMA Terminals iPod iPhone Dock socket USB 2 0 AUX IN1 L R Sockets AUX IN2 L R Sockets Aerial Socket Frequency Range FM 87 5 108 MHz Power Supply Power Consumption 220...

Page 34: ......

Page 35: ......

Page 36: ...2V2 Adr c o Solheimsveien 6 8 PB 153 NO 1471 Lørenskog Norge Norge 815 32 000 Sverige 0771 115 115 Danmark 70 80 70 70 Finland 020321321 Made for iPod Made for iPhone mean that an electronic accessory has been designed to connect specifically to iPod iPhone respectively and has been certified by the developer to meet Apple performance standards Apple is not responsible for the operation of this de...

Reviews: