background image

FM Operation ......................................................................................................................22

Switching from DAB to FM Mode ........................................................................................................ 22
Auto Scan ..................................................................................................................................................... 22
Manual Scan ................................................................................................................................................ 22
Scan Setting ................................................................................................................................................ 22
Audio Mode ................................................................................................................................................. 23
Preset Stations ............................................................................................................................................ 23
Recalling a Stored Station ...................................................................................................................... 23
FM Display Modes ..................................................................................................................................... 24

Compatible Disc Types .......................................................................................................25
CD Operation ......................................................................................................................25

Playback ........................................................................................................................................................ 25
To Pause Playback ..................................................................................................................................... 25
To Stop Playback ........................................................................................................................................ 25
Skipping to Another Track ..................................................................................................................... 25
Repeat Playback ......................................................................................................................................... 26
Random Playback ...................................................................................................................................... 26
Programme Setting .................................................................................................................................. 26
Programme Cancel ................................................................................................................................... 26
Intro Playback ............................................................................................................................................. 26

Bluetooth® Operation ........................................................................................................27
AUX Operation ....................................................................................................................28
Maintenance .......................................................................................................................29

Cleaning the Unit ...................................................................................................................................... 29
Handling Discs ............................................................................................................................................ 29
Cleaning Discs ............................................................................................................................................ 29
Storing Discs ............................................................................................................................................... 29

Hints and Tips .....................................................................................................................30
Specifications ......................................................................................................................31

Summary of Contents for axm525dbe

Page 1: ...GB Instruction Manual AXM525DBE Micro Hi Fi System with DAB and Bluetooth technology ...

Page 2: ...ing to the Mains Supply 14 Using Earphones 15 Connecting the Aerial 15 Charging from the USB CHARGING Port 15 General Operation 16 Powering ON OFF 16 Selecting Modes 16 Adjusting the Volume 16 Auto Setting the Clock 16 Manually Setting the Time 16 Settings the Daily Timer 17 To Turn the Daily Timer On Off 17 Setting the Sleep Timer 17 EQ Control 18 Software Version 18 System Reset 18 DAB Operation...

Page 3: ...patible Disc Types 25 CD Operation 25 Playback 25 To Pause Playback 25 To Stop Playback 25 Skipping to Another Track 25 Repeat Playback 26 Random Playback 26 Programme Setting 26 Programme Cancel 26 Intro Playback 26 Bluetooth Operation 27 AUX Operation 28 Maintenance 29 Cleaning the Unit 29 Handling Discs 29 Cleaning Discs 29 Storing Discs 29 Hints and Tips 30 Specifications 31 ...

Page 4: ... objects filled with liquids such as vases DON T place hot objects or naked flame sources such as lighted candles or nightlights on or close to equipment High temperatures can melt plastic and lead to fires DON T use makeshift stands and NEVER fix legs with wooden screws To ensure complete safety always fit the manufacturer s approved stand or legs with the fixings provided and according to the in...

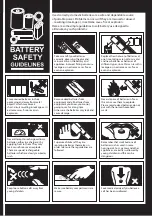
Page 5: ...long time Otherwise the batteries may leak and cause damage Store unused batteries in their packaging and away from metal objects which may cause a short circuit resulting in leakage or in extreme cases fire or even an explosion Never dispose of batteries in fire as this can cause them to explode Please recycle dead batteries do not put with the normal household waste Supervise children if they ar...

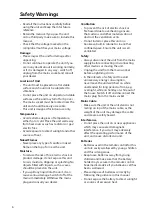
Page 6: ... Withdraw the mains plug and consult your dealer Ventilation To prevent the risk of electric shock or fire hazard due to overheating ensure that curtains and other materials do not obstruct the ventilation vents Do not install or place this unit in a bookcase built in cabinet or in another confined space Ensure the unit is well ventilated Safety Always disconnect the unit from the mains supply bef...

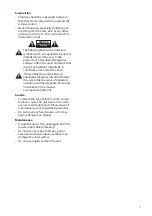
Page 7: ...nitude to constitute a risk of electric shock The exclamation point within an equilateral triangle is intended to alert the user to the presence of important operating and maintenance servicing instructions in the manual accompanying the unit Service To reduce the risk of electric shock do not remove screws The unit does not contain any user serviceable parts Please leave all maintenance work to q...

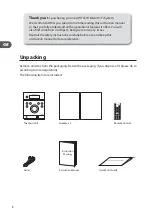
Page 8: ... operational features it offers You will also find some hints and tips to help you resolve any issues Read all the safety instructions carefully before use and keep this instruction manual for future reference The Main Unit Speaker x 2 Remote Control INFO STANDBY MODE CLOCK RANDOM MONO STEREO PRESET TIMER EQ INTRO SLEEP MUTE VOLUME REPEAT PRESET MEM MENU ENTER PAIR SCAN SKIP TUNE SEARCH SCAN ENTER...

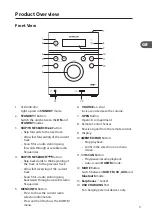
Page 9: ... to the previous track Allow fast reversing of the current track Search for a radio station going backwards through accessible radio frequencies 5 MENU INFO Button Press to show the current radio selection information Press and hold to show the DAB FM menu 6 VOLUME Dial Increase or decrease the volume 7 OPEN Button Open CD compartment 8 Remote Control Sensor Receive signal from the remote control ...

Page 10: ...ANT AUX IN AC R L Rear View 1 2 3 4 1 Aerial Socket 2 AUX IN Socket Connects to an external audio device 3 SPEAKER L R Sockets 4 Mains Cable GB 10 ...

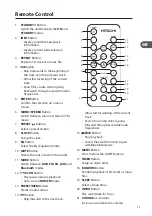
Page 11: ...und 11 MODE Button Switch between DAB FM CD AUX and Bluetooth modes 12 SCAN Button Play pause resume playback Auto scan in DAB FM mode 13 PRESET MEM Button Preset a radio station 14 Button Skip forwards to the next track Remote Control INFO STANDBY MODE CLOCK RANDOM MONO STEREO PRESET TIMER EQ INTRO SLEEP MUTE VOLUME REPEAT PRESET MEM MENU ENTER PAIR SCAN 4 6 7 8 9 10 5 1 2 3 14 17 19 21 18 20 11 ...

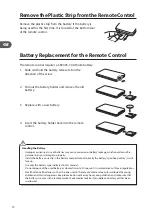
Page 12: ...y in the battery compartment Normally the battery s positive polarity will face up Use only the battery type indicated in this manual Do not dispose of the used battery as domestic waste Dispose of it in accordance with local regulations Small button cell batteries such as the one used in the remote control are easily swallowed by young children and this is dangerous Keep loose button cells away f...

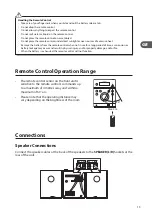
Page 13: ...s when you slide and pull the battery release tab Do not drop the remote control Do not allow anything to impact the remote control Do not spill water or liquid on the remote control Do not place the remote control on a wet object Do not place the remote control under direct sunlight or near sources of excessive heat Remove the battery from the remote control when not in use for a long period of t...

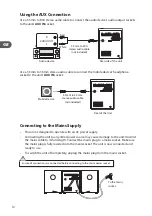
Page 14: ...t AUDIO OUT R Red White L Audio device Rear side of the unit Connecting to the Mains Supply This unit is designed to operate with an AC power supply Connecting the unit to any other power source may cause damage to the unit Unwind the mains cable to its full length Connect the mains plug to a mains socket Make sure the mains plug is fully inserted into the mains socket The unit is now connected an...

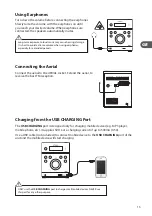
Page 15: ...ging from the USB CHARGING Port The USB CHARGING port is designed only for charging mobile devices e g MP3 player mobile phone etc It supplies 5V DC at a charging current of up to 500mA 0 5A Use a USB cable not included to connect mobile device to the USB CHARGING port of the unit and the mobile device will start charging SKIP TUNE SEARCH SCAN ENTER PAIR VOLUME USB CHARGING MENU INFO STANDBY MODE ...

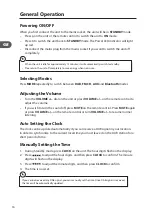
Page 16: ...LUME on the remote control to adjust the volume If you wish to turn the sound off press MUTE on the remote control Press MUTE again or press VOLUME on the remote control or turn VOLUME to resume normal listening Auto Setting the Clock The clock can be updated automatically if you can receive a DAB signal in your location In order to synchronise to the current local time you must leave it on the DA...

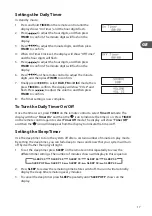
Page 17: ...e timer is set press TIMER on the remote control to select Timer On mode The display will show Timer On and then the icon to indicate the timer is on Press TIMER on the remote control again to select Timer Off mode The display will show Timer Off and then the icon will disappear from the display to indicate the time is off Setting the Sleep Timer Use the sleep timer to turn the system off after a ...

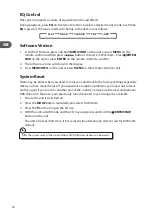
Page 18: ...ntrol to exit System Reset There may be times when you need to reset your unit back to the factory settings especially when you have moved house If you experience reception problems you may want to reset and try again If you move to another part of the country and pick up the local and national DAB stations in that area your previously tuned channels may no longer be available 1 Ensure the unit is...

Page 19: ...red automatically To explore and listen to the found stations press to select Manual Tuning As well as the auto tune function you can manually tune the receiver This can help you when aligning your aerial or when adding stations that were missed while auto tuning 1 Press and hold MENU INFO button on the unit or press MENU on the remote control and then press to select Manual tune Press ENTER PAIR ...

Page 20: ...firm delete Or select No to cancel Preset Stations You can store up to 30 of your favourite stations to the memory This will enable you to access your favourite stations quickly and easily 1 To store a preset you must first be listening to the station that you would like to save press and hold PRESET MEM on the remote control The display will show Save to P 2 Press PRESET to select your desired pr...

Page 21: ...multiplex is a collection of radio stations that are bundled and transmitted on one frequency There are national and local multiplexes Local ones contain stations that are specific to that area DAB unlike normal radio groups together several radio stations and transmits them on one frequency Frequency This displays the frequency of the present station such as 11C 220 352MHz Signal Error This displ...

Page 22: ...d frequency is reached With FM radio it may be necessary to fine tune each station by pressing repeatedly Each press tap will adjust the frequency by 0 05MHz If reception is still poor adjust the position of the aerial or try moving the radio to another location Scan Setting This is a scanning option to scan all stations or just scan stations with strong signal 1 Press and hold MENU INFO on the un...

Page 23: ...s will enable you to access your favourite stations quickly and easily 1 To store a preset you must first be listening to the station that you would like to save press and hold PRESET MEM on the remote control The display will show Save to P 2 Press PRESET to select your desired preset station number and then press ENTER to confirm 3 The station will be stored and the screen will then show Preset ...

Page 24: ... the lower segment of the display Radio Text This is a scrolling message displaying information about the current programme Programme Type This describes the style or genre of the programme that is being broadcast Station Name This displays the station name Audio Type This displays if the station being received is in mono or stereo Radio Text Programme Type Station Name Audio Type GB 24 ...

Page 25: ...s no disc or the disc can t be read No Disc will show on the display 4 The total number of tracks will display on the display the first track of the CD disc will be played automatically This unit can play CD CD R CD RW disc 8cm To Pause Playback 1 Press SCAN to pause the playback 2 To resume playback press SCAN again To Stop Playback Press PAIR on the remote control or ENTER PAIR on the unit to st...

Page 26: ...DOM playback Normal playback will resume Programme Setting User can program up to 20 tracks in CD mode in any desired order Programme mode is activated while in STOP mode 1 Press PRESET MEM on the remote control to enter programme mode 2 Press to select the track that you want to preset 3 Press PRESET MEM on the remote control to confirm the track 4 Repeat steps 2 3 to programme more tracks Once i...

Page 27: ...PAIR on the unit or PAIR on the remote or switch to another function on the unit or disable the function from your Bluetooth device If the signal strength is weak your Bluetooth receiver may disconnect but it will re enter pairing mode automatically For better signal reception remove any obstacles between the unit and the Bluetooth device This unit supports A2DP Advanced Audio Distribution Profile...

Page 28: ...r your desired sound output level 5 In AUX mode operate your audio device directly for playback features 4 hour playback 1 If the unit is in AUX mode more than 4 hours it will automatically switch to standby mode 2 10 minutes before entering standby AUTO OFF will flash on the display 3 Press INTRO to continue cancel auto off function When connecting the external audio device refer to the owner s m...

Page 29: ...e disc from the centre outwards with a cloth Always keep the disc clean If you cannot wipe off the dust with a soft cloth wipe the disc lightly with a slightly moistened cloth and finish with a dry cloth Do not use any type of solvent such as thinner benzine commercially available cleaners or antistatic spray They may damage the disc Storing Discs Do not store discs in places subjected to direct s...

Page 30: ...disc inside the unit N0 Disc appears on the display Insert the disc correctly with the label side facing up Clean the disc PAUSE mode may be activated deactivate it A non valid disc has been inserted Condensation may have formed inside the unit due to a sudden change in temperature Wait about an hour for it to clear and try again Disc skips Make sure the unit is on a secure spot Vibrations or jarr...

Page 31: ...y CD Compartment 1 USB CHARGING Port 1 AUX IN Socket 1 Headphones Socket 1 Aerial Socket Frequency Range DAB DAB 174 928 239 200 MHz BAND III FM 87 5 108 MHz Compact Disc Optical Pickup 3 Beam Laser Frequency Response 30Hz 20kHz Dimension Unit Speaker 135mm W 186mm D 170mm H 130mm W 115mm D 170mm H Net Weight Unit Speaker 1 00 kg 0 75kg 2 Features and specifications are subject to change without p...

Page 32: ...the requirement NOT to dispose the equipment including any spent or discarded batteries as unsorted municipal waste but use the return and collection systems available If the batteries or accumulators included with this equipment display the chemical symbol Hg Cd or Pb then it means that the battery has a heavy metal content of more than 0 0005 Mercury or more than 0 002 Cadmium or more than 0 004...

Reviews: