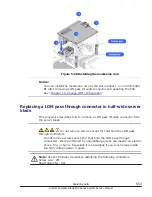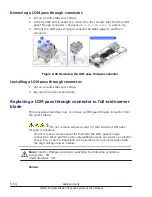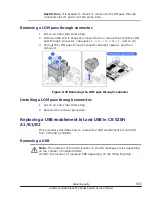
Figure 5-81 Removing the connector cover
3
.
Insert the pass through mezzanine component into server blade
connector and storage expansion blade connector straight downward.
Make sure to insert the arch shaped guide bracket into edges of server
blade and expansion blade.
Figure 5-82 Inserting the pass through mezzanine component
4
.
Push the portions indicated PUSH on the pass through mezzanine card
and cable connector to connect to the server blade connector and
expansion blade connector, respectively.
5
.
Close the latches on the pass through mezzanine card.
5-66
Replacing parts
Hitachi Compute Blade 500 Series System Service Manual
Summary of Contents for CB 520A A1
Page 26: ...xxvi Preface Hitachi Compute Blade 500 Series System Service Manual ...
Page 152: ...4 64 Common process for replacement Hitachi Compute Blade 500 Series System Service Manual ...
Page 294: ...6 12 Identifying RAID rebuild status Hitachi Compute Blade 500 Series System Service Manual ...
Page 432: ...9 16 Updating firmware Hitachi Compute Blade 500 Series System Service Manual ...
Page 439: ...Change LOM configuration 10 7 Hitachi Compute Blade 500 Series System Service Manual ...
Page 442: ...10 10 Change LOM configuration Hitachi Compute Blade 500 Series System Service Manual ...
Page 450: ...10 18 Change LOM configuration Hitachi Compute Blade 500 Series System Service Manual ...
Page 464: ...11 14 Troubleshooting Hitachi Compute Blade 500 Series System Service Manual ...
Page 465: ...Hitachi Compute Blade 500 Series System Service Manual ...


