Replacing a SAS-kit 1 in full-wide server blade
This procedure describes how to remove a SAS-kit 1 from the server blade.
A SAS-kit 1 is composed of:
1
.
HDD backplane board
Removing a SAS-kit 1
1
.
Put on an anti-static wrist strap.
2
.
Remove the target server blade.
See
Removing a full-wide server blade on page 5-6
3
.
Open the top cover of the server blade. See
4
.
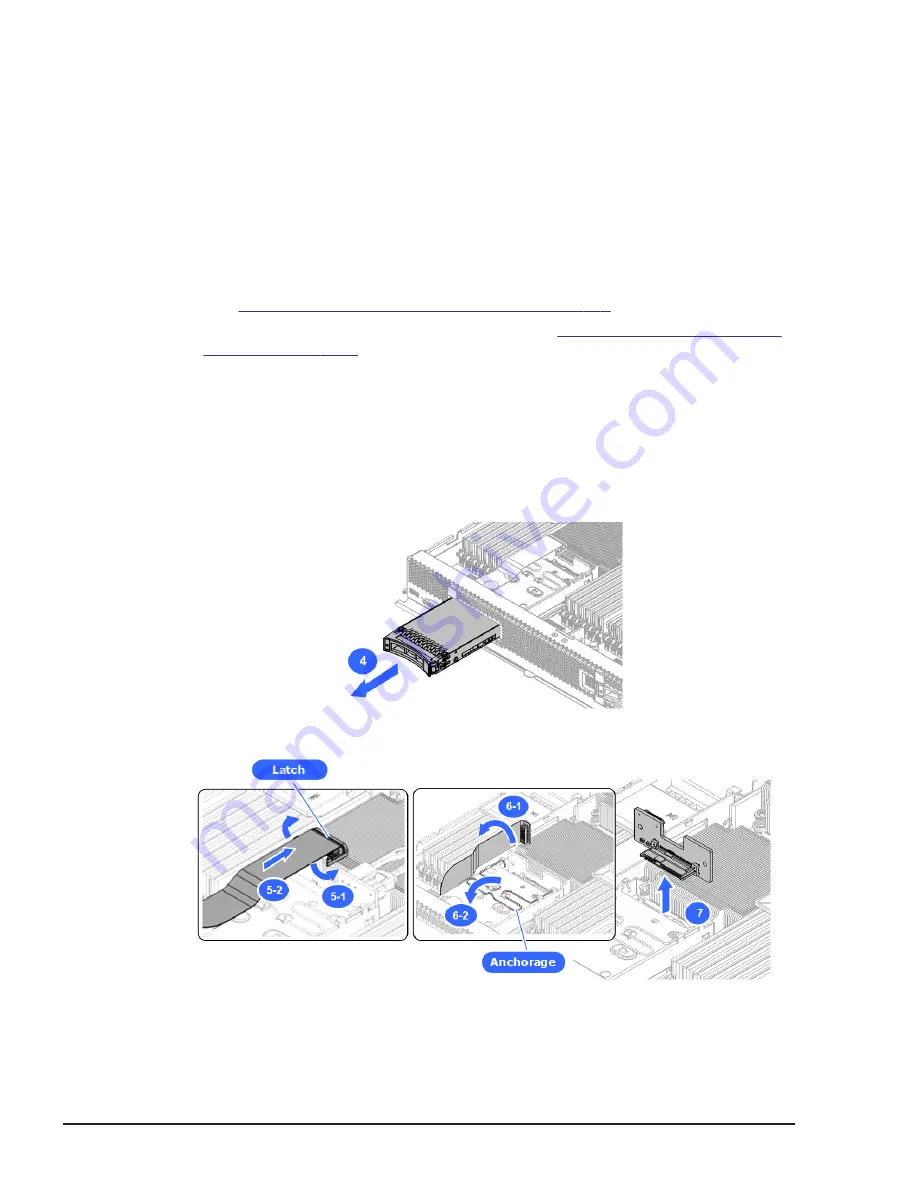
Slide out the disk drives approximately 4 cm to disconnect with the HDD
backplane board.
5
.
While opening up both of the edges of the latch, push out the connector
cable.
6
.
Turn the cable counterclockwise about 90 degrees, and then remove the
anchorage of HDD backplane.
7
.
Pull out the HDD backplane board assembly.
Figure 5-114 Removing the HDD
Figure 5-115 Removing the HDD backplane board
5-92
Replacing parts
Hitachi Compute Blade 500 Series System Service Manual
Summary of Contents for CB 520A A1
Page 26: ...xxvi Preface Hitachi Compute Blade 500 Series System Service Manual ...
Page 152: ...4 64 Common process for replacement Hitachi Compute Blade 500 Series System Service Manual ...
Page 294: ...6 12 Identifying RAID rebuild status Hitachi Compute Blade 500 Series System Service Manual ...
Page 432: ...9 16 Updating firmware Hitachi Compute Blade 500 Series System Service Manual ...
Page 439: ...Change LOM configuration 10 7 Hitachi Compute Blade 500 Series System Service Manual ...
Page 442: ...10 10 Change LOM configuration Hitachi Compute Blade 500 Series System Service Manual ...
Page 450: ...10 18 Change LOM configuration Hitachi Compute Blade 500 Series System Service Manual ...
Page 464: ...11 14 Troubleshooting Hitachi Compute Blade 500 Series System Service Manual ...
Page 465: ...Hitachi Compute Blade 500 Series System Service Manual ...


