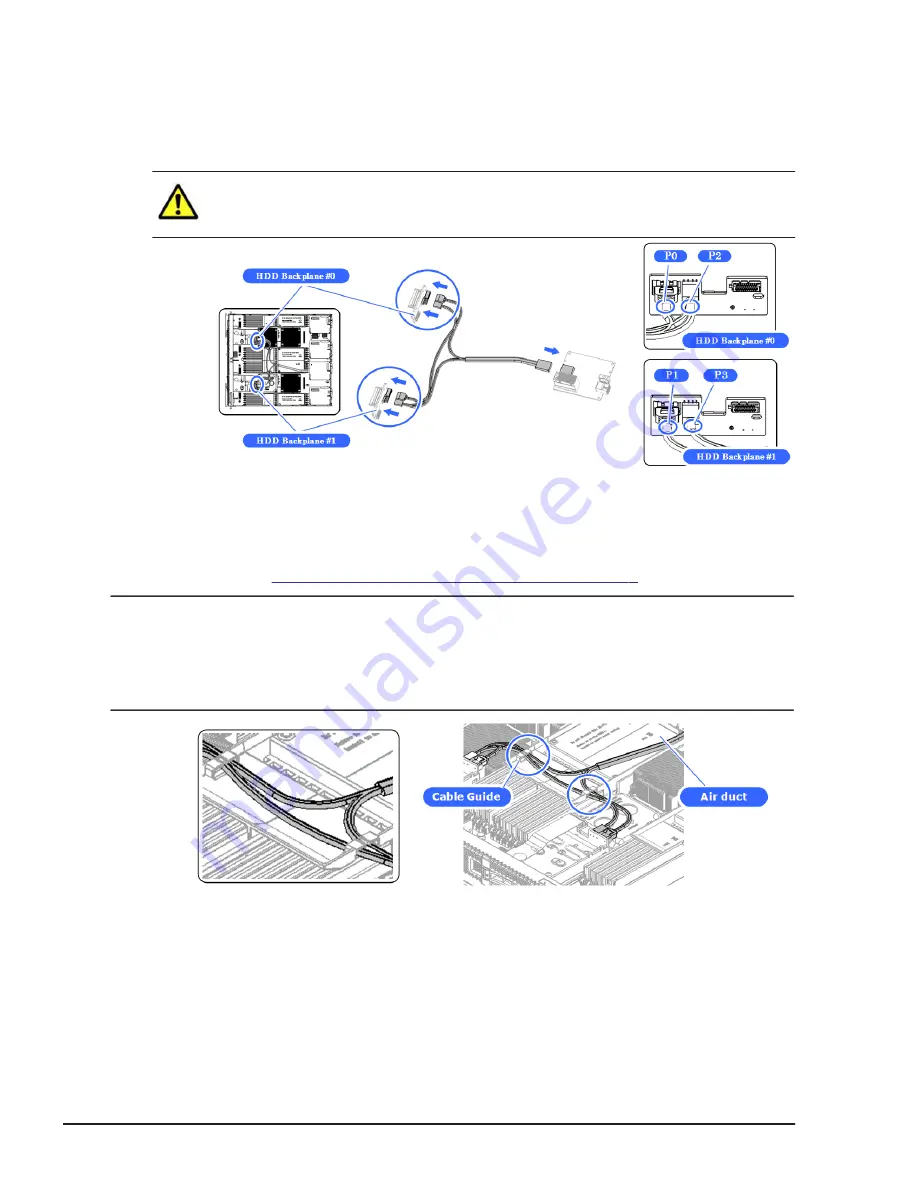
Installing a SAS-kit 2
1
.
Put on an antistatic wrist strap.
2
.
Connect the SAS cable to the HDD backplane board and the RAID
mezzanine card before installing.
CAUTION: To reduce the risk of the personal injury, connect the SAS
cable before the HDD backplane board and RAID mezzanine card are
installed in the server blade.
Figure 5-126 Connecting the SAS cable
3
.
Reverse the removal procedure.
4
.
Place the SAS cable into the guide of the air duct.
5
.
Perform
Installing a full-wide server blade on page 5-7
procedure.
Notice:
Place the SAS cable to the cable guide correctly.
If the cable is not in place correctly, that might cause serious damage to
the cable.
Figure 5-127 Fixing the SAS cable- CB 540A A1/B1
5-98
Replacing parts
Hitachi Compute Blade 500 Series System Service Manual
Summary of Contents for CB 520A A1
Page 26: ...xxvi Preface Hitachi Compute Blade 500 Series System Service Manual ...
Page 152: ...4 64 Common process for replacement Hitachi Compute Blade 500 Series System Service Manual ...
Page 294: ...6 12 Identifying RAID rebuild status Hitachi Compute Blade 500 Series System Service Manual ...
Page 432: ...9 16 Updating firmware Hitachi Compute Blade 500 Series System Service Manual ...
Page 439: ...Change LOM configuration 10 7 Hitachi Compute Blade 500 Series System Service Manual ...
Page 442: ...10 10 Change LOM configuration Hitachi Compute Blade 500 Series System Service Manual ...
Page 450: ...10 18 Change LOM configuration Hitachi Compute Blade 500 Series System Service Manual ...
Page 464: ...11 14 Troubleshooting Hitachi Compute Blade 500 Series System Service Manual ...
Page 465: ...Hitachi Compute Blade 500 Series System Service Manual ...


