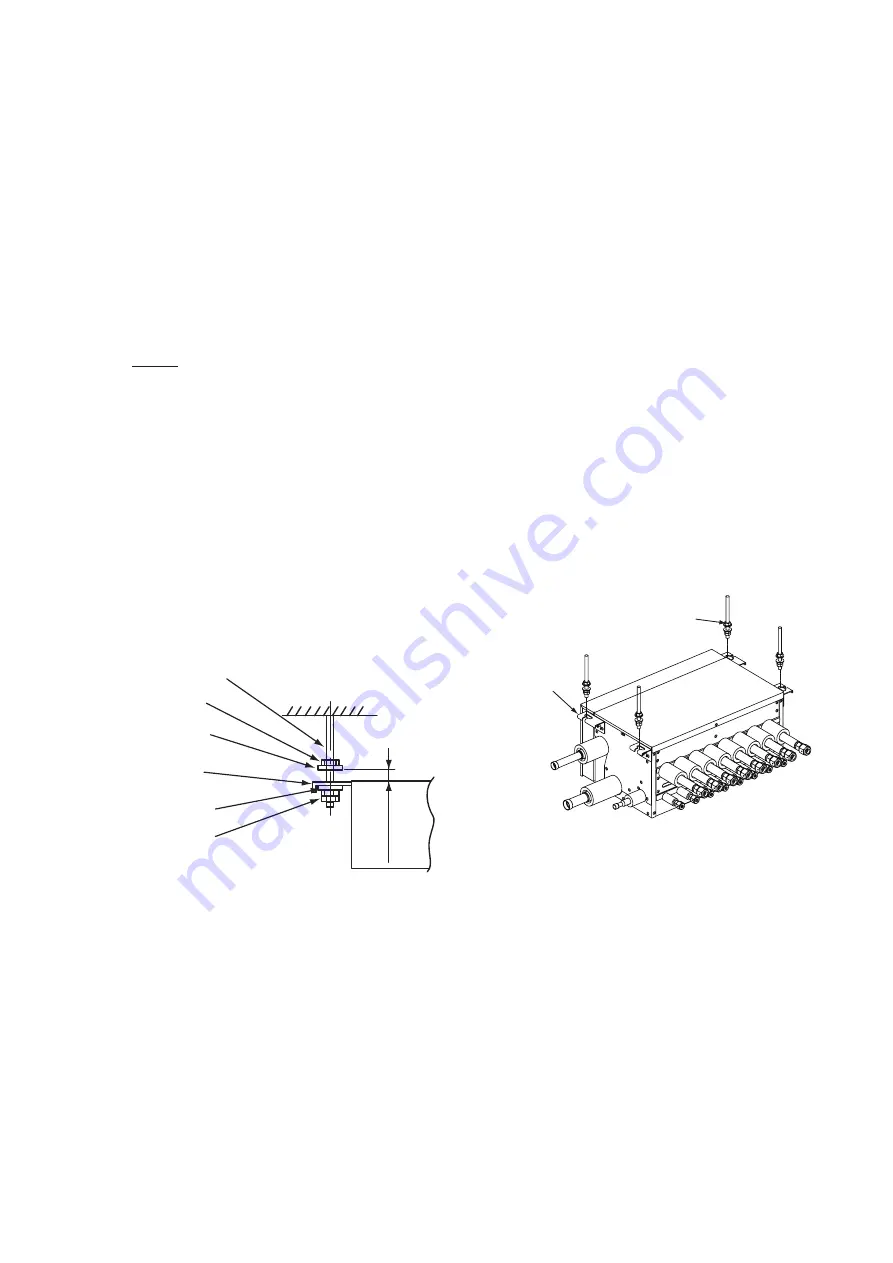
Suspension Bolt
(Field-Supplied)
Nut (Field-Supplied)
Washer with Insulation
(Field-Supplied)
Suspension Bracket
(Attached Indoor Unit)
Washer (Field-Supplied)
Double-Nut
(Field-Supplied)
(1-3/16 to 1-15/16 inch)
30 to 50mm
Suspension Bolt
Suspension Bracket
(Four Places)
10
P5417025-rev.1
4.4 Installation
Figure 4.4 Suspension
Figure 4.5 Hanging Method
4.4.2 Mounting and Hanging the CH-Box
(1) Place nuts and washers onto the suspension
bolts before installing the CH-Box.
NOTE:
Make sure to use washers for installing the
suspension bolts to the suspension brackets.
Install the washer with the insulation side
facing down for suspended installation
applications. This way, the washers
themselves remain in position on the
suspension bolts during the installation
phase.
Field-Supplied Parts
* Suspension Bolt:
4-M10 or W3/8
* Nut:
12-M10 or W3/8
* Washer:
4-M10 or W3/8
* Washer with Insulation: 4-M10 or W3/8
(2) Hanging the CH-Box
(a) Hang the CH-Box by putting hands on the
bottom of the cabinet.
(b) Insert the suspension bolt into the groove
part of the suspension bracket as shown
in Figure 4.5. Ensure that the washers
are correctly affixed to the suspension
bracket.
(c) After the hanging work, the piping and
wiring connection work is required inside
the ceiling in the gap between the roof
and ceiling so it is not visible. Therefore,
determine the drawing direction of the
pipe after selecting the installation location
of the CH-Box. Before doing the hanging
work, carry out the piping and wiring work
up to the connecting positions.
(d) Keep the CH-Box level to the ceiling
surface. If the CH-Box is not level, a
malfunction may occur.
(e) Tighten the nuts of the suspension
bolt with the suspension bracket after
adjustment is completed.
Adhesive must be applied to the nuts in
order to prevent them from loosening.
4.4.1 Marking of the Positions of the Suspension
Bolts and Wiring Connections
(1) Mark the positions of the suspension bolts,
refrigerant piping connections and wiring
connection.
(2) Installation dimensions are shown in
Figure 2.1 and 2.2.
Summary of Contents for CH-AP04MSSX
Page 2: ......
Page 10: ...viii P5417025 rev 1 ...
Page 37: ...P5417025 rev 1 27 ...
Page 38: ...28 P5417025 rev 1 ...
Page 39: ...P5417025 rev 1 29 ...


