--- 10 ---
9-2. Reassembly
Reassembly can be accomplished by following the disassembly procedures in reverse. However, special attention
should be given to the following items.
9-2-1. Wiring Connection
Referring to the wiring diagrams and leadwire arrangements in item 9-5.
9-2-2. Reassembly of the armature and the stator
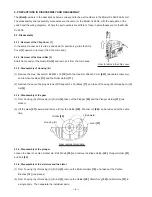
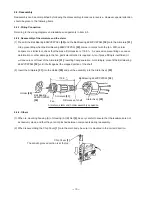
(1) Press-fit the Ball Bearing 608VVC2PS2L
[30]
and the Ball Bearing 626VVC2PS2L
[32]
onto the Armature
[31]
.
Stop press-fitting when the Ball Bearing 608VVC2PS2L
[30]
comes in contact with the fan. With vernier
calipers or a similar tool, check that the press-fit dimension is 119.9 . As excessive press-fitting can cause
deformation or other damage to the fan, particular attention is required. Also, if press-fitting is insufficient, it
will cause loss of thrust of the Armature
[31]
, resulting heat generation. Accordingly, press-fit the Ball Bearing
626VVC2PS2L
[32]
until it butts against the stepped portion of the shaft.
(2) Insert the Armature
[31]
into the Holder
[29]
and put the assembly into the Stator Ass'y
[33]
.
Armature, stator and holder assembly sequence
Fan
Holder
[29]
Armature
[31]
Stator Ass'y
[33]
Ball Bearing
608VVC2PS2L
[30]
Difference of shaft
Ball Bearing 626VVC2PS2L
[32]
9-2-3. Others
(1) When re-mounting housing (A) of Housing (A).(B) Set
[4]
, be very careful to ensure that the leadwires are not
excessively slack, and that they are not pinched between components during reassembly.
(2) When reassembling the Chip Cover
[1]
onto the main body, be sure it is mounted in the correct direction.
- 0.3
0
Chip Cover
[1]
The antislip grooved portion is at the top.
119.9
- 0.3
0

