


-9-
• Cord installation
2. Disassembly and reassembly of the recoil starter and cylinder
[Tools required]
• Hex. bar wrench (4 mm)
• Long-nose pliers
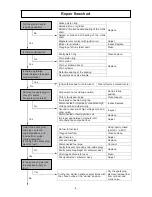
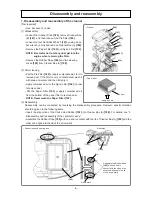
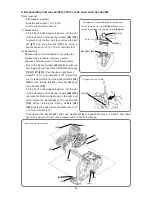
(1) Disassembly
• Pull out and remove the plug cap and Shield Cover
[25]
from Spark Plug Ass'y BPMR7A
[142]
.
•
Loosen the three Set Bolts M5 x 25
[10]
and one Set Bolt M5
[9]
by using a hex. bar wrench (4 mm),
and then remove the Recoil Starter
[8]
and Fan Guide
[7]
.
• Loosen the two Bolts M5 x 16
[45]
by using a hex. bar wrench (4 mm), and then remove the Cylinder
Cover
[136]
.
• Remove the Shield Cover Ring
[26]
from the Shield Cover
[25]
by using long-nose pliers.
• Use long-nose pliers to open the five caulked portions of the Shield Cover
[25]
and then remove the
Shield Cover
[25]
from the plug cap.
NOTE: The Shield Cover [25] and Shield Cover Ring [26] are not mounted on the Models
CM 75EAP and CM 75EBP for North America.
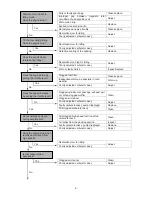
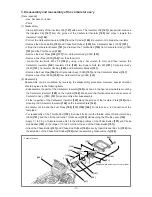
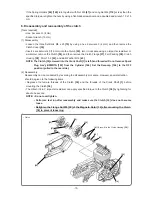
(2) Reassembly
Reassembly can be conducted by reversing the disassembly procedure. However, special attention
should be given to the following items.
• Do not reuse the Shield Cover
[25]
.
• Mount the Shield Cover
[25]
on the plug cap according to the figure on the next page.
Assemble the high-voltage cord and Cord
[21]
as shown in sectional diagram below.
High-voltage cord
Plug cap
[21]
Run the high-voltage cord in the groove of the Cylinder Cover
[136]
.
Put the Cord
[21]
in pawls of the
Fan Guide
[7]
for reassembly.
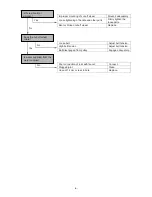
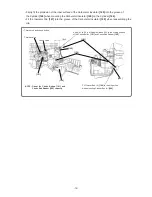
[25]
[136]
[7]
[142]
[136]
[21]
High-voltage cord
Do not get any other part caught between the cord
terminal and terminal retaining rib of the Fan Guide
[7]
.
Cord terminal
[23]
[7]
Terminal retaining rib
To the Recoil Starter
[8]
[25]


