


-20-
•
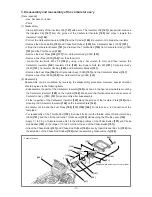
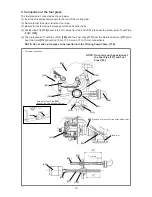
Disassembly of the piston
Hex. socket
hd. bolt M6
Pin extracting bolt
Jig J-381
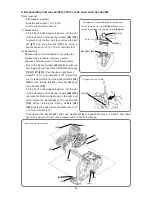
13. Disassembly and reassembly of the piston and piston rings
[Tools required]
• Long-nose pliers
• Jig J-381 (Code No. 6600412) (Piston pin extractor ass’y)
• Hex. socket hd. bolt M6
• Round bar about 11.8 mm in diameter (Borer 12 mm in diameter, etc.)
(1) Disassembly
• Remove the two Cir Clips
[171]
by using long-nose
pliers.
• Fit an extra hex. socket hd. bolt M6 to the pushing
end of the Piston Pin
[173]
. Turn the pin extracting
bolt of the jig J-381 to push out the Piston Pin
[173]
.
NOTE: Be careful not to damage the Piston
(51.5) [172].
• Pull out the two Piston Rings
[170]
by widening
their closed gap portions.
NOTE: Do not widen the gap too much. Doing
so runs the risk of breaking the ring.
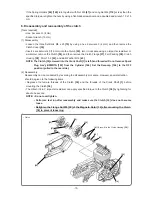
(2) Reassembly
• Be careful not to damage the peripheral surface of the Piston (51.5)
[172]
when disassembled.
Remove carbon dust from the top of the Piston (51.5)
[172]
and clean the piston with gasoline.
• If the two Piston Rings
[170]
do not move smoothly, remove carbon dust from the ring grooves of the
Piston (51.5)
[172]
and the two Piston Rings
[170]
, and fully clean the parts with gasoline.
• Follow the steps below to insert the Piston Pin
[173]
. See the following figure “Reassembly of the
piston.”
(a) Mount the jig J-381 on the Piston (51.5)
[172]
and fit an extra hex. socket hd. bolt M6 into the
pushing end of the Piston Pin
[173]
.
(b) Mount Needle Bearing (A)
[2]
on the connecting rod small end and cover it with the Piston (51.5)
[172]
. Align the triangular arrow on top of the Piston (51.5)
[172]
with the direction of the exhaust
port of the Cylinder
[146]
. Insert a round bar about 11.8 mm in diameter (a borer 12 mm in diameter,
etc.) into the Piston (51.5)
[172]
opposite the side where the Piston Pin
[173]
is inserted, in order to
prevent Needle Bearing (A)
[2]
from becoming misaligned.
(c) With a round bar 11.8 mm in diameter inserted, turn the pin extracting bolt of the jig J-381 clockwise
and push in the bolt just before the circlip mounting groove of the Piston (51.5)
[172]
, being careful
not to slant the Piston Pin
[173]
.
• Do not reuse the two Cir Clips
[171]
.
• Fit the tips of the two Cir Clips
[171]
into the grooves of the Piston (51.5)
[172]
by using long-nose
pliers, and fit the entire clips into the grooves by turning them along the grooves.
• Align the openings of the two Piston Rings
[170]
to the knock pins of the Piston (51.5)
[172]
.
• Apply a small quantity of two-cycle oil to Needle Bearing (A)
[2]
after mounting the Piston (51.5)
[172]
.


