16
English
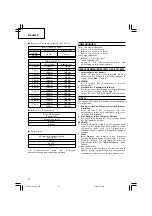
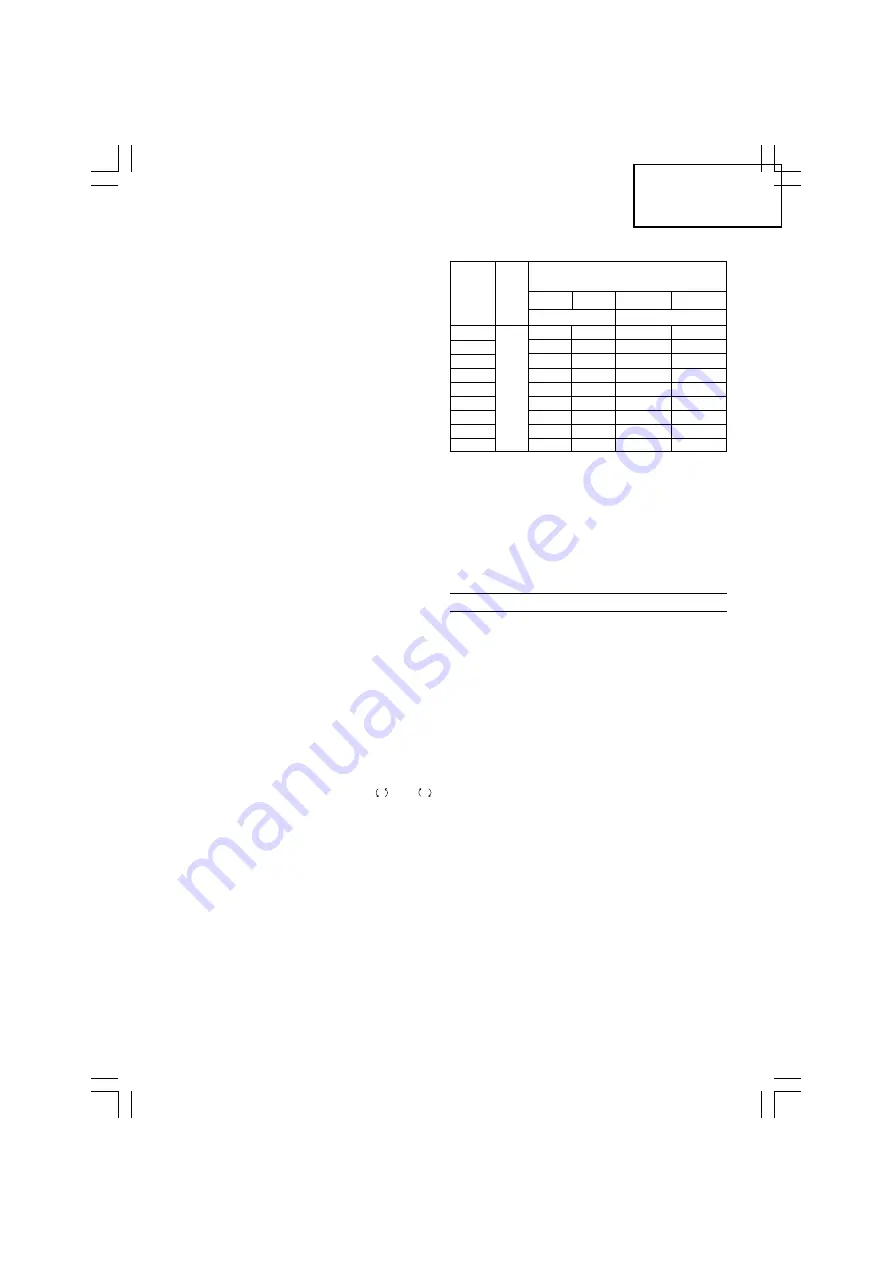
Table 3
* Use an adapter for a small diameter bit.
These data are for the referential values. The number of
holes that can be drilled varies according to the sharpness
of the used bit or the conditions of the concrete being
drilled.
CAUTION:
When using this unit continuously, the unit may
overheat, leading to damage in the motor and switch.
Please leave it without using it for approximately
15 minutes.
HOW TO USE
CAUTION:
䡬
When using the light equipped hook, pay sufficient
attention so that the main equipment does not fall.
If the tool falls, there is a risk of accident.
䡬
Do not attach the tip tool except phillips bit to the
tool main unit when carrying the tool main unit with
the light equipped hook suspended from a waist
belt.
Injury may result if you carry the equipment
suspended from the waist belt with sharp tipped
components such as drill bit attached.
1. Using the light equipped hook
The light equipped hook can be installed on the
right or left side and the angle can be adjusted in
5 steps between 0
°
and 80
°
.
(1) Operating the hook
(a) Pull out the hook toward you in the direction
of arrow (A) and turn in the direction of arrow
(B). (
Fig. 9
)
(b) The angle can be adjusted in 5 steps (0°, 20°,
40°, 60°, 80°).
Adjust the angle of the hook to the desired
position for use.
(2) Switching the hook position
CAUTION:
Incomplete installation of the hook may result in
bodily injury when used.
(a) Securely hold the main unit and remove the
screw using a slotted head screwdriver or a
coin. (
Fig. 10
)
(b) Remove the hook and spring.
(Fig. 11
)
(c) Install the hook and spring on the other side and
securely fasten with screw. (
Fig. 12
)
2. Confirm that the battery is mounted correctly.
3. Installation of dust cup or dust collector (B) (Optional
accessories) (Fig. 6, Fig. 7)
When using a rotary hammer for upward drilling
operations attach a dust cup or a dust collector (B)
to collect dust or particles for easy operation.
䡬
Installing the dust cup
Use the dust cup by attaching to the drill bit as
shown in
Fig. 6
.
When using a bit which has big diameter, enlarge
the center hole of the dust cup with this rotary
hammer.
䡬
Installing dust collector (B)
When using dust collector (B), insert dust collector
(B) from the tip of the bit by aligning it to the
groove on the grip. (
Fig. 7
)
CAUTION:
䡬
The dust cup and dust collector (B) are for exclusive
use of concrete drilling work. Do not use them for
wood or metal drilling work.
䡬
Insert dust collector (B) completely into the chuck
part of the main unit.
䡬
When turning the rotary hammer on while dust
collector (B) is detached from a concrete surface,
dust collector (B) will rotate together with the drill
bit. Make sure to turn on the switch after pressing
dust cup on the concrete surface. When using dust
collector (B) attached to a drill bit that has more
than 190 mm of overall length, dust collector (B)
cannot touch the concrete surface and will rotate.
Therefore, please use dust collector (B) by attaching
to drill bits which have 166 mm, 160 mm, and 110
mm overall length.
䡬
Dump particles after every two or three holes when
drilling.
䡬
Please replace the drill bit after removing dust
collector (B).
4. Selecting the driver bit
Screw heads or bits will be damaged unless a bit
appropriate for the screw diameter is employed to
drive in the screws.
5. Confirm the direction of bit rotation (Fig. 8)
The bit rotates clockwise (viewed from the rear
side) by pushing the R-side of the push button.
The L-side of the push button is pushed to turn the
bit counterclockwise. (See
Fig. 8
) (The
L
and
R
marks are provided on the body.)
CAUTION:
The push button cannot be switched while the
power tool is turning. To switch the push button,
stop the power tool, then set the push button.
6. Continuous drilling
The number of holes that can be drilled in concrete
after one recharge is shown in
Table 3
.
Possible continuous
Bit dia. Depth
drilling number (holes)
(mm)
(mm) DH14DL DH18DL DH14DMR DH18DMR
3.0 Ah battery
2.0 Ah battery
*3.5
65
110
43
73
4
98
122
65
81
5
80
113
53
75
6
30
72
105
48
70
8
55
77
37
51
10
48
64
32
43
12
41
57
27
38
14
34
47
23
31
16
22
32
15
21
01Eng_DH14DL_WE
11/6/08, 20:28
16
Summary of Contents for DH 14DL
Page 5: ...4 25 26 28 27 i 3mm 9 5mm j k l 00Table_DH14DL_WE 11 6 08 20 27 4 ...
Page 102: ...101 09Back_DH14DL_WE 11 6 08 20 33 101 ...
Page 104: ...103 1 2 3 4 5 09Back_DH14DL_WE 11 6 08 20 33 103 ...
Page 105: ...104 09Back_DH14DL_WE 11 6 08 20 33 104 ...


