14
English
(3) Turn the change lever to mark. (Fig. 20)
Then bull point or cold chisel is locked.
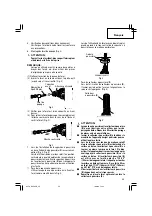
9 . Using the stopper (Fig. 23)
(1) Loosen the wing bolt and insert the stopper into
the mounting hole on the side handle.
(2) Adjust the stopper position according to the depth
of the hole and tighten the wing bolt securely.
10. How to use the drill bit (taper shank) and the taper
shank adaptor.
(1) Mount the taper shank adaptor to the rotary
hammer. (Fig. 24)
(2) Mount the drill bit (taper shank) to the taper shank
adaptor. (Fig. 24)
(3) Turn the switch ON, and drill a hole in prescribed
depth.
(4) To remove the drill bit (taper shank), insert the cotter
into the slot of the taper shank adaptor and strike
the head of the cotter with a hammer supporting
on the rests. (Fig. 25)
Fig. 24
Fig. 23
11. Using the side handle
When you wish to change a position of the side
handle, turn grip of the side handle
counterclockwise to loosen it, and then fasten it
firmly.
CAUTION:
When boring a hole, there can be a case where the
machine attempts to rotate by the reaction at the
time of penetrating a concrete wall and/or when a
tip of the blade comes in contact with the rebar.
Firmly fasten the side handle and hold the machine
with both of your hands. Unless you hold it
securely, an accident can occur.
HOW TO USE THE CORE BIT (FOR LIGHT
LOAD)
When boring penetrating large hole use the core bit (for
light load). At that time use with the center pin and the
core bit shank provided as optional accessories.
1. Mounting
CAUTION:
Be sure to turn power OFF and disconnect the plug
from the receptacle.
(1) Mount the core bit to the core bit shank. (Fig. 26)
Lubricate the thread of the core bit shank to facilitate
disassembly.
Stopper
Wing bolt
Side handle
Mounting hole
Drill bit
Taper shank
adaptor
Front cap
Grip
Cotter
Rests
Taper shank adaptor
Fig. 25
01Eng_DH28PD_US
10/2/09, 15:32
14


