background image

English

1

DOUBLE INSULATION
DOUBLE ISOLATION
AISLAMIENTO DOBLE

MODE D’EMPLOI ET INSTRUCTIONS DE SECURITE

AVERTISSEMENT

Une utilisation incorrecte et dangereuse de cet outil motorisé peut entraîner la
mort ou de sérieuses blessures corporelles!
Ce mode d’emploi contient d’importantes informations à propos de la sécurité de
ce produit. Prière de lire et de comprendre ce mode d’emploi avant d’utiliser l’outil
motorisé. Garder ce mode d’emploi à la disponibilité des autres utilisateurs avant
qu’ils utilisent l’outil motorisé.

INSTRUCTION MANUAL AND SAFETY INSTRUCTIONS

WARNING

Improper and unsafe use of this power tool can result in death or serious bodily
injury!
This manual contains important information about product safety. Please read
and understand this manual before operating the power tool. Please keep this
manual available for others before they use the power tool.

MANUAL DE INSTRUCCIONES E INSTRUCCIONES DE SEGURIDAD

ADVERTENCIA

¡La utilización inapropiada e insegura de esta herramienta eléctrica puede resultar
en lesiones serias o en la muerte!
Este manual contiene información importante sobre la seguridad del producto.
Lea y comprenda este manual antes de utilizar la herramienta eléctrica.  Guarde
este manual para que puedan leerlo otras personas antes de que utilicen la
herramienta eléctrica.

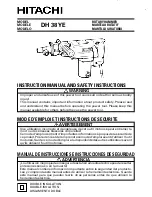
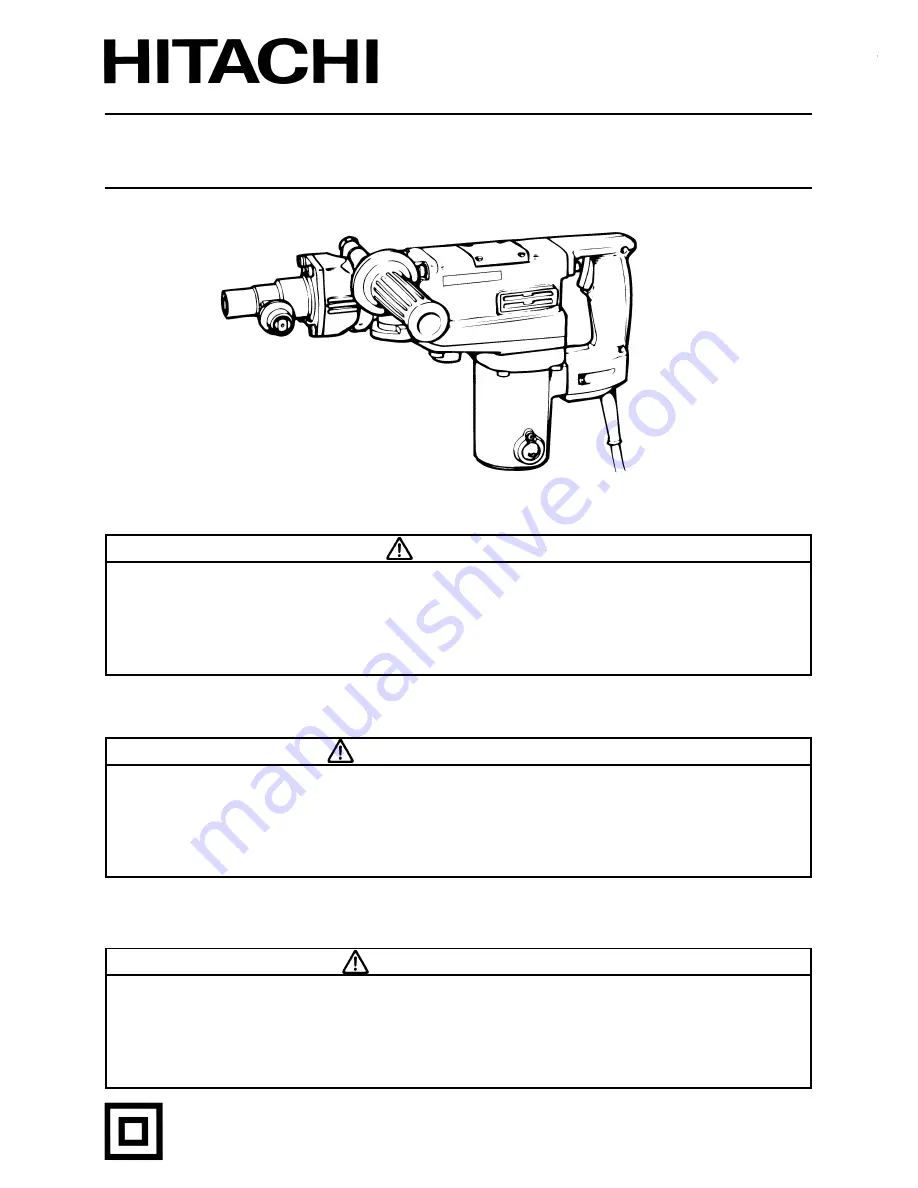
DH 38YE

MODEL

ROTARY HAMMER

MODELE

MARTEAU ROTATIF

MODELO

MARTILLO GIRATORIO

Summary of Contents for DH 38YE

Page 1: ...d unsafe use of this power tool can result in death or serious bodily injury This manual contains important information about product safety Please read and understand this manual before operating the power tool Please keep this manual available for others before they use the power tool MANUAL DE INSTRUCCIONES E INSTRUCCIONES DE SEGURIDAD ADVERTENCIA Lautilizacióninapropiadaeinseguradeestaherramie...

Page 2: ...CORDON DE RALLONGE 27 DOUBLE ISOLATION POUR UN FONCTIONNEMENT PLUS SUR 28 Page UTILISATION ET ENTRETIEN NOM DES PIECES 29 FICHE TECHNIQUE 29 ACCESSOIRES 30 ACCESSOIRES STANDARD 30 ACCESSOIRES EN OPTION 30 APPLICATIONS 32 AVANT L UTILISATION 32 UTILISATION 33 COMMENT REMPLACER LA GRAISS 35 REMPLACEMENT DE LA GRAISSE 36 ENTRETIEN ET INSPECTION 37 ENTRETIEN ET REPARATION 38 LISTA DES PIÈCES 58 ÍNDICE...

Page 3: ...section of this Instruction Manual and in the sections which contain the operation and maintenance instructions Hazards that must be avoided to prevent bodily injury or machine damage are identified by WARNINGS on the power tool and in this Instruction Manual Never use this power tool in a manner that has not been specifically recommended by HITACHI unless you first confirm that the planned use wi...

Page 4: ...osures Never operate the tool in damp or wet locations 5 DISCONNECT TOOLS Never leave the tool connected to a power source Always disconnect the tool from its power source before servicing inspecting maintaining cleaning and before changing or checking any parts 6 AVOID UNINTENTIONAL STARTING Don tcarrythetoolwhileitisconnectedtoitspowersource Don tcarrythetoolwithyour finger near the power switch...

Page 5: ...ean for better and safer performance Follow instructions for lubricating and changing accessories Inspect tool cords periodically and if damaged have repaired by an authorized service center Inspect extension cords periodically and replace if damaged Keep handles dry clean and free from oil and grease 19 REMOVE ADJUSTING KEYS AND WRENCHES Keys and adjusting wrenches remove from tool before turning...

Page 6: ...r air vent must be kept clean so that air can freely flow at all times Check for dust build up frequently 30 OPERATE POWER TOOLS AT THE RATED VOLTAGE Operate the power tool at voltages specified on its nameplate If using the power tool at a higher voltage than the rated voltage it will result in abnormally fast motor revolution and may damage the unit and the motor may burn out 31 NEVER USE A TOOL...

Page 7: ...an underground wiring Touching these active wiring or electric cable with this tool you may receive an electric shock Comfirm if there are any buried object such as electric cable within the wall floor or ceiling where you are going to operate here after REPLACEMENT PARTS When servicing use only identical replacement parts Repairs should be conducted only by a Hitachi authorized service center POL...

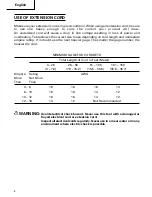
Page 8: ...ng If in doubt use the next heavier gage The smaller the gage number the heavier the cord MINIMUM GAGE FOR CORD SETS Total Length of Cord in Feet Meter 0 25 26 50 51 100 101 150 0 7 6 7 9 15 2 15 5 30 5 30 8 45 7 Ampere Rating AWG More Not More Than Than 0 6 18 16 16 14 6 10 18 16 14 12 10 12 16 16 14 12 12 16 14 12 Not Recommended WARNING Avoid electrical shock hazard Never use this tool with a d...

Page 9: ...no external grounding you must still follow the normal electrical safety precautions given in this Instruction Manual including not using the power tool in wet environments To keep the double insulation system effective follow these precautions 䡬 Only HITACHI AUTHORIZED SERVICE CENTER should disassemble or assemble this power tool and only genuine HITACHI replacement parts should be installed 䡬 Cl...

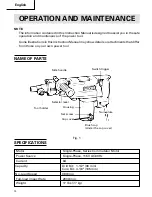
Page 10: ... 7 7 kg OPERATION AND MAINTENANCE NOTE The information contained in this Instruction Manual is designed to assist you in the safe operation and maintenance of the power tool Some illustrations in this Instruction Manual may show details or attachments that differ from those on your own power tool NAME OF PARTS Fig 1 Housing Switch trigger Side handle Nameplate Selector lever Brush cap Under the ca...

Page 11: ...11 ...

Page 12: ...12 ...

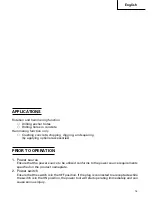
Page 13: ...g optional accessories PRIOR TO OPERATION 1 Power source Ensure that the power source to be utilized conforms to the power source requirements specified on the product nameplate 2 Power switch Ensure that the switch is in the OFF position If the plug is connected to a receptacle while the switch is in the ON position the power tool will start operating immediately and can cause serious injury ...

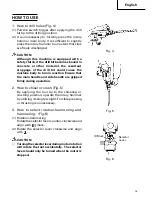
Page 14: ...ons conforming to prescribed precautions 6 How to install dust cover Fig 2 Always install the dust cover on the drill bit or the taper shank adaptor Insert the dust cover until it lies flush in the groove NOTE For a thick drill bit insert the dust cover from drill rear 7 How to install tool CAUTION For tools such as a bull point and a cold chisel use only Hitachi genuine parts 1 Clean then smear t...

Page 15: ...body to turn in reaction Ensure that the main handle and side handle are gripped firmly during operation 2 How to chisel or crush Fig 5 By applying the tool tip to the chiseling or crushing position operate the rotary hammer by utilizing its empty weight Forcible pressing or thrusting is unnecessary 3 How to select rotation hammering and hammering Fig 6 1 Rotation hammering Rotate the selector lev...

Page 16: ...he taper shank adaptor 1 Install drill bit with taper shank in the taper shank adaptor 2 Turn the power on and drill a base hole 3 After cleaning out dust with a syringe attach the plug to the anchor tip and drive in the anchor with a manual hammer 4 To remove the drill bit with taper shank insert a cotter into the slot of the taper shank adaptor place supports under the rotary hammer and tap the ...

Page 17: ...s not fall even if it faces downward Fig 12 2 How to bore Fig 13 1 Connect the plug to the receptacle 2 A spring is installed in the center pin Push it lightly to the wall or the floor straight Connect all over the surface of the core bit tip and start operating 3 When boring about 3 16 5 mm in depth the position of the hole will establish Bore after that removing the center pin and the guide plat...

Page 18: ...y 6 months of usage Ask for grease replacement at the nearest HITACHI Authorized Service Center Proceed for replacement of grease 2 Grease replenishment CAUTION 䡬 Before replenishing the grease turn the power off and pull out the power plug 1 Remove the crank case cover and wipe off the grease inside 2 Apply 0 7 oz 20 g of HITACHI Electric Hammer Grease A standard accessory contained in tube to th...

Page 19: ...xercise due care to ensure the winding does not become damaged and or wet with oil or water 4 Inspecting the carbon brushes Fig 16 The Motor employs carbon brushes which are consumable parts When they become worn to or near the wear limit it could result in motor trouble When an auto stop carbon brush is equipped the motor will stop automatically At that time replace both carbon brushes with new o...

Page 20: ...ush cap securely and to install the cap cover SERVICE AND REPAIRS All quality power tools will eventually require servicing or replacement of parts because of wear from normal use To assure that only authorized replacement parts will be used all service and repairs must be performed by a HITACHI AUTHORIZED SERVICE CENTER ONLY NOTE Specifications are subject to change without any obligation on the ...

Page 21: ...de d emploi et dans les sections qui contiennent les instructions de fonctionnement et d entretien Les dangers qui doivent être évités pour prévenir des blessures corporelles ou un endommagement de la machine sont identifiés par AVERTISSEMENTS sur l outil motorisé et dans ce mode d emploi Nejamaisutilisercetoutilmotoriséd unemanièrequin estpasspécifiquementrecommandée par HITACHI sans avoir d abor...

Page 22: ...rotections anti bruit pour se protéger du bruit 4 SE PROTEGER CONTRE LES DECHARGES ELECTRIQUES Empêcher tout contact du corps avec les surfaces mises à la terre par exemple tuyaux radiateurs plaques de cuisson et enceintes de réfrigération Ne jamais faire fonctionner l outil dans un endroit humide ou mouillé 5 DEBRANCHER LES OUTILS Ne jamais laisser l outil branché dans une source d alimentation T...

Page 23: ...e porter des gants en caoutchouc et des chaussures anti glissantes lors d un travail à l extérieur Porter un couvre chef qui recouvre les cheveux longs 14 PORTERUNMASQUE UNMASQUEANTI POUSSIEREOUUNAPPAREILRESPIRATOIRE SI LE TRAVAIL DOIT DEGAGER DE LA POUSSIERE Touteslespersonnesprésentessurl airedetravaildevrontégalementporterunmasque un masque anti poussière ou un appareil respiratoire 15 NE PAS M...

Page 24: ...til motorisé pour des applications autres que celles spécifiées dans le mode d emploi 24 MANIPULER L OUTIL CORRECTEMENT Utiliser l outil de la façon indiquée dans ce mode d emploi Ne pas laisser tomber ou lancer l outil Ne jamais permettre que l outil soit utilisé par des enfants des personnes non familiarisées avec son fonctionnement ou un personnel non autorisé 25 VERIFIER S IL Y A DES FILS SOUS...

Page 25: ... Ne pas abandonner l outil avant qu il ne soit complètement arrêté 33 MANIPULER L OUTIL MOTORISE AVEC PRECAUTION Si un outil motorisé tombe ou frappe un matériau dur accidentellement il risque d être déformé fendu ou endommagé 34 NE PAS ESSUYER LES PARTIES EN PLASTIQUE AVEC DU SOLVANT Les solvants comme l essence les diluants la benzine le tétrachlorure de carbone et l alcool peuvent endommager et...

Page 26: ...e des fils électriques Le fait de toucher avec l outil un fil ou un câble électrique sous tension encastré dans le mur risque de provoquer une décharge électrique Vérifier s il y des objets encastrés par exemple un câble électrique dans le mur le plancher ou le plafond avant d y commencer le travail PIECES DE RECHANGE Pour les réparations utiliser exclusivement des pièces de rechange identiques Le...

Page 27: ...e signalétique Encasdedoute utiliseruncalibresupérieur Pluslenuméroducalibreestpetit plus le cordon est lourd CALIBRE MINIMUM DES CORDONS Longueur totale de cordon en pieds mètres 0 25 26 50 51 100 101 150 0 7 6 7 9 15 2 15 5 30 5 30 8 45 7 Intensité nominale CALIBRE Supérieure Non supérieure à à 0 6 18 16 16 14 6 10 18 16 14 12 10 12 16 16 14 12 12 16 14 12 Non recommandé AVERTISSEMENT Eviter tou...

Page 28: ...and même nécessaire de suivre les précautions de sécurité électrique données dans ce mode d emploi y compris de ne pas utiliser l outil motorisé dans un environnement humide Pour garder le système de double isolation effectif suivre ces précautions 䡬 Seuls les CENTRES DE SERVICE AUTORISES HITACHI peuvent démonter et remonter cet outil motorisé et uniquement des pièces de rechange HITACHI garanties...

Page 29: ...érents de ceux de l outil motorisé utilisé NOM DES PARTIES SPECIFICATIONS Moteur Moteur série monophasé à collecteur Source d alimentation Secteur 115V 60 Hz monophasé Courant 8A Capacité Mèche 1 1 2 38 mm Couronne 4 1 8 105 mm Vitesse sans charge 380 min Nombre de percussions à pleine charge 2800 min Poids 17 lbs 7 7 kg Fig 1 Porte outil Carter Interrupteur Poignée latérale Plaque signalétique Vi...

Page 30: ...30 ...

Page 31: ...31 ...

Page 32: ... Si la fiche est connectée sur une prise alors que l interrupteur est sur la position ON marche l outil motorisé démarrera immédiatement risquant de causer de sérieuses blessures 3 Cordon prolongateur Quand la zone de travail est éloignée de la source d alimentation utiliser un cordon prolongateur d épaisseur et de capacité nominale suffisante Le cordon prolongateur doit être aussi court que possi...

Page 33: ...oraire Insérer à fond la queue de l outil dans le trou hexagonal du couvercle frontal Fig 3 3 Retourner le porte outil pour fixer l outil REMARQUE Pour enlever l outil procéder à l inverse de son installation UTILISATION 1 Comment percer des trous Fig 4 1 Tirer l interrupteur après avoir appliqué la pointe de la mèche à la position de forage 2 Il n est pas nécessaire d appuyer de force sur le corp...

Page 34: ...ler la quenouille Fig 9 1 Desserrer la poignée latérale et insérer la partie droite de la quenouille dans le trou du boulon de la poignée 2 Déplacerlaquenouilleàlapositionspécifiée et faire tourner l attache coulissante de la poignée latérale dans le sens des aiguilles d une montre pour fixer la quenouille 5 Comment utiliser la mèche queue conique et le raccord de queue conique 1 Installer la mèch...

Page 35: ...le ne puissepastomber mêmesielleorientéeversle bas Fig 12 2 Perçage Fig 13 1 Brancher la perceuse 2 Un ressort est placé dans le goujon central Appuyer légèrement l outil contre le mur ou le plancher tout droit Toute la surface de la couronne doit être en contact avec le mur ou le plancher Mettre en marche 3 Quand on a percé sur une profondeur d environ 3 16 5mm lapositiondutrouestdéterminée Conti...

Page 36: ...utilisation Se procurer la graisse chez l Agence de Service Autorisée HITACHI la plus proche Procéder au remplacement 2 Plein de graisse PRECAUTION 䡬 Avant de faire le plein de la graisse fermer l interrupteur et débrancher l outil de la prise de courant 1 Enlever le couvercle du carter et essuyer la graisse à l intérieur 2 Appliquer 0 7 oz 20 g de graisse pour marteau électrique Hitachi A en tube...

Page 37: ... outil électro portatif Veiller soigneusement à ce que ce bobinage ne soit pas endommagé et ou mouillé par de l huile ou de l eau 4 Contrôle des balais en carbone Fig 16 Le moteur utilise des balais en carbone qui sont des pièces qui s usent Quand ils sont usés ou près de la limite d usure il pourra en résulter un mauvais fonctionnement du moteur Quand le moteur est équipé d un balai en carbone à ...

Page 38: ... remonter le couvercle du bouchon ENTRETIEN ET REPARATION Tous les outils motorisés de qualité auront éventuellement besoin d une réparation ou du remplacement d une pièce à cause de l usure normale de l outil Pour assurer que seules des pièces de rechange autorisées seront utilisées tous les entretiens et les réparations doivent être effectués uniquement par UN CENTRE DE SERVICE HITACHI AUTORISE ...

Page 39: ...ión SEGURIDAD de este Manual de instrucciones y en las secciones que contienen las instrucciones de operación y mantenimiento Para evitar lesiones o el daño de la herramienta eléctrica los riesgos están identificados con ADVERTENCIAS en dicha herramienta y en este Manual de instrucciones No utilice nunca esta herramienta eléctrica de ninguna forma no específicamente recomendada por HITACHI a menos...

Page 40: ...da de protección contra el ruido excesivo 4 PROTÉJASE CONTRA LAS DESCARGAS ELÉCTRICAS Evite que su cuerpo entre en contacto con superficies puestas a tierra tales como tubos radiadores y conductos de refrigeración No utilice nunca ninguna herramienta en lugares húmedos 5 DESCONECTE LAS HERRAMIENTAS No deje nunca ninguna herramienta conectada a la fuente de alimentación Desconecte siemprelasherrami...

Page 41: ...ADAMENTE No utilice ropa floja ni joyas Éstas podrían pillarse en las piezas móviles Para trabajar en exteriores se recomienda utilizar guantes de goma y calzado antideslizante Si su pelo es largo utilice algo que lo recubra 14 CUANDO VAYA A TRABAJAR EN UN LUGAR POLVORIENTO UTILICE UN PROTECTOR PARA LA CARA UNA MÁSCARA CONTRA EL POLVO O UNA CRETA ANTIGÁS Todas las personas que trabajen donde se es...

Page 42: ...raciones autorizado No utilice una herramienta cuyo interruptor de alimentación no funcione 23 NO UTILICE NUNCA UNA HERRAMIENTA ELÉCTRICA PARA APLICACIONES QUE NO SEAN LAS ESPECIFICADAS No utilice nunca una herramienta eléctrica para aplicaciones no especificadas en este Manual de instrucciones 24 MANEJE CORRECTAMENTE LA HERRAMIENTA Maneje la herramienta de acuerdo con las instrucciones ofrecidas ...

Page 43: ...su arreglo a un centro de reparaciones autorizado por Hitachi 32 NO DEJE NUNCA LA HERRAMIENTA EN FUNCIONAMIENTO DESATENDIDA DESCONECTE SU ALIMENTACIÓN No deje sola la herramientas hasta mientras no se haya parado completamente 33 MANEJE CON CUIDADO LAS HERRAMIENTAS ELÉCTRICAS Siunaherramientaeléctricasehacaídoohachocadoinadvertidamentecontramateriales duros es posible que se haya deformado rajado ...

Page 44: ...an estar enterrados o emparedados tales como cables eléctricos Si tocase un cable activo con esta herramienta podría recibir una descarga eléctrica Confirme que no haya ningún objeto enterrado o emparedado como cables eléctricos en el suelo el techo o en las paredes en los que vaya a trabajar PIEZAS DE REEMPLAZO Para la reparación de una herramienta utilice solamente piezas de reemplazo idénticas ...

Page 45: ...ble y la indicación de amperaje de la tabla de características Cuando menor sea el número de calibre mayor será el cable CALIBRE MÍNIMO PARA CABLES Longitud total del cable en pies metros 0 25 26 50 51 100 101 150 0 7 6 7 9 15 2 15 5 30 5 30 8 45 7 Amperaje nominal AWG Más No más de de 0 6 18 16 16 14 6 10 18 16 14 12 10 12 16 16 14 12 12 16 14 12 No se recomienda ADVERTENCIA Evite descargas eléct...

Page 46: ... deberá seguir las precauciones sobre seguridad eléctrica ofrecidas en este Manual de instrucciones incluyendo la no utilización de la herramienta eléctrica en ambientes húmedos para mantener efectivo el sistema de aislamiento doble tenga en cuenta las precauciones siguientes 䡬 Esta herramienta eléctrica solamente deberá desensamblar y ensamblarla un CENTRO DE REPARACIONES AUTORIZADO POR HITACHI y...

Page 47: ...amienta eléctrica NOMENCLATURA Fig 1 ESPECIFICACIONES Motor Motor conmutador en serie monofásico Fuente de alimentación 115 V CA 60 Hz monofásica Corriente 8A Capacidad Barrena 1 1 2 38 mm Barrena tubulare 4 1 8 105 mm Velocidad sin carga 380 min Frecuencia de impacto a plena carga 2800 min Peso 17 lbs 7 7 kg Interruptor disparador Mango lateral Sostén de herranienta Carcase Tornillo de fijación P...

Page 48: ...48 ...

Page 49: ...49 ...

Page 50: ...en la posición OFF Si enchufase el cable de alimentación en un tomacorriente de la red con el interruptor en ON la herramienta eléctrica comenzaría a funcionar inmediatamente lo que podría provocar lesiones serias 3 Cable prolongador Cuando el área de trabajo esté alejada de la fuente de alimentación utilice un cable prolongador de suficiente grosor y con la capacidad nominal El cable prolongador ...

Page 51: ...afrío usar siempre piezas genuinas Hitachi 1 Limpiar y luego engrasar la barrena con la grasa provista 2 Tirar del sostén en la dirección de la flecha q y rotar en la dirección de la flecha w la izquierda Insertar planamente la barrena de herramienta en el orificio hexagonal de la cubierta delantera Fig 3 3 Retornar el sostén de herramienta para fijar ésta NOTA Quitar la herramienta invirtiendo el...

Page 52: ...lectora en el sentido contrario a las agujas del reloj y alinéela con la marca 2 Gire la palanca selectora en el sentido de las agujas del reloj y alinéela con la marca PRECAUCIÓN 䡬 Si se gira la palanca selectora mientras rota el motor puede rotar también la herramienta accidentalmente 4 Cómo usar el tope 1 Instalar el tope Fig 7 1 Alfojar el mango lateral e insertar la parte recta del tope en el...

Page 53: ... clavija en la extremidad del anclaje e introduzca el anclaje con un martillo de mano 4 Para sacar la broca con la barrena ahusada introduzca una chaveta en la ranura del adaptador de barrena ahusada ponga apoyos debajo del martillo rotativo y golpee la chaveta con un martillo de mano Fig 9 Fig 9 Adaptador de barrena ahusada Chaveta Apoyo ...

Page 54: ...e estar indicando hacia abajo Fig 12 2 Modo de taladrar Fig 13 1 Conectar el enchufe a la toma de alimentación 2 El pasador central se ha instalado un resorte Presionar ligeramente y sin torcerse hacia la pared o hacia el pared o hacia el suelo Procurar que toda la punta de la barrena tubular esté en contacto con la superficie a taladrar y luego empezar la operación 3 Al taladrar aproximadamente 3...

Page 55: ...la herramienta cambiarle la grasa cada 6 meses de uso Consultar para ello al centro de servicio HITACHI autorizado Procedimiento de cambio de grasa 2 Rellenado de grasa PRECAUCIÓN 䡬 Antes de rellenar de grasa desconectar el aparato y desenchufarlo del tomacorriente 1 Quitar la cubierta del cigüeñal y limpiar la grasa interna 2 Aplicar 0 7 oz 20 g de grasa para martillo eléctrico Hitachi tipo A acc...

Page 56: ...as herramientas eléctricas Prestar el mayor cuidado y asegurarse de que el bobinado no se dañe y o se humedezca con aceite o agua 4 Inspeccionar los carbones de contacto Fig 16 El motor emplea escobillas de carbón que son partes consumibles Cuando se gastan o están cerca del limite de desgaste pueden causar problemas al motor Al equiparse la escobilla de carbón de parada automática el motor se det...

Page 57: ...nstalar la cubierta de la tapa MANTENIMIENTO Y REPARACIÓN Todas las herramientas eléctricas de calidad requieren de vez en cuando el servicio de mantenimiento o el reemplazo de piezas debido al desgaste producido durante la utilización normal Para asegurarse de que solamente se utilicen piezas de reemplazo autorizadas todos los servicios de mantenimiento y reparación deberán realizarse SOLAMENTE E...

Page 58: ...58 Español ...

Page 59: ...59 ...

Page 60: ...60 ...

Page 61: ...61 ...

Page 62: ...62 ...

Page 63: ...63 ...

Page 64: ...ition à ces substances varie en fonction de la fréquence d exécution de ce genre de travail Pour réduire l exposition à ces produits chimiques travailler dans un lieu bien ventilé et porter un équipement de protection agréé par exemple un masque anti poussière spécialement conçu pour filter les particules microscopiques ADVERTENCIA Alogunos polvos creados por el lijado mecámico el aserrado el esme...

Reviews: