English
27
HOW TO USE
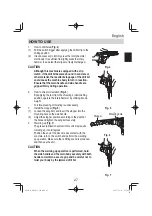
1. How to drill holes (
Fig. 4
)
(1) Pull the switch trigger after applying the drill bit tip to the
drilling position.
(2) It is unnecessary to forcibly press the rotary hammer
main body. It is su
ffi
cient to slightly press the rotary
hammer to an extent that clips are freely discharged.
CAUTION
Although this machine is equipped with a slip
clutch, if the drill bit becomes bound in concrete or
other material, the resultant stoppage of the drill bit
could cause the machine body to turn in reaction.
Ensure that the main handle and side handle are
gripped
fi
rmly during operation.
2. How to chisel or demolish (
Fig. 5
)
By applying the tool tip to the chiseling or demolishing
position, operate the rotary hammer by utilizing its own
weight.
Forcible pressing or thrusting is unnecessary.
3. Install the stopper (
Fig. 6
)
(1) Loosen the wing bolt, and insert the stopper into the
mounting hole on the side handle.
(2) Adjust the stopper position according to the depth of
the hole and tighten the wing bolt securely.
4. Warming up (
Fig. 7
)
The grease lubrication system in this unit may require
warming up in cold regions.
Position the end of the bit so makes contact with the
concrete, turn on the switch and perform the warming
up operation. Make sure that a hitting sound is produced
and then use the unit.
CAUTION
When the warming up operation is performed, hold
the side handle and the main body securely with both
hands to maintain a secure grip and be careful not to
twist your body by the jammed drill bit.
Fig. 4
Fig. 5
Stopper
Mounting hole
Fig. 6
Fig. 7
000Book̲DH40SC̲ChS.indb 27
000Book̲DH40SC̲ChS.indb 27
2017/03/31 17:54:45
2017/03/31 17:54:45


