background image

7

English

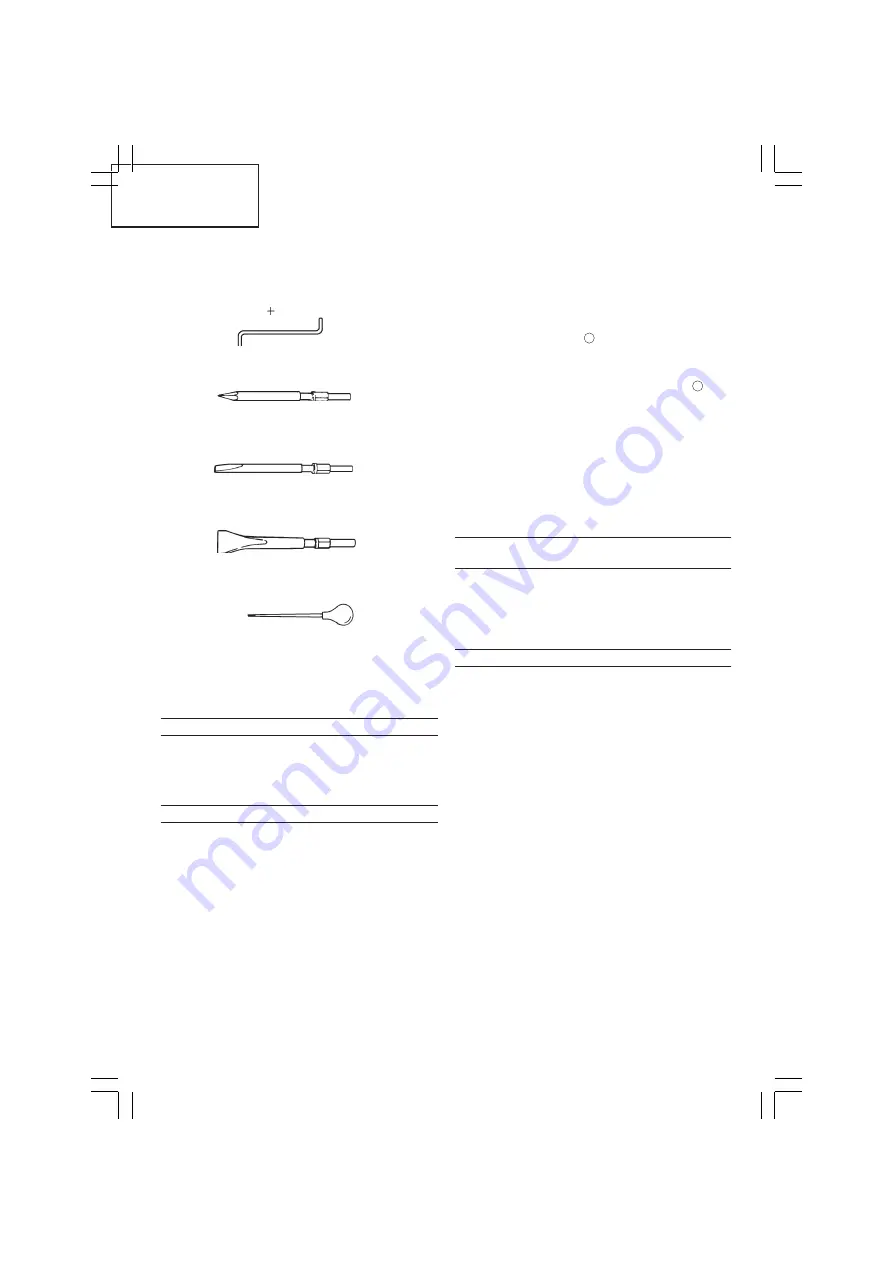
(1) Anchor adapter (for Ro Hammering)

Anchor size:
W1/4, W5/16, W3/8, W1/2, W5/8
(No. 20) (No. 25) (No. 30) (No. 40) (No. 50)

Cursing (Hammering)

Groove digging and edging (Hammering)

Asphalt cutting (Hammering)

Syringe (for chip removal)

Hammer grease A
500 g (in a can)

70 g (in a green tube)
30 g (in a green tube)

Optional accessories are subject to change without
notice.

APPLICATIONS

Drilling holes in concrete

Drilling anchor holes

Crushing concrete, chipping, digging, and squaring
(by applying optional accessories)

PRIOR TO OPERATION

1. Power source

Ensure that the power source to be utilized conforms
to the power requirements specified on the product
nameplate.

2. Power switch

Ensure that the power switch is in the OFF position. If
the plug is connected to a power receptacle while the
power switch is in the ON position, the power tool
will start operating immediately, which could cause a
serious accident.

3. Extension cord

When the work area is removed from the power
source, use an extension cord of sufficient thickness
and rated capacity. The extension cord should be
kept as short as practicable.

4. How to install tool
NOTE

For tools such as a bull point and a cold chisel, use
only Hitachi genuine parts.

(1) Clean, then smear the tool shank with the grease

provided in the green tube. (

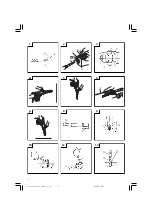
Fig. 1

)

(2) Press the push button, slightly lift the tool retainer in

the direction of arrow 

A

 as shown in 

Fig. 2

 to hook

the tool retainer edge with the push button and
engage the push button.

(3) Release your finger from the push button and further

lift the tool retainer in the direction of arrow 

A

.

NOTE

First time when the tool retainer is lifted, remove your
finger from the push button. If the push button is kept
pressed, the edge of the tool retainer comes in contact
with your finger and the tool retainer cannot be lifted.
(4) Fully insert the tool shank into the hexagonal hole in

the front cover.

(5) Return the tool retainer to secure the tool.
(6) Pull the tool to make sure it is locked completely.

NOTE

Remove in the reverse order of installation.

WHEN THE PUSH BUTTON DOES NOT
OPERATE SMOOTHLY

When the push button does not operate smoothly, please
remove dirt from the inside through the outlet using a
wire, etc. Then lubricate lubricating oil and push the
push button several times to make it operate smoothly.
 (

Fig. 3

)

HOW TO USE THE ROTARY HAMMER

1. How to drill holes (Fig. 4)

(1) Pull the switch trigger after applying the drill bit tip to

the drilling position.

(2) It is unnecessary to forcibly press the rotary hammer

main body. It is sufficient to slightly press the rotary
hammer to an extent that shavings are freely
discharged.

CAUTION

Although this machine is equipped with a safety
clutch, if the drill bit becomes bound in concrete or
other material, the resultant stoppage of the drill bit
could cause the machine body to turn in reaction.
Ensure that the main handle and side handle are
gripped firmly during operation.

2. How to chisel or demolish (Fig. 5)

By applying the drill bit tip to the chiseling or
demolishing position, operate the rotary hammer by
utilizing its empty weight.
Forcible pressing or thrusting is unnecessary.

3. Install the stopper (Fig. 6)

(1) Loosen the side handle and insert the straight portion

of the stopper into the handle bolt hole.

(2) Move the stopper to the specified position and rotate

the grip of the side handle clockwise to fix the stopper.

4. Warming up (Fig. 7)

The grease lubrication system in this unit may require
warming up in cold regions.
Position the end of the bit so makes contact with the
concrete, turn on the switch and perform the warming
up operation. Make sure that a hitting sound is
produced and then use the unit.

(2) Drift key

(1) Bull point

Overall length: 280, 450 mm

(1) Cold chisel

Overall length: 280, 450 mm

(1) Cutter

 01Eng_DH40SR_CKT

7/31/12, 3:13 PM

7

Summary of Contents for DH 40SR

Page 1: ... คู มือการใช งาน Read through carefully and understand these instructions before use Leer cuidadosamente y comprender estas instrucciones antes del uso 使用前務請詳加閱讀 본 설명서를 자세히 읽고 내용을 숙지한 뒤 제품을 사용하십시오 โปรดอ านโดยละเอียดและทําความเข าใจก อนใช งาน 000Cover DH40SR CKT indd 1 000Cover DH40SR CKT indd 1 2012 07 27 14 41 31 2012 07 27 14 41 31 ...

Page 2: ...1 3 2 1 2 1 5 6 3 7 6 5 4 9 8 7 0 A B 12 11 10 C D E F G 1 3 4 5 6 8 9 4 7 A 00Table_DH40SR_CKTp0102 p65 12 7 27 14 11 1 ...

Page 3: ...2 13 14 15 E H I J K 16 17 18 I N J M L K J 19 20 73 17 mm 7 mm O P O 00Table_DH40SR_CKTp0102 p65 12 7 27 14 11 2 ...

Page 4: ...ador de barrena ahusada 錐柄附加器 Drill bit taper shank Broca de barrena barrena ahusada 鑽頭 帶錐柄 Indicating groove shows standard depth matching the out side diameter of the anchor for drilling Ranura indicadora que muestra la profundidad normal de coincidencia del diámetro exterior del anclaje para taladrar 指示槽顯示安裝用于鑽孔的描栓外徑 的標準深度 Cotter Chaveta 製銷 Rest Apoyo 台座 Core bit Barrena tubular 取心鑽具 q Core bit...

Page 5: ...ัด 렌치 아웃 งัดออก 테이퍼 생크 어댑터 ตัวปรับเพลาเทเปอร 드릴 비트 테이퍼 생크 หัวสว าน เพลาเทเปอร 표시 홈은 드릴용 앵커의 외경과 일치하는 표준 깊이를 표시합니다 ร องที กํากับไว แสดงความลึกขนาดมาตรฐานที ตรงกับเส นผ านศูนย กลางด านนอกของสกรูพุก ที จะเจาะ 쐐기 ลิ ม 받침대 แท น 코어 비트 จานเจียรเพชรคอนกรีต q 코어 비트 생크 เพลาจานเจียรเพชรคอนกรีต w 가이드 플레이트 แผ งราง e 센터 핀 เดือยนํา r 코어 비트 팁 ปลายจานเจียรเพชรคอนกรีต t 크랭크 커버 ครอบข อเหวี ยง y 마모 한도 ขอบเขตการสึกหรอ...

Page 6: ...djusting key or wrench before turning the power tool on A wrench or a key left attached to a rotating part of the power tool may result in personal injury e Do not overreach Keep proper footing and balance at all times This enables better control of the power tool in unexpected situations f Dress properly Do not wear loose clothing or jewellery Keep your hair clothing and gloves away from moving p...

Page 7: ...0 V 240 V Power input 950 W 1 Capacity Drill bit 40 mm Core bit 120 mm No load speed 2 510 min Full load impact rate 2 2800 min Weight without cord side handle 6 5 kg 1 Drill bit taper shank External dia 11 12 14 3 14 5 17 5 21 5 mm 2 Taper shank adapter 3 Cotter PRECAUTIONS ON USING ROTARY HAMMER 䡬 Wear earplugs to protect your ears during operation 䡬 Do not touch the bit during or immediately af...

Page 8: ...ainer cannot be lifted 4 Fully insert the tool shank into the hexagonal hole in the front cover 5 Return the tool retainer to secure the tool 6 Pull the tool to make sure it is locked completely NOTE Remove in the reverse order of installation WHEN THE PUSH BUTTON DOES NOT OPERATE SMOOTHLY When the push button does not operate smoothly please remove dirt from the inside through the outlet using a ...

Page 9: ...ning the guide plate right or left the guide plate never slips off even when the drill is used in a downward direction Fig 16 2 Drilling holes 1 Insert the plug into a receptacle 2 A spring is built in the center pin By straightly and gently pressing it to the wall or floor surface the entire surface of the core bit tip attains contact to start the hole drilling job Fig 17 3 When the hole depth re...

Page 10: ... cover with securely tightening two set screws 6 Service parts list A Item No B Code No C No Used D Remarks CAUTION Repair modification and inspection of Hitachi Power Tools must be carried out by an Hitachi Authorized Service Center This Parts List will be helpful if presented with the tool to the Hitachi Authorized Service Center when requesting repair or other maintenance In the operation and m...

Page 11: ... daños personales b Utilice equipo de seguridad Utilice siempre una protección ocular El equipo de seguridad como máscara para el polvo zapatos de seguridad antideslizantes casco o protección para oídos utilizado para condiciones adecuadas reducirá los daños personales c Evite un inicio accidental Asegúrese de que el interruptor está en off antes de enchufarlo El transporte de herramientas eléctri...

Page 12: ...comprobar cuidadosamente que no hayan objetos empotrados tales como cables o conductos eléctricos 䡬 Sujetar siempre firmemente al asidero del cuerpo y el asidero lateral de la harrmienta De lo contrario la contrafuerza producida podría causar un funcionamiento impreciso e incluso peligroso ACCESORIOS ESTANDAR 1 Caja Plástica 1 2 Mango lateral 1 3 Tope 1 4 Grasa A para martillo 1 Los accesorios est...

Page 13: ...e prolongación Cuando está alejada el área de trabajo de la red de alimentación usar un cable de prolongación de un grosor y potencia normal suficiente El cable de prolongación debe ser mantenido lo más corto posible 4 Montaje de la herramienta NOTA Para usar herramientas tales como el puntero y cortafrío usar siempre piezas genuinas Hitachi 1 Limpiar y engrasar la espiga con la grasa provista Fig...

Page 14: ...la punta del anclaje y meterlo con un martillo manual 4 Luego de insertar el anclaje usar la cuña sacabarrenas para separar el anclaje Fig 10 5 Empleando un martillo manual sacar de un glope la parte cónica del anclaje Fig 11 PRECAUCION Debido a que esta parte sobrante saltará al golpearla prestar atención a su dirección 2 Cuando se use un adaptador de espiga cónica Fig 12 1 Instalar la barrena en...

Page 15: ...esto provocaría un riesgo serio 3 Mantenimiento de motor La unidad de bobinado del motor es el verdadero corazón de las herramientas eléctricas Prestar el mayor cuidado y asegurarse de que el bobinado no se dañe y o se humedezca con aceite o agua 4 Inspeccionar los carbones de contacto Fig 20 El motor emplea escobillas de carbón que son partes consumibles Cuando se gastan o están cerca del limite ...

Page 16: ...15 03ChT_DH40SR_CKT 12 7 31 15 01 15 ...

Page 17: ...16 03ChT_DH40SR_CKT 12 7 31 15 01 16 ...

Page 18: ...17 03ChT_DH40SR_CKT 12 7 31 15 01 17 ...

Page 19: ...18 A A 03ChT_DH40SR_CKT 12 7 31 15 01 18 ...

Page 20: ...19 03ChT_DH40SR_CKT 12 7 31 15 01 19 ...

Page 21: ...20 03ChT_DH40SR_CKT 12 7 31 15 01 20 ...

Page 22: ...그를 꽂으면 사고가 날 수 있습 니다 d 전원을 켜기 전에 조정 키 또는 렌치를 반드시 제거 해야 합니다 전동 툴의 회전 부위에 키 또는 렌치가 부착되어 있으 면 부상을 입을 수 있습니다 e 작업 대상과의 거리를 잘 조절하십시오 알맞은 발판 을 사용하고 항상 균형을 잡고 있어야 합니다 그렇게 하면 예기치 못한 상황에서도 전동 툴을 잘 다 룰 수 있습니다 f 알맞은 복장을 갖추십시오 헐렁한 옷이나 장신구를 착용하면 안 됩니다 머리카락 옷 장갑 등을 움직이 는 부품으로부터 보호하십시오 헐렁한 옷이나 장신구 긴 머리카락이 부품에 딸려 들 어갈 수도 있습니다 g 분진 추출 및 집진 장비에 연결할 수 있는 장치가 제 공되는 경우 그러한 장치가 잘 연결되어 있고 제대로 작동하는지 확인하십시오 이러한 장치를 사용하면 먼...

Page 23: ...리케이션 드릴 비트 모르스 테이퍼 번호 1 드릴 비트 테이퍼 생크 11 12 14 3 14 5 17 5 mm 모르스 테이퍼 번호 2 드릴 비트 테이퍼 생크 21 5 mm A 테이퍼 테이퍼 생크 어댑터 형태의 A 테이퍼 또 는 B 테이퍼가 옵션 액세서리로 제공되 나 이에 사용되는 드릴 비트는 제공되 지 않습니다 B 테이퍼 대형 직경 구멍 보링 회전 해머 작업 2 코어 비트 3 코어 비트 생크 가이드 플 레이트 1 센터 핀 1 센터 핀 38 mm 105 mm의 코어 비트에 적용됨 32 mm 및 35 mm의 코어 비트에 적용됨 참고 25 mm 또는 29 mm의 코어 비트에 사용하지 마십시오 2 코어 비트 외경 25 29 32 35 38 45 54 64 79 94 105 mm 가이드 플레이트 포함 25 mm 또는 ...

Page 24: ...위치로 옮기고 사이드 핸들의 그립을 시 계 방향으로 돌려 스토퍼를 고정시킵니다 4 예열 그림 7 이 장치의 그리스 윤활 시스템은 추운 지역에서 예열이 필요합니다 비트의 끝을 콘크리트와 접촉하게 위치시키고 스위치를 켜서 예열 작업을 수행하십시오 부딪치는 소리가 난 다 음에 장치를 사용하십시오 주의 예열 작업이 수행되면 두 손으로 사이드 핸들과 본체를 꽉 잡아 그립을 고정하고 드릴 비트의 끼임으로 신체가 뒤틀리지 않도록 주의하십시오 앵커에 대한 드릴 작업 및 밀어 넣기 작업 앵커 어댑터와 테이퍼 생크 어댑터와 같은 앵커용 옵션 액세 서리를 사용하십시오 1 회전 해머 작업 앵커 어댑터를 사용하는 경우 1 자체 드릴 앵커를 앵커 어댑터에 장착합니다 그림 8 2 스위치를 켜고 자체 드릴 앵커로 기본 구멍을 뚫습니다 ...

Page 25: ...리스 교환 방법 이 기계는 완전 기밀 구조로서 먼지가 들어오는 것을 막고 윤 활유 누설을 방지합니다 따라서 장시간 윤활하지 않고도 사 용할 수 있습니다 아래의 설명대로 그리스를 교환하십시오 1 그리스 교환 주기 구입 후 6개월 사용할 때마다 그리스를 교환합니다 가 까운 Hitachi 공인 서비스 센터에 그리스 교환을 문의하 십시오 그리스 교환을 진행합니다 2 그리스 보충 주의 그리스를 보충하기 전에 전원을 끄고 전원 플러그를 뽑 으십시오 1 크랭크 커버를 벗기고 내부의 그리스를 닦아냅니다 그림 19 2 Hitachi 전기 해머 그리스 A 30 g 표준 액세서리 튜브에 들어 있음 을 크랭크 케이스에 공급합니다 3 그리스 보충 후 크랭크 케이스를 단단히 장착합니다 참고 Hitachi 전기 해머 그리스 A는 저점...

Page 26: ...อนิ วอยู ที ตัวสวิทซ หรือเมื อเสียบปลั ก ขณะเป ดสวิทซ ไว อาจทําให เกิดอุบัติเหตุ d เอาสลักปรับแต งหรือประแจออกก อนเป ดสวิทซ ไฟฟ า สลักหรือประแจที ติดกับส วนหมุนของเครื องมือไฟฟ าอาจทําให คุณบาดเจ บได e อย าเอื อมตัว ยืนให มั นและสมดุลตลอดเวลา ทําให ควบคุมเครื องมือไฟฟ าได ดีขึ นเมื อมีเหตุที ไม คาดฝ น f แต งตัวให รัดกุม อย าสวมเสื อผ าหลวมหรือใช เครื องประดับ ให ผม เสื อผ าและถุงมืออยู ห างจากชิ น...

Page 27: ...ตรฐานได โดยไม ต องแจ งล วงหน า อุปกรณ ประกอบ แยกจําหน าย การเจาะรูทะลุ การหมุน การกระแทก 1 หัวสว าน เพลาหกเหลี ยม ความยาวรวม 280 400 505 มม เส นผ านศูนย กลางภายนอก 16 19 22 25 28 32 38 มม การเจาะรูสกรูพุก การหมุน การกระแทก 3 ลิ ม 1 หัวสว าน เพลาเทเปอร เส นผ านศูนย กลางภายนอก 11 12 14 3 14 5 17 5 21 5 มม 2 ตัวปรับเพลาเทเปอร ตัวปรับเพลาเทเปอร การใช หัวสว าน เรียวมอส เบอร 1 หัวสว าน เพลาเทเปอร 11 12 ...

Page 28: ...กดค างไว ตลอด ขอบตัวคีบเครื องมือจะติดกับนิ วมือ ทําให ยกตัวคีบเครื องมือไม ได 4 สอดเพลาเครื องมือเข าในรูหกเหลี ยมที ครอบหน าจนสุด 5 หมุนตัวคีบเพื อยึดเครื องมือ 6 ดึงเครื องมือเพื อให แน ใจว าล อกแน นดีแล ว หมายเหตุ ถอดออกตามขั นตอนการประกอบในลําดับย อนกลับ เมื อปุ มกดทํางานติดขัด เมื อกดปุ มกดไม ค อยลง ควรขจัดคราบสกปรกออกจากด านในของช อง ระบายโดยใช สายไฟ จากนั น ทาน ํามันหล อลื น แล วกดปุ มกดหล...

Page 29: ... าวจะกระเด นหลุดออกมา 2 เมื อใช ตัวปรับเพลาเทเปอร รูปที 12 1 ติดหัวสว านที มีเพลาเทเปอร เข าในตัวปรับเพลาเทเปอร 2 กดเป ดสวิทซ แล วเจาะรูฐานจนได ความลึกตามตําแหน งร องที กํากับ ไว บนหัวสว าน 3 หลังจากใช กระบอกฉีดเป าฝุ นผงออกแล ว ให ป ดจุกที ด านปลาย สกรูพุก แล วตอกสกรูพุกด วยค อน 4 หากต องการถอดหัวสว าน เพลาเทเปอร ให สอดลิ มเข าไปในช อง ของตัวปรับเพลาเทเปอร แล วใช ค อนทุบหัวลิ มเพื อรับน ําหนักแท ...

Page 30: ...จะใช แปรงถ านซึ งเป นอะไหล สิ นเปลือง เมื อแปรงถ านสึกหรอ หรือใกล ระดับ ขอบเขตการสึกหรอ จะทําให มอเตอร ขัดข องได เมื อใช แปรงถ านหยุดอัตโนมัติ มอเตอร จะหยุดการทํางานโดย อัตโนมัติ ในขั นตอนนี ให เปลี ยนแปรงถ านทั งสองใหม โดยต องเป น เบอร แปรงถ านตามที ระบุไว ในภาพ นอกจากนี ควรทําความสะอาด แปรงถ านทุกครั ง และตรวจสอบดูว าแปรงถ านเลื อนได โดยอิสระ ในที ยึดแปรง 5 การเปลี ยนแปรงถ าน คลายสกรูตั งตําแหน ...

Page 31: ...30 000Book DH40SR CKT indb 30 000Book DH40SR CKT indb 30 2012 07 31 15 34 15 2012 07 31 15 34 15 ...

Page 32: ... 107 108 101 109 110 111 112 113 102 85 86 87 88 89 98 92 91 93 94 95 90 77 76 75 40 34 31 32 33 15 16 17 18 19 20 21 22 23 8 9 10 11 44 45 46 47 48 57 58 59 60 61 62 63 64 65 66 67 68 69 70 72 73 74 71 49 50 51 52 53 54 55 56 43 12 000Book DH40SR CKT indb 31 000Book DH40SR CKT indb 31 2012 07 31 15 34 15 2012 07 31 15 34 15 ...

Page 33: ...S2L 62 313 058 1 63 313 053 1 64 321 281 1 A B C D 65 321 282 10 66 320 343 10 67 321 280 1 68 321 283 1 69 629 VVM 1 629VVC2PS2L 70 944 525 1 71 321 277 1 57 59 61 69 72 321 276 1 73 939 299 1 M661 74 321 319 1 75 313 078 1 76 313 079 1 77 313 080 1 78 971 786 1 79 620 1DD 1 6201DDCMPS2L 80 302 420 1 81 321 640 1 82 1 360 591U 1 110V 120V 79 81 86 87 82 2 360 591E 1 220V 230V 81 83 321 320 1 84 9...

Page 34: ...33 000Book DH40SR CKT indb 33 000Book DH40SR CKT indb 33 2012 07 31 15 34 17 2012 07 31 15 34 17 ...

Page 35: ...34 000Book DH40SR CKT indb 34 000Book DH40SR CKT indb 34 2012 07 31 15 34 17 2012 07 31 15 34 17 ...

Page 36: ...208 Code No C99121735 M Printed in Malaysia 000Book DH40SR CKT indb 35 000Book DH40SR CKT indb 35 2012 07 31 15 34 18 2012 07 31 15 34 18 ...

Reviews: