background image

ELECTRIC  TOOL  PARTS  LIST

LIST NO.

CORDLESS  DRIVER  DRILL
Model  DS 7DF

2003 

 2 

25

(E1)

 F881

Summary of Contents for DS 7DF

Page 1: ...POWER TOOLS TECHNICAL DATA AND SERVICE MANUAL CORDLESS DRIVER DRILL DS 7DF SPECIFICATIONS AND PARTS ARE SUBJECT TO CHANGE FOR IMPROVEMENT LIST No F881 Mar 2003 D MODEL DS 7DF ...

Page 2: ...AL DATA AND SERVICE MANUAL a symbol s is are used in the place of company name s and model name s of our competitor s The symbol s utilized here is are as follows Symbols Utilized Competitors Company Name Model Name BOSCH GSR7 2 1 B ...

Page 3: ...8 PRECAUTIONS IN SALES PROMOTION 7 8 1 Safety Instructions 7 8 2 Inherent Drawbacks of Cordless Driver Drills Requiring Particular Attention During Sales Promotion 9 9 REFERENCE MATERIALS 10 9 1 Feedback System 10 10 REPAIR GUIDE 11 10 1 Precautions in Disassembly and Reassembly 11 10 2 Precautions in Disassembly and Reassembly of the Battery Charger 16 11 STANDARD REPAIR TIME UNIT SCHEDULES 17 As...

Page 4: ...nces the cooling effect and the variable speed switch with feedback system ensures a sufficiently large torque even at a low speed 3 APPLICATIONS Tightening and loosening wood screws self tapping screw and machine screw Drilling into wood materials plastic mild steel and aluminum 4 SELLING POINTS 10 mm 3 8 keyless chuck 7 2 V cassette battery Durable fan cooled motor Compact and light Overall leng...

Page 5: ...odel Soft grip handle HITACHI DS 7DF DN 10DSA Equipped None B None DS 7DF Previous T type handle Gentle shape for comfortable gripping Elastomer material Soft resin Tightening torque may be different depending on types of screws and workpieces Instruct the customer to check the types of screws and workpieces to be used before operation Guide for selecting proper tightening torque Clutch position 1...

Page 6: ... Burnt Cycle 4 1 4 Variable speed switch with braking function The braking function allows the driver unit to stop rotation immediately when the trigger switch is released which is a convenient feature during actual working Also the feedback system ensures a sufficiently large torque even in the variable speed range Maker Model Type Feedback circuit Electric brake B Variable speed Not indicated Eq...

Page 7: ...standard accessory charger at ambient temperature of 20 C Charging temperature 10 C 40 C 50 F 104 F Overcharge prevention circuit A thermostat monitors the surface temperature of the battery and on detecting the temperature rise which occurs on completion of charging automatically turns off the unit to prevent the battery from overcharge Input capacity 28 W Function On During charging Off Charging...

Page 8: ...depending on charger to be used DN 10DSA Mild steel Aluminum Wood Drilling 10 mm 3 8 10 mm 3 8 15 mm 19 32 10 mm 3 8 10 mm 3 8 10 mm 3 8 10 mm 3 8 10 mm 3 8 15 mm 19 32 Screw driving Machine screw Wood screw 6 mm 1 4 dia 5 1 dia x 32 11 x 1 1 4 4 5 dia x 20 3 16 x 3 4 Not indicated 6 dia x 1 4 x Slip torque Max torque 0 5 3 9 N m 5 40 kgf cm 4 3 35 in lbs 22 positions 8 0 N m 82 kgf cm 71 in lbs 8...

Page 9: ...712S 165 285 510 7 WORKING PERFORMANCE PER SINGLE CHARGE Drilling and fastening performance comparison per charge Remark Number of machine screws fastened per charge Remark 1 Number of holes or fasteners per charge The above table shows an example of test data obtained using the battery which is standard for this tool As actually measured values listed in the above table may vary depending on shar...

Page 10: ... outlet fuel powered generator etc will cause the charger to overheat and burn out 4 Do not use any voltage increasing equipment transformer etc between the power source and the charger If the charger is used with voltage higher than that indicated on the unit it will not function properly 5 Conduct battery charging at an ambient temperature range of 10 C 40 C 50 F 104 F Special temperature sensit...

Page 11: ...isposal of the type FEB 7S or EB 712S storage battery Ensure that all customers understand that Type FEB 7S or EB 712S storage batteries should be turned in to any Hitachi Power Tools sales outlet or authorized service center when they are no longer capable of being recharged or repaired If thrown into a fire the batteries may explode or if discharged indiscriminately leakage of the cadmium compou...

Page 12: ...espersons should advise the customer to immediately release the switch and stop operation if the motor becomes locked A jammed drill bit can be disengaged from the workpiece material by setting the switch to reverse rotation or by manually turning the main body of the tool 4 Variation in amount of work possible per charge Although the nominal chargeable capacity of the storage batteries used with ...

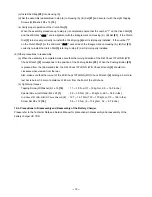
Page 13: ...ficient cooling before recharging This phenomenon is common to all existing batteries and chargers which employ temperature sensitive overcharge protection devices The cooling time required before recharging can be accomplished varies from a few minutes to about 30 minutes depending on the load duration of use and ambient temperature Fig 2 Schematic diagram of the feedback system 9 REFERENCE MATER...

Page 14: ...ull the Motor 18 from the Motor Spacer 15 and remove it from the Gear Box Ass y 17 See Fig 1 3 Removal of the Drill Chuck 10TLRD N W O Chuck Wrench 2 See Fig 2 a Mount the assembly of the Drill Chuck 10TLRD N W O Chuck Wrench 2 Clutch Dial 3 and Gear Box Ass y 17 in special repair tool J 331 Code No 321936 clamped in the vise as illustrated in Fig 2 In this operation check that the pinion press fi...

Page 15: ...e reverse of the disassembly procedure with some items to be noted as follows 1 Reassembly of the power supply unit a Be sure to perform wiring connections as indicated in the wiring diagram See Fig 4 4 Disassembly of the clutch unit a After press up the hook of Clutch Dial 3 with the small flat blade screwdriver the Clutch Dial 3 and Click Spring 4 can be taken out as they are See Fig 3 b Turn th...

Page 16: ...te the direction of each parts when installing the Ring Gear 10 Pinion B 12 as illustrated in Fig 6 ii Install the Gear Case 8 and the Motor Spacer 15 together with the recess on the Gear Case 8 aligned with the projection on the Motor Spacer 15 Fig 7 Fig 6 8 10 14 13 12 11 15 16 Recess Projection 3 Reassembly of the clutch unit a Install the Steel Ball D4 9 into the Gear Case 8 and mount Washer D...

Page 17: ...h the ridge at the Click Spring 4 facing the front side insert Click Spring 4 into the projection of the Gear Case 8 together with the three projections on the Gear Case 8 aligned with the three holes at the Click Spring 4 See Fig 9 Apply grease Hitachi Motor Grease No 29 Code No 930035 to the ridge at the Click Spring 4 Insert the Clutch Dial 3 to the Gear Case 8 See Fig 10 Mount the Nut 5 into t...

Page 18: ...haft Check that the pinion press fitted onto the shaft of the Motor 18 and Planet Gear A Set 13 mesh properly 6 Installation of the Bit Holder 26 into Housing A Fit the upper and lower projections of the Bit Holder 26 in the grooves in Housing A 7 Reassembly of main body See Fig 11 a Install the Pushing Button 25 into Housing A b Install the assembly reassembled in step 5 into Housing A Note that ...

Page 19: ... that the turning direction of the Drill Chuck 10TLRD N W O Chuck Wrench 2 corresponds to the position of the Pushing Button 25 When the Pushing Button 25 is pressed from the R marked side the Drill Chuck 10TLRD N W O Chuck Wrench 2 should turn clockwise when viewed from the rear Also make sure that the run out of the Drill Chuck 10TLRD N W O Chuck Wrench 2 holding a 9 mm dia test bar is below 0 8...

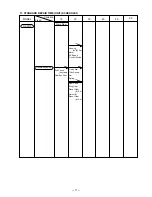
Page 20: ... 10 20 30 40 Fixed Variable DS 7DF Work Flow Housing A B Set Motor DC Speed Control Switch 60 50 Clutch Dial Click Spring Nut Spring Gear Case Ring Gear Planet Gear B Set Pinion B Planet Gear A Set Drill Chuck key less Gear Box Ass y General Assembly ...

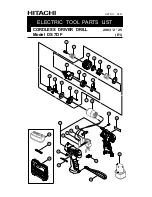
Page 21: ...ELECTRIC TOOL PARTS LIST LIST NO CORDLESS DRIVER DRILL Model DS 7DF 2003 2 25 E1 F881 ...

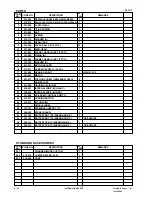
Page 22: ...A 1 15 321 910 MOTOR SPACER 1 16 315 817 SCREW SET D3X12 6 PCS 3 17 321 899 GEAR BOX ASS Y 1 INCLUD 3 16 18 321 897 MOTOR 1 19 991 672 TAPPING SCREW W WASHER D3X16 8 20 NAME PLATE 1 21 321 896 HOUSING A B SET 1 22 306 041 INTERNAL WIRE B BLACK 1 23 306 040 INTERNAL WIRE B RED 1 24 321 898 DC SPEED CONTROL SWITCH 1 25 321 871 PUSHING BUTTON 1 26 318 237 BIT HOLDER 1 27 HITACHI LABEL 1 28 315 141 TE...

Page 23: ......

Reviews: