background image

English

12

6.


How


to


select


tightening


torque


and


rotational


speed

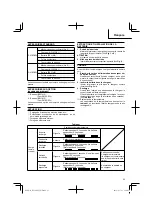
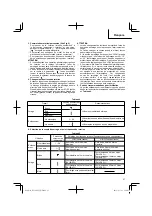
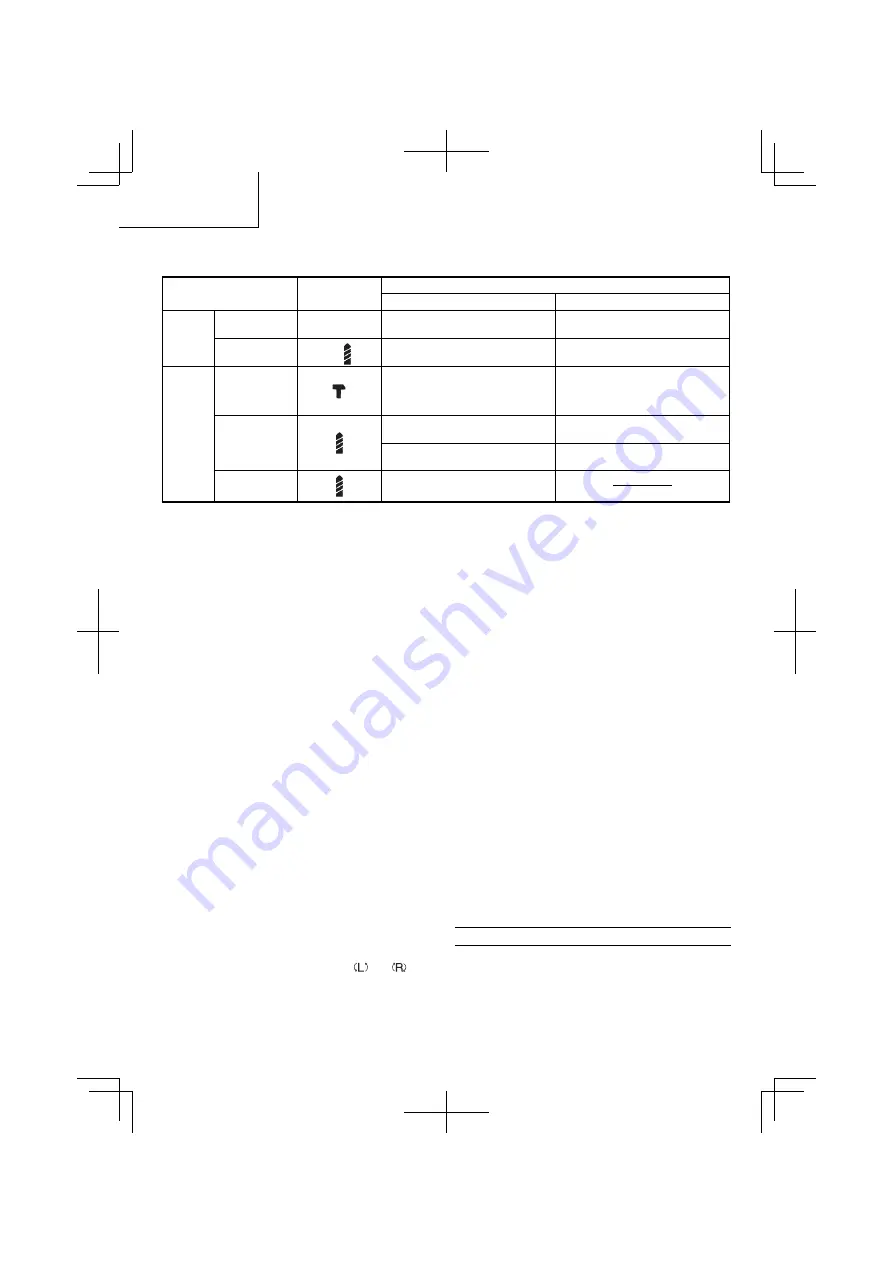
Table


5

Use

Clutch


Dial


Position

Rotating


speed


selection


(Position


of


the


shift


knob)

LOW


(Low


speed)

HIGH


(High


speed)

Driving

Machine


screw

1


22

For


4


mm


or


smaller


diameter


screws.

For


6


mm


or


smaller


diameter


screws.

Wood


screw

1


For


8


mm


or


smaller


nominal


diameter


screws.

For


4.8


mm


or


smaller


nominal


diameter


screws.

Drilling

Brick

For


13


mm


or


smaller


diameters.

For


8


mm


or


smaller


diameters.


(DV14DSFL)

For


10


mm


or


smaller


diameters.


(DV18DSFL)

Wood

For


32


mm


or


smaller


diameters.


(DV14DSFL)

For


18


mm


or


smaller


diameters.


(DV14DSFL)

For


38


mm


or


smaller


diameters.


(DV18DSFL)

For


22


mm


or


smaller


diameters.


(DV18DSFL)

Metal

For


drilling


with


a


metal


working


drill


bit.


The


rotational


speed


of


the


drill


can


be


controlled


by


varying


the


amount


that


the


trigger


switch


is


pulled.


Speed


is


low


when


the


trigger


switch


is


pulled


slightly


and


increases


as


the


trigger


switch


is


pulled


more.

NOTE


A


buzzing


noise


is


produced


when


the


motor


is


about


to


rotate;


This


is


only


a


noise,


not


a


machine


failure.

11.


For


drilling


into


brick


Excessive


pressing


force


never


increases


drilling


speed.


It


will


not


only


damage


the


drill


tip


or


reduce


working


e


ciency,


but


could


also


shorten


the


service


life


of


drill


bit.


Operate


the


impact


driver


drill


within


10-15


kg


pressing


force


while


drilling


into


brick.

12.


Using


the


hook


The


hook


is


used


to


hang


up


the


power


tool


to


your


waist


belt


while


working.

CAUTION


When


using


the


hook,


hang


up


the


power


tool

 fi 

rmly


not


to


drop


accidentally.


If


the


power


tool


is


dropped,


it


may


lead


to


an


accident.


When


carrying


the


power


tool


with


hooked


to


your


waist


belt,


do


not

 fi 

t


any


bit


to


the


tip


of


power


tool.


If


the


sharp


bit


such


as


drill


is

 fi 

tted


to


the


power


tool


when


carrying


it


with


hooked


to


your


waist


belt,


you


will


be


injured.


Install


securely


the


hook.


Unless


the


hook


is


securely


installed,


it


may


cause


an


injury


while


using.

(1)


Removing


the


hook.


Remove


the


screws

 fi 

xing


the


hook


with


screw


driver.


(

Fig.


11

)

(2)


Replacing


the


hook


and


tightening


the


screws.


Install


securely


the


hook


in


the


groove


of


power


tool


and


tighten


the


screws


to

 fi 

x


the


hook

 fi 

rmly.


(

Fig.


12

)

CAUTION


Only


Hitachi


STANDARD


ACCESSORIES


phillips


bit


(No.


2


×


65L;


Code


No.


983006)


may


be


used.


Do


not


use


other


bits


since


they


may


come


loose.

MAINTENANCE


AND


INSPECTION

1.


Inspecting


the


tool


Since


use


of


as


dull


tool


will


degrade


e


ciency


and


cause


possible


motor


malfunction,


sharpen


or


replace


the


tool


as


soon


as


abrasion


is


noted.

2.


Inspecting


the


mounting


screws


Regularly


inspect


all


mounting


screws


and


ensure


that


they


are


properly


tightened.


Should


any


of


the


screws


be


loose,


retighten


them


immediately.


Failure


to


do


so


could


result


in


serious


hazard.

CAUTION


The


selection


examples


shown


in


Table


5


should


be


considered


as


general


standard.


As


di


erent


types


of


tightening


screws


and


di


erent


materials


to


be


tightened


are


used


in


actual


works


proper


adjustments


are


naturally


necessary.


When


using


the


impact


driver


drill


with


a


machine


screw


at


HIGH


(high


speed),


a


screw


may


damage


or


a


bit


may


loose


due


to


the


tightning


torque


is


too


strong.


Use


the


impact


driver


drill


at


LOW


(low


speed)


when


using


a


machine


screw.

NOTE


The


use


of


the


battery


in


a


cold


condition


(below


0


degree


Centigrade)


can


sometimes


result


in


the


weakened


tightening


torque


and


reduced


amount


of


work.


This,


however,


is


a


temporary


phenomenon,


and


returns


to


normal


when


the


battery


warms


up.

7.


Mounting


and


dismounting


of


the


bit

(1)


After


inserting


a


driver


bit,


etc.


into


the


keyless


drill


chuck,


fi 

rmly


grasp


the


ring


and


tighten


the


sleeve


by


turning


it


toward


the


right


(in


the


clockwise


direction


as


viewed


from


the


front)


(See


Fig.


9

).


If


the


sleeve


becomes


loose


during


operation,


tighten


it


further.


The


tightening


force


becomes


stronger


when


the


sleeve


is


tightened


additionally.

(2)


Dismounting


the


bit


Firmly


grasp


the


ring


and


loosen


the


sleeve


by


turning


it


toward


the


left


(in


the


counter-clockwise


direction


as


viewed


from


the


front)


(See


Fig.


10

).

CAUTION


When


it


is


no


longer


possible


to


loosen


the


sleeve,


use


a


vise


or


similar


instrument


to


secure


the


bit.


Set


the


clutch


mode


between


1


and


11


and


then


turn


the


sleeve


to


the


loose


side


(left


side)


while


operating


the


clutch.


It


should


be


easy


now


to


loosen


the


sleeve.

8.


Con

fi 

rm


that


the


battery


is


mounted


correctly

9.


Check


the


rotational


direction


The


bit


rotates


clockwise


(viewed


from


the


rear


side)


by


pushing


the


R-side


of


the


selector


button.


The


L-side


of


the


selector


button


is


pushed


to


turn


the


bit


counterclockwise


(See


Fig.


10

)


(The


and


marks


are


provided


on


the


body).

CAUTION


Always


use


this


unit


with


clockwise


rotation,


when


using


it


as


an


impact


drill.

10.


Switch


operation


When


the


trigger


switch


is


depressed,


the


tool


rotates.


When


the


trigger


is


released,


the


tool


stops.

000Book̲DV14DSFL̲WE.indb   12

000Book̲DV14DSFL̲WE.indb   12

2011/03/23   12:00:47

2011/03/23   12:00:47

Summary of Contents for DV 14DSFL

Page 1: ...o Instruções de uso Read through carefully and understand these instructions before use Diese Anleitung vor Benutzung des Werkzeugs sorgfältig durchlesen und verstehen Lire soigneusement et bien assimiler ces instructions avant usage Prima dell uso leggere attentamente e comprendere queste instruzioni Deze gebruiksaanwijzing s v p voor gebruik zorgvuldig doorlezen Leer cuidadosamente y comprender ...

Page 2: ...2 1 2 3 4 5 6 7 8 3 8 1 2 6 4 5 1 2 7 1 1 9 0 000Book DV14DSFL WE indb 2 000Book DV14DSFL WE indb 2 2011 03 23 12 00 43 2011 03 23 12 00 43 ...

Page 3: ...3 9 10 11 12 e r t y u u i q w o p o i 000Book DV14DSFL WE indb 3 000Book DV14DSFL WE indb 3 2011 03 23 12 00 44 2011 03 23 12 00 44 ...

Page 4: ...ion Segno del martello Clutch dial Kupplungsskala Sélecteur de débrayage Ghiera frizione Triangle mark Dreiecksmarkierung Triangle Simbolo del triangolo Weak Schwach Faible Debol Strong Stark Fort Forte Line Linie Filet Linea Shift knob Schaltknopf Bouton de décalage Manopola di comando Low speed Kleine Geschwindigkeit Vitesse ralentie Bassa velocità High speed Große Geschwindigkeit Vitesse élevée...

Page 5: ...rtelo Koppelingsinstelling Dial del embrague Disco de engate Driehoekje Marca de triángulo Marca de triângulo Zwak Débil Fraco Sterk Fuerte Forte Streepje Línea Linha Toerenschakelaar Mando de cambio Comutador Laag toerental Velocidad alta Velocidade baixa Hoog toerental Velocidad baja Velocidade alta q Ring Anillo Anel w Klembus Manguito Manguito e Aandraaien Apretar Apertar r Losdraaien Aflojar ...

Page 6: ...lo per Paesi UE Non gettare le apparecchiature elettriche tra i rifiuti domestici Secondo la Direttiva Europea 2002 96 CE sui rifiuti di apparecchiature elettriche ed elettroniche e la sua attuazione in conformità alle norme nazionali le apparecchiature elettriche esauste devono essere raccolte separatamente al fine di essere reimpiegate in modo eco compatibile Symbolen WAARSCHUWING Hieronder staa...

Page 7: ... your finger on the switch or energising power tools that have the switch on invites accidents d Remove any adjusting key or wrench before turning the power tool on A wrench or a key left attached to a rotating part of the power tool may result in personal injury e Do not overreach Keep proper footing and balance at all times This enables better control of the power tool in unexpected situations f...

Page 8: ...3 described below when using this product even if you are pulling the switch the motor may stop This is not the trouble but the result of protection function 1 When the battery power remaining runs out the motor stops In such case charge it up immediately 2 If the tool is overloaded the motor may stop In this case release the switch of tool and eliminate causes of overloading After that you can us...

Page 9: ...ording to the condition of the charger or the rechargeable battery Do not place conductive debris nail and wires such as iron wire and copper wire in the storage case To prevent shorting from occurring load the battery in the tool or insert securely the battery cover for storing until the ventilator is not seen See Fig 1 SPECIFICATIONS POWER TOOL Model DV14DSFL DV18DSFL No load speed Low High 0 40...

Page 10: ...ng the work environment Check if the work environment is suitable by following the precautions HOW TO USE 1 Confirm the clutch dial position See Fig 5 The three modes of screwdriver drill and impact drill can be switched by the position of the cap in this unit 1 When using this unit as a screwdriver line up the one of the numbers 1 3 5 22 on the clutch dial or the dots with the triangle mark on th...

Page 11: ...is normally performed at the Rotation setting is performed at Impact setting the effect of making holes does not only increase but it may also damage the bit or other parts If it is hard to turn the clutch dial to hammer mark position turn the chuck slightly in either direction and then turn the clutch dial to hammer mark position again 4 Change rotation speed Operate the shift knob to change the r...

Page 12: ...ting the tool Since use of as dull tool will degrade efficiency and cause possible motor malfunction sharpen or replace the tool as soon as abrasion is noted 2 Inspecting the mounting screws Regularly inspect all mounting screws and ensure that they are properly tightened Should any of the screws be loose retighten them immediately Failure to do so could result in serious hazard CAUTION The selectio...

Page 13: ...ttery is disassembled and modified such as disassembly and replacement of cells or other internal parts GUARANTEE We guarantee Hitachi Power Tools in accordance with statutory country specific regulation This guarantee does not cover defects or damage due to misuse abuse or normal wear and tear In case of complaint please send the Power Tool undismantled with the GUARANTEE CERTIFICATE found at the...

Page 14: ...cht vermeiden lässt verwenden Sie eine Stromversorgung mit Fehlerstromschutzeinrichtung Residual Current Device RCD DurchdenEinsatzeinerFehlerstromschutzeinrichtung wird das Risiko eines elektrischen Schlages reduziert 3 Persönliche Sicherheit a Bleiben Sie wachsam achten Sie auf das was Sie tun und setzen Sie Ihren Verstand ein wenn Sie mit Elektrowerkzeugen arbeiten Benutzen Sie keine Elektrower...

Page 15: ...nen zu Reizungen oder Verbrennungen führen 6 Service a Lassen Sie Elektrowerkzeuge durch qualifizierte Fachkräfte und unter Einsatz passender zugelassener Originalteile warten Dies sorgt dafür dass die Sicherheit des Elektrowerkzeugs nicht beeinträchtigt wird VORSICHT Von Kindern und gebrechlichen Personen fernhalten Werkzeuge sollten bei Nichtgebrauch außerhalb der Reichweite von Kindern und gebr...

Page 16: ... ab 8 Vermeiden Sie hohe Temperaturen und hohen Druck wie er beispielsweise in der Mikrowelle einem Trockner oder einem Hochdruckbehälter auftritt 9 Wenn Sie ein Leck oder Rußgeruch feststellen vermeiden Sie jeglichen Kontakt mit Feuerstellen 10 Vermeiden Sie eine Verwendung an Orten an denen starke statische Elektrizität erzeugt wird 11 WerdeneinLeck Rußgeruch Erwärmung Verfärbungen Verformungen ...

Page 17: ...kzeugs die Batterie wie folgt laden 1 Den Netzstecker des Ladegerätes in eine Steckdose einstecken Beim Anschluss des Ladegeräts an eine Netzsteckdose blinkt die Kontrolllampe rot auf in Sekundenabständen 2 Eine Batterie in das Ladegerät einlegen Die Batterie in das Ladegerät stecken wie in Abb 3 und 4 gezeigt 3 Laden Beim Einlegen einer Batterie in das Ladegerät leuchtet die Kontrolllampe kontinu...

Page 18: ...e Abb 5 3 Einstellen des Anzugsdrehmoments Drehen Sie die Kupplungsskala und richten Sie eine der Zahlen 1 3 5 22 auf der Kupplungsskala oder den Punkt auf die Dreiecksmarkierung am äußeren Gehäuse aus Verstellen Sie die Kappe entsprechend dem erforderlichen Drehmoment in Richtung von stärkerem oder schwächerem Drehmoment 2 Über die Temperatur der Akkubatterie Die Temperaturen für Batterien sind i...

Page 19: ...igkeit Ein schrauben Maschinenschraube 1 22 Für Schrauben von 4 mm Durchmesser oder weniger Für Schraube von 6 mm Durchmesser oder weniger Holzschraube 1 Für 8 mm Durchmesser oder weniger Nenndurchschnitt Für 4 8 mm Durchmesser oder weniger Nenndurchschnitt Bohren Ziegel Für 13 mm Durchmesser oder weniger Für 8 mm Durchmesser oder weniger DV14DSFL Für 10 mm Durchmesser oder weniger DV18DSFL Holz F...

Page 20: ...sich nicht um eine Störung 11 Für Bohren von Ziegel und Metall Übermäßiger Druck erhöht niemals die Bohrgeschwindigkeit Er verursacht nicht nur Beschädigung der Bohrerspitze und verringerte Arbeitswirksamkeit sondern verkürzt auch die Standzeit des Bohrers Betreiben Sie den Akku Schlagbohrschrauber beim Bohren von Ziegelsteinen mit einem Druck von 10 bis 15 kg 12 Verwendung des Hakens Der Haken di...

Page 21: ...nd Im Schadensfall senden Sie das nicht zerlegte Elektrowerkzeug zusammen mit dem GARANTIESCHEIN den Sie am Ende der Bedienungsanleitung finden an ein von Hitachi autorisiertes Servicecenter HINWEIS Aufgrund des ständigen Forschungs und Entwicklung sprogramms von HITACHI sind änderungen der hierin gemachten technischen Angaben vorbehalten Information über Betriebslärm und Vibration Die gemessenen ...

Page 22: ...ous êtes fatigué ou sous l emprise de drogues d alcool ou de médicaments Un moment d inattention en cours d utilisation d un outil peut entraîner des blessures graves des personnes b Utiliser un équipement de sécurité Toujours porter une protection pour les yeux Les équipements de sécurité tels que les masques contre les poussières les chaussures de sécurité antidérapantes les casques ou les prote...

Page 23: ...euse La batterie ne peut pas être chargée à une température supérieure à 50 C La température la plus appropriée serait de 20 C 25 C 3 Quand une charge a été effectuée laissez le chargeur au repos pendant environ 15 minutes avant de commencer la prochaine charge de batterie Ne pas recharger plus de deux batteries de suite 4 Ne laissez pas de corps étrangers pénétrer par le trou de raccord de la batt...

Page 24: ...tement un médecin En l absence de traitement le liquide peut détériorer l oeil 2 En cas de projection de liquide ayant fuit de la batterie sur votre peau ou vos vêtements rincez immédiatement ces derniers à l eau claire au robinet Le liquide peut provoquer une irritation de la peau 3 En cas de détection de rouille de mauvaise odeur de surchauffe de décoloration de déformation et ou autres anomalies...

Page 25: ...du chargeur à une prise murale le voyant témoin clignote en rouge à intervalles d une seconde 2 Insérer la batterie dans le chargeur Insérer fermement la pile dans le chargeur comme illustré aux Fig 3 et 4 3 Recharge Quand vous insérez une batterie dans le chargeur le voyant témoin s allume en rouge Quand la batterie est complètement chargée le voyant témoin clignote en rouge à intervalles d une s...

Page 26: ...moteur se vérouille et s arrête pendant que l outil est utililsé en tant que perceuse Pendant le fonctionnement de la perceuse à percussion faites attention à ne pas verrouiller le moteur Une percussion trop prolongée peut casser la vis par suite d un serrage excessif 2 Au sujet de la température de la batterie rechargeable Les plages de température des batteries rechargeables sont indiquées dans ...

Page 27: ... vitesse Enfonce ment Vis méchanique 1 22 Pour vis de 4 mm ou moins diamètre Pour vis de 6 mm ou moins diamètre Vis de bois 1 Pour vis de 8 mm ou moins diamètre nominal Pour vis de 4 8 mm ou moins diamètre nominal Forage Brique Pour diamètre de 13 mm ou moins Pour diamètre de 8 mm ou moins DV14DSFL Pour diamètre de 10 mm ou moins DV18DSFL Bois Pour diamètre de 32 mm ou moins DV14DSFL Pour diamètre...

Page 28: ...s au Tableau 5 seront pris en tant qu exemples standard étant donné que différentes vis de serrages et différents matériels devant être serrés seront utilisés réellement et pour lesquels un réglage approprié sera évidemment requis Si la perceuse à percussion est utilisée pour serrer une vis à métaux à grande vitesse HIGH la vis risque d être endommagée ou de se desserrer à cause de la trop grande fo...

Page 29: ...ec une batterie autre que celle que nous avons spécifié ou encore si la batterie est démontée et modifiée par exemple le démontage et remplacement des cellules ou autres composants internes GARANTIE Nous garantissons que l ensemble des Outils électriques Hitachi sont conformes aux réglementations spécifiques statutaires nationales Cette garantie ne couvre pas les défautsnilesdommagesinhérentsàunem...

Page 30: ...zzatura protettiva quali maschera facciale calzature antiscivolo caschi o protezioni oculari ridurrà il rischio di lesioni personali c Impedite le accensioni involontarie Prima del collegamento a una sorgente di alimentazione e o pacco batteria e prima di raccogliere o trasportare l utensile verificate che l interruttore sia posizionato su OFF Il trasporto degli elettroutensili tenendo le dita sul...

Page 31: ...corto circuiti alla batteria ricaricabile Il fenomeno provoca surriscaldamento e grande corrente elettrica Può quindi causare bruciature o danni alla batteria 7 Non gettare la batteria nel fuoco Può esplodere 8 Non appena la vita della batteria dopo le operazioni di ricaricatura diventa troppo breve per fini pratici si porti la batteria al negozio dove è stata acquistata Non la si getti mai via 9 ...

Page 32: ...tio penetrano corpi estranei conduttivi potrebbe verificarsi un cortocircuito della batteria con conseguente incendio Nello stoccaggio della batteria a ioni di litio attenersi scrupolosamente alle seguenti istruzioni Non inserire corpi conduttivi chiodi e fili ad esempio fili di ferro o rame nel vano di stoccaggio Per impedire cortocircuiti caricare la batteria nello strumento o applicare saldamen...

Page 33: ...ricaricabile Tabella 1 Indicazioni della spia Spia rossa Prima della carica Lampeggia Si illumina per 0 5 secondi Non si illumina per 0 5 secondi Spento per 0 5 secondi Durante la carica Si illumina Si illumina stabilmente Carica completa Lampeggia Si illumina per 0 5 secondi Non si illumina per 0 5 secondi Spento per 0 5 secondi Standby di surriscalda mento Lampeggia Si illumina per 1 secondi Non...

Page 34: ...ossibili danni all utensile La ghiera della frizione non deve essere mai collocata su posizioni intermedie tra i numeri 1 3 5 22 o fra i punti Non utilizzare l utensile con la ghiera della frizione situata in posizione intermedia tra il numero 22 e la linea al centro del simbolo del trapano Questo può causare danni Ved Fig 6 2 Regolazione della coppia di serraggio 1 Coppia di serraggio La coppia d...

Page 35: ...e la punta a bassa velocità LOW quando si impiega una vite di macchina NOTA L uso della batteria a basse temperature sotto 0 gradi centigradi può a volte risultare in una coppia di serraggio indebolita e una minore quantità di lavoro Questo è tuttavia un fenomeno temporaneo e il funzionamento torna alla normalità quando la batteria si scalda 7 Montaggio e smontaggio della punta 1 Dopo aver inserit...

Page 36: ...rla immediatamente Si rischia in caso contrario di provocare incidenti pericolosi 3 Manutenzione del motore L avvolgimento del motore il vero e proprio cuore degli attezzi elettrici Fare attenzione a non danneggiare l avvolgimento e o non bagnarlo con olio o acqua 4 Pulizia della carcassa dell utensile Se il trapano avvitatore a percussione è sporco pulirlo con uno staccio soffice inumidito di acqua...

Page 37: ...ato è stato misurato in conformità a un metodo di test standard e può essere utilizzato per confrontare un utensile con un altro Può anche essere utilizzato in una valutazione preliminare dell esposizione AVVERTENZA Il valore di emissione vibrazioni durante l uso effettivo dell utensile può essere diverso dal valore dichiarato in base alle modalità di utilizzo dell utensile stesso Identificare le m...

Page 38: ...k 3 Persoonlijke veiligheid a Blijf waakzaam let voortdurend op uw werk en gebruik uw gezond verstand wanneer u elektrisch gereedschap gebruikt Gebruik geen elektrisch gereedschap wanneer u moe bent of onder invloed van drugs alcohol of medicijnen Eén moment van onoplettendheid kan in ernstig lichamelijk letsel resulteren b Gebruik persoonlijke beschermingsmiddelen Draag altijd oogbescherming Besc...

Page 39: ...schap vast aan de geïsoleerde handgrepen tijdens het uitvoeren van een bewerking waarbij het snijtoebehoren of de klem in aanraking kan komen met verborgen bedrading Snijtoebehoren of klemmen die een onder stroom staande draad aanraken maken dat niet geïsoleerde delen van het gereedschap ook onder stroom komen waardoor de gebruiker een elektrische schok kan krijgen 2 Laad de accu bij een temperatu...

Page 40: ...e opslag haalt u hem onmiddellijk uit de uitrusting of de acculader en stopt u het gebruik LET OP 1 Wanneer u de lekkende vloeistof uit de accu in de ogen krijgt wrijf dan niet in de ogen en was ze goed uit met vers proper water zoals kraantjeswater en roep er onmiddellijk een dokter bij Indien u geen behandeling krijgt kan de vloeistof oogproblemen veroorzaken 2 Wanneer de vloeistof lekt op uw hu...

Page 41: ...e oplader zoals in Afb 3 en 4 getoond wordt 3 Opladen Wanneer een batterij in de acculader wordt aangebracht blijft het lampje continu rood branden Wanneer de batterij volledig is opgeladen gaat het lampje in rood knipperen met tussenpozen van 1 seconde Zie Tabel 1 1 Aanduiding van het controlelampje De aanduidingen van het controlelampje zijn zoals aangegeven in Tabel 1 al naar gelang de toestand...

Page 42: ...gebruiken 3 Tijd die benodigd is De oplaadtijden in de onderstaande Tabel 3 zijn afhankelijk van de kombinatie van acculader en batterij Tabel 3 Oplaadtijden bij 20 C Acculader Batterij UC18YGSL BSL1415 BSL1815 Circa 40 min OPMERKING De tijd voor het opladen verschilt afhankelijk van de omgevingstemperatuur en het spanningsvoltage 4 Trek de stekker van het oplaadapparaat uit het stopkontakt 5 Houd...

Page 43: ...ties voor gebruik Tabel 4 geeft een overzicht van de diverse werkzaamheden die met dit apparaat kunnen worden uitgevoerd op basis van de mechanische eigenschappen van dit gereedschap Tabel 4 Werk Koppelingsinstelling positie Suggesties Boren Steen Gebruik een boor en dopsleutel die met de diameter van de schroef overeenkomen Hout Staal Aluminium Drijven Kolomschroef 1 22 Bohrespitze of Hülse dem S...

Page 44: ...heupriem plaats dan geen uitrustingsstuk in de kop van de machine Als de machine is uitgerust met een scherp uitrustingsstuk zoals een boor terwijl u het aan uw heupriem draagt veroorzaakt dat letsel Bevestig de haak stevig Als de haak niet stevig is bevestigd kan dit letsel veroorzaken tijdens het gebruik 1 De haak verwijderen Verwijder de schroeven die de haak op zijn plaats houden met een schro...

Page 45: ...rmatie betreffende luchtgeluid en trillingen De gemeten waarden zijn verkregen overeenkomstig EN60745 en voldoen aan de eisen van ISO 4871 Gemeten A gewogen geluidsniveau 96 dB A Gemeten A gewogen geluidsdrukniveau 85 dB A Onzekerheid KpA 3 dB A Draag gehoorbescherming Totale trillingswaarden triax vector som bepaald overeenkomstig EN60745 Stootboren in beton Trillingsemissiewaarde ah ID 10 4 m s2 ...

Page 46: ...rramienta eléctrica No utilice una herramienta eléctrica cuando esté cansado o esté bajo la influencia de drogas alcohol o medicación La distracción momentánea cuando utiliza herramientaseléctricaspuededarlugaraimportantes daños personales b Utilice un equipo de protección Utilice siempre una protección ocular El equipo de protección como máscara para el polvo zapatos de seguridad antideslizantes ...

Page 47: ...ccesorio de corte o los pasadores entra en contacto con un cable con corriente las partes metálicas expuestas de la herramienta eléctrica pueden transmitir esa corriente y producir una descarga eléctrica al operador 2 Siempre cargar la batería a una temperatura comprendida 0 C 50 C Una temperatura inferior a 0 C causa una sobrecarga lo que es peligroso No puede cargarse la batería a una temperatur...

Page 48: ...os no se los frote y lávelos bien con agua limpia como por ejemplo agua del grifo y póngase en contacto con un médico inmediatamente Si no se trata el líquido podría causar problemas de visión 2 Si el líquido de fuga entra en contacto con la piel o la ropa lávela bien con agua limpia como por ejemplo agua del grifo inmediatamente Podría producir irritación de la piel 3 Si observa óxido mal olor re...

Page 49: ...el enchufe del cargador a una toma de la red el piloto parpadeará en rojo A intervalos de 1 segundo 2 Inserte la batería en el cargador Inserte fi rmemente la batería en el cargador como se muestra en las Fig 3 y 4 3 Carga Cuando inserte una batería en el cargador el piloto permanecerá continuamente encendido en rojo Cuando la batería se haya cargado completamente el piloto parpadeará en rojo A in...

Page 50: ...pa en la dirección de par débil o fuerte según el par que necesite PRECAUCIÓN El giro del motor podrá trabarse mientras que se uas la unidad como taladro Tenga cuidado de no bloquear el motor mientras se está operando el taladro atornillador de impacto Un aprite excesivo podrá causar la rotura del tornillo 2 Temperatura de las baterías Las temperaturas para las baterías recargables se muestran en ...

Page 51: ...rto tiempo puede quemarse tanto él como la bateria Para ampliar su duración la batería de litio está equipada con la función de protección para detener la salida Por lo tanto si se sobrecarga al batería el motor puede detenerse No obstante esto no esun problema sino el resultado de la función de protección En este caso suelte el interruptor de la herramienta y elimine las causas de la sobrecarga 5...

Page 52: ... eficacia de trabajo sino que también acortará la duración útil de la broca Utilice el taladro atornillador de impacto a batería con una fuerza de presión de 10 15 kg cuando taladre ladrillos 12 Uso del gancho El gancho se usa para colgarse la herramienta con alimentación eléctrica del cinturón mientras se trabaja PRECAUCIÓN Cuando se utiliza el gancho se debe sujetar la herramienta con firmeza pa...

Page 53: ... desmontar y con el CERTIFICADO DE GARANTÍA que aparece al final de estas instrucciones de uso al Centro de Servicio Autorizado de Hitachi NOTA Debido al programa continuo de investigación y desarrollo de HITACHI estas especificaciones están sujetas a cambio sin previo aviso Información sobre el ruido propagado por el aire y vibración Los valores medidos se determinaron de acuerdo con EN60745 decl...

Page 54: ...ais graves b Utilize equipamento de protecção pessoal Utilize sempre protecção para os olhos O equipamento de protecção tal como uma máscara de pó sapatos de segurança anti derrapantes chapéu rígido ou protecção auricular utilizados para condições adequadas reduzirá os ferimentos pessoais c Evite ligar por acidente Certifique se de que o interruptor está na posição de desligado antes de ligar a fo...

Page 55: ...rregamento libere o recarregador por cerca de 15 minutos antes da próxima recarga da bateria Não recarregue mais do que duas baterias consecutivamente 4 Não deixe que materiais estranhos entrem no orifício de conexão da bateria recarregável 5 Não desmonte nunca a bateria recarregável nem o recarregador 6 Nunca provoque curto circuito na bateria recarregável Ao fazer isso a bateria provocará uma gr...

Page 56: ...nte com água limpa como água da torneira Existe a possibilidade do líquido provocar irritação cutânea 3 Se se deparar com ferrugem maus odores sobreaquecimento descoloração deformações e ou outras irregularidades ao utilizar a bateria pela primeira vez pare de utilizá la e devolva a ao seu fornecedor ou vendedor AVISO Se uma matéria estranha condutora penetrar no terminal da bateria de iões de lít...

Page 57: ...gador como mostra a Fig 3 e 4 3 Recarga Ao inserir a bateria no carregador a luz avisadora acender se á continuamente a vermelho Quando a bateria ficar completamente recarregada a luz avisadora piscará a vermelho Em intervalos de 1 segundo Veja Tabela 1 1 Indicação da lâmpada piloto As indicações da lâmpada piloto serão apresentadas na Tabela 1 de acordo com a condição do carregador ou a bateria r...

Page 58: ...da de maneira correta ANTES DA OPERAÇÃO 1 Definição e verificação do ambiente de trabalho Confirme se o ambiente de trabalho é apropriado seguindo as precauções MODO DE USAR 1 Verifique a posição do disco de engate Veja Fig 5 Os três modos de chave de fenda berbequim e berbequim com percussão podem se alternados pela posição da tampa no aparelho 1 Ao usar este aparelho como chave de fenda alinhe a...

Page 59: ... baixa Quando ajustado para HIGH o berbequim gira em velocidade alta CUIDADO Ao mudar a velocidade de rotação com o comutador confirme que o interruptor está desligado Mudar a velocidade enquanto o motor estiver girando danifica as engrenagens Ao ajustar o comutador para HIGH velocidade alta e a posição do disco de engate se encontrar entre 15 e 22 pode acontecer que a embraiagem não engrene e que...

Page 60: ...rica presa ao cinto não encaixe uma ponteira na ponta da ferramenta eléctrica Se uma ponteira aguçada tal como uma broca for encaixada na ferramenta eléctrica quando a transportar presa ao cinto sofrerá ferimentos Coloque o gancho fixamente Se o gancho não for colocado fixamente poderá causar ferimentos durante a utilização 1 Remover o gancho Retire os parafusos que fixam o gancho com uma chave de...

Page 61: ...minados de acordo com a EN60745 e declarados em conformidade com a ISO 4871 Nível de potência sonora ponderada A medida 96 dB A Nível de pressão sonora ponderada A medida 85 dB A Imprecisão KpA 3 dB A Use proteção auditiva Os valores totais da vibração soma do vector triax são determinados de acordo com a norma EN60745 Perfuração por impacto de betão Valor de emissão de vibrações ah ID 10 4 m s2 I...

Page 62: ...27 PLANET GEAR A 6 28 PINION B 1 29 FIRST RING GEAR 1 30 WASHER B 1 31 MOTOR SPACER 1 32 MACHINE SCREW W SP WASHER M4 6 2 33 HOUSING A B SET 1 34 HITACHI LABEL 1 35 TRUSS HD SCREW M4 1 36 HOOK 1 37 LOCK NUT M4 2 38 PACKING 2 39 PUSH BUTTON 1 40 MOTOR 1 41 INTERNAL WIRE 1 42 SHIFT KNOB 1 43 INTERNAL WIRE RED 140L 1 Item No Part Name Q TY 44 DC SPEED CONTROL SWITCH 1 45 CONTROLLER TERMINAL 1 46 1 BA...

Page 63: ...e adquisición 4 Nombre y dirección del cliente 5 Nombre y dirección del distribudor Se ruega poner el sello del distribudor con su nombre y dirección Français Português CERTIFICAT DE GARANTIE 1 No de modèle 2 No de série 3 Date d achat 4 Nom et adresse du client 5 Nom et adresse du revendeur Cachet portant le nom et l adresse du revendeur CERTIFICADO DE GARANTIA 1 Número do modelo 2 Número do séri...

Page 64: ...64 1 2 3 4 5 08Back DV14DSFL WE indd 64 08Back DV14DSFL WE indd 64 2012 10 09 14 16 17 2012 10 09 14 16 17 ...

Page 65: ...e Tel 33 1 69474949 Fax 33 1 60861416 URL http www hitachi powertools fr Hitachi Power Tools Belgium N V S A Koningin Astridlaan 51 1780 Wemmel Belgium Tel 32 2 460 1720 Fax 32 2 460 2542 URL http www hitachi powertools be Hitachi Fercad Power Tools Italia S p A Via Retrone 49 36077 Altavilla Vicentina VI Italy Tel 39 0444 548111 Fax 39 0444 548110 URL http www hitachi powertools it Hitachi Power ...

Page 66: ...66 08Back DV14DSFL WE indd 66 08Back DV14DSFL WE indd 66 2012 10 09 14 16 17 2012 10 09 14 16 17 ...

Page 67: ...67 08Back DV14DSFL WE indd 67 08Back DV14DSFL WE indd 67 2012 10 09 14 16 17 2012 10 09 14 16 17 ...

Page 68: ...s Europeas de Hitachi Koki Europe Ltd está autorizado para recopilar archivos técnicos Esta declaración se aplica a los productos con marcas de la CE Français Português DECLARATION DE CONFORMITE CE Nous déclarons sous notre seule et entière responsabilité que ce produit est conforme aux normes ou documents de normalisation EN60745 EN60335 EN55014 et EN61000 en accord avec les Directives 2004 108 C...

Reviews: