background image

English

7

BATTERY REMOVAL/INSTALLATION

1. Battery removal

Hold the handle tightly and push the battery latch (2
pcs.) to remove the battery (see Figs. 1 and 2).

CAUTION

Never short-circuit the battery.

2. Battery installation

Insert the battery while observing its polarities (see
Fig. 2).

CHARGING

UC18YRL

Before using the power tool, charge the battery as follows.
1. Connect the charger’s power cord to a receptacle

When the power cord is connected, the charger’s
pilot lamp will blink in red (At 1-second intervals).

2. Insert the battery into the charger

Insert the battery firmly, until it contacts the bottom of
the charger compartment.

CAUTION

If the battery is inserted in the reverse direction, not
only recharging will become impossible, but it may
also cause problems in the charger such as deformed
recharging terminal.

3. Charging

When inserting a battery in the charger, charging will
commence and the pilot lamp will light up
continuously in red.
When the battery becomes fully recharged, the pilot
lamp will blink in red (At 1-second intervals) (See
Table 1).

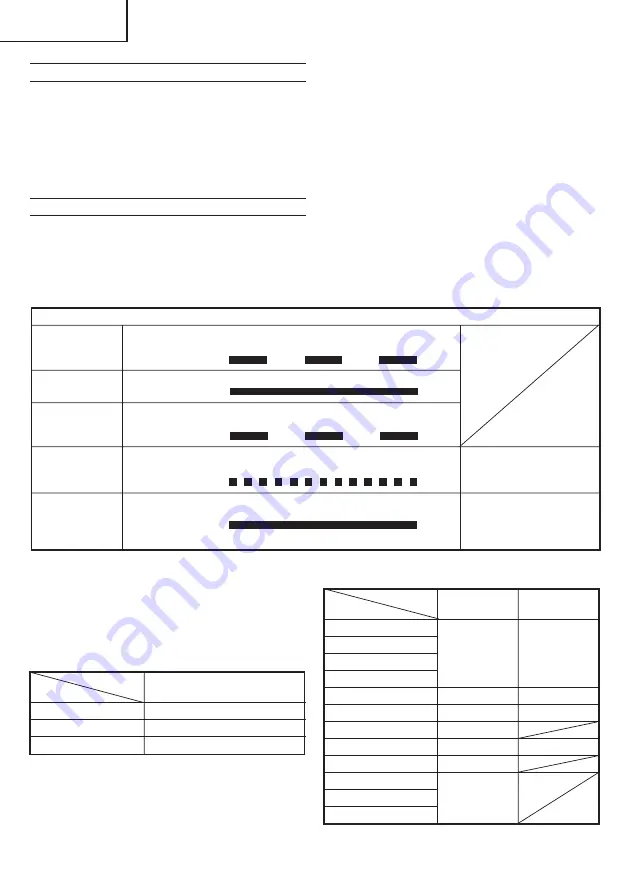
(1) Pilot lamp indication

The indications of the pilot lamp will be as shown in
Table 1, according to the condition of the charger or
the rechargeable battery.

Lights for 0.5 seconds. Does not light for
0.5 seconds. (off for 0.5 seconds)

Lights continuously

Lights for 0.5 seconds. Does not light for
0.5 seconds. (off for 0.5 seconds)

Lights for 0.1 seconds. Does not light for
0.1 seconds. (off for 0.1 seconds)

Lights continuously

Before
charging

While
charging

Charging
complete

Charging
impossible

Overheat
standby

Blinks
(RED)

Lights
(RED)

Blinks
(RED)

Flikers
(RED)

Lights
(GREEN)

Malfunction in the battery
or the charger.

Battery overheated. Unable
to charge (Charging will
commence when battery
cools).

Table 1

Indications of the lamps

NOTE: When standby for cooling battery, UC18YRL cools the overheated battery by cooling fan.

(2) Regarding the temperatures of the rechargeable

battery
The temperatures for rechargeable batteries are as
shown in the table below, and batteries that have
become hot should be cooled for a while before
being recharged.

Table 2 Recharging ranges of batteries

(3) Regarding recharging time

Depending on the combination of the charger and
batteries, the charging time will become as shown in
Table 3.

Table 3 Charging time (At 20°C)

Charger

UC18YRL

Rechargeable batteries

Ni-Cd batteries

–5°C – 55°C

Ni-MH batteries

–5°C – 50°C

Li-ion batteries

0°C – 50°C

Charger

UC18YRL

UC18YG

Battery

EB14B

BCC1414C

Apporx. 20 min. Apporx. 30 min.

EB1414S

EB1814SL, BCC1814C

EB1820L

Apporx. 30 min. Apporx. 50 min.

EB1424

Apporx. 35 min. Apporx. 60 min.

EB1426H

Apporx. 40 min.

EB1824L

Apporx. 35 min. Apporx. 60 min.

EB1826HL

Apporx. 40 min.

EB1430H

EB1830HL

Apporx. 45 min.

EBM1830

Summary of Contents for DV 14DVC

Page 1: ...us notre seule et entière responsabilité que ce produit est conforme aux normes EN60745 EN55014 et EN61000 en accord avec les Directives 73 23 CEE 89 336 CEE et 98 37 CE du Conseil Cette déclaration s applique aux produits désignés CE Italiano DICHIARAZIONE DI CONFORMITÀ CE Si dichiara sotto nostra responsabilità che questo prodotto è conforme agli standard EN60745 EN55014 e EN61000 conformemente ...

Page 2: ...us notre seule et entière responsabilité que ce produit est conforme aux normes EN60745 EN55014 et EN61000 en accord avec les Directives 73 23 CEE 89 336 CEE et 98 37 CE du Conseil Cette déclaration s applique aux produits désignés CE Italiano DICHIARAZIONE DI CONFORMITÀ CE Si dichiara sotto nostra responsabilità che questo prodotto è conforme agli standard EN60745 EN55014 e EN61000 conformemente ...

Page 3: ...ttery For DV18DVC Latch Pull out Insert Handle Insert Pilot lamp Hole for connecting the rechargeable battery Drill mark Hammer mark Cap Triangle mark Weak Strong Black line Shift knob Low speed High speed Ring Sleeve Tighten Loose Trigger switch Selector button 1 2 3 4 5 6 7 8 9 0 A B C D E F G H I J K L M N O P 18 V aufladbare Batterie Für DV18DCL 14 4 V aufladbare Batterie Für DV14DVC 18 V aufl...

Page 4: ...ttery For DV18DVC Latch Pull out Insert Handle Insert Pilot lamp Hole for connecting the rechargeable battery Drill mark Hammer mark Cap Triangle mark Weak Strong Black line Shift knob Low speed High speed Ring Sleeve Tighten Loose Trigger switch Selector button 1 2 3 4 5 6 7 8 9 0 A B C D E F G H I J K L M N O P 18 V aufladbare Batterie Für DV18DCL 14 4 V aufladbare Batterie Für DV14DVC 18 V aufl...

Page 5: ...idents d Remove any adjusting key or wrench before turning the power tool on A wrench or a key left attached to a rotating part of the power tool may result in personal injury e Do not overreach Keep proper footing and balance at all times This enables better control of the power tool in unexpected situations f Dress properly Do not wear loose clothing or jewellery Keep your hair clothing and glov...

Page 6: ... to the shop from which it was purchased as soon as the post charging battery life becomes too short for practical use Do not dispose of the exhausted battery 9 Using an exhausted battery will damage the charger 10 Do not insert object into the air ventilation slots of the charger Inserting metal objects or inflammables into the charger air ventilation slots will result in electrical shock hazard ...

Page 7: ...Plus driver bit No 2 65L 1 DV14DVC 2 Charger UC18YG 1 3 Plastic case 1 1 Plus driver bit No 2 65L 1 DV18DVC 2 Charger UC18YG 1 3 Plastic case 1 Model DV18DCL DV14DVC DV18DVC No load speed Low High 0 400 0 1500 min 1 0 400 0 1500 min 1 0 400 0 1500 min 1 No load impact rate Low High 0 5 600 0 21000 min 1 0 5 600 0 21000 min 1 0 5600 0 21000 min 1 Brick Depth 30 mm 13 mm 13 mm 13 mm Wood Drilling Th...

Page 8: ...or 0 5 seconds off for 0 5 seconds Lights continuously Lights for 0 5 seconds Does not light for 0 5 seconds off for 0 5 seconds Lights for 0 1 seconds Does not light for 0 1 seconds off for 0 1 seconds Lights continuously Before charging While charging Charging complete Charging impossible Overheat standby Blinks RED Lights RED Blinks RED Flikers RED Lights GREEN Malfunction in the battery or the...

Page 9: ...time This is a temporary phenomenon and normal time required for recharging will be restored by recharging the batteries 2 3 times How to make the batteries perform longer 1 Recharge the batteries before they become completely exhausted When you feel that the power of the tool becomes weaker stop using the tool and recharge its battery If you continue to use the tool and exhaust the electric curre...

Page 10: ...ob in the direction of the arrow see Figs 7 and 8 When the shift knob is set to LOW the drill rotates at a low speed When set to HIGH the drill rotates at a high speed CAUTION 䡬 When changing the rotational speed with the shift knob confirm that the switch is off Changing the speed while the motor is rotating will damage the gears 䡬 When setting the shift knob to HIGH high speed and the position o...

Page 11: ...bodily injury 䡬 Do not stow bits that are of a different length gauge or dimension than the plus driver bit 65 mm long included in the STANDARD ACCESSORIES The bit may fall and cause bodily injury 1 Removing the bit Securely hold the main unit and pull out the bit by holding the tip with your thumb Fig 11 2 Installing the Bit Install the bit with steps opposite of when removing Insert the bit so t...

Page 12: ...connected to the terminal marked with the letter L or coloured red Neither core must be connected to the earth terminal NOTE This requirement is provided according to BRITISH STANDARD 2769 1984 Therefore the letter code and colour code may not be applicable to other markets except United Kingdom Information concerning airborne noise and vibration The measured values were determined according to EN...

Page 13: ...Arbeit mit Elektrowerkzeugen können bereits kurze Phasen der Unaufmerksamkeit zu schweren Verletzungen führen b Benutzen Sie Schutzausrüstung Tragen Sie immer einen Augenschutz Schutzausrüstung wie Staubmaske rutschsichere Sicherheitsschuhe Schutzhelm und Gehörschutz senken das Verletzungsrisiko bei angemessenem Einsatz c Vermeiden Sie unbeabsichtigten Anlauf Achten Sie darauf dass sich der Schalt...

Page 14: ...t auseinandernehmen 5 Niemals die Batterie kurzschließen Kurzschluß der Batterie verursacht eine zu große Stromzufuhr und überhitzung wodurch Durchbrennen oder Schaden beider Batterie entsteht 6 Die Batterie nicht ins Feuer werfen Sie könnte dabei explodieren 7 Beim Bohren von Wand Boden oder Decke nachprüfen ob keine versenkten Kabel usw vorhanden sind 8 Bringen Sie die Batterie zum Geschäft wo S...

Page 15: ... Nr 2 65L 1 DV18DVC 2 Ladegerät UC18YG 1 3 Plastikgehäus 1 LADEGERÄT Model UC18YRL UC18YG Ladespannung 7 2 18 V 7 2 18 V Gewicht 0 6 kg 0 3 kg Modell DV18DCL DV14DVC DV18DVC Leerlaufdrehzahl Niedrig Schnell 0 400 0 1500 min 1 0 400 0 1500 min 1 0 400 0 1500 min 1 Leerlauf Schlaggeschwindigkeit Niedrig Schnell 0 5600 0 21000 min 1 0 5600 0 21000 min 1 0 5600 0 21000 min 1 Ziegel Tiefe 30 mm 13 mm 1...

Page 16: ... Ladegeräts für die Akkubatterie Leuchtet für 0 5 Sekunden Erlischt für 0 5 Sekunden aus für 0 5 Sekunden Leuchtet kontinuierlich Leuchtet für 0 5 Sekunden Erlischt für 0 5 Sekunden aus für 0 5 Sekunden Leuchtet für 0 1 Sekunden Erlischt für 0 1 Sekunden aus für 0 1 Sekunden Leuchtet kontinuierlich aus für 0 1 Sekunden Vor dem Laden Beim Laden Laden durchgeführt Laden unmöglich Wegen Überhitzung a...

Page 17: ...nen 4 Das Ladegerät fasthalten und den Batterie herausziehen Zur Leistung von neuen Batterien Da die Chemikalien in neuen bzw in längere Zeit nicht verwendeten Akkus nicht aktiviert sind kann die elektrische Entladung bei der ersten und zweiten Verwendung gering sein Dies ist eine vorübergehende Erscheinung und die normale Batterieleistung wird nach zwei oder dreimaligem Aufladen der Batterien wie...

Page 18: ...htgeschwindigkeit Die Aufrichtgeschwindigkeit mit dem Schaltknopf wechseln Den Schaltknopf in Richtung Pfeil bewegen siehe Abb 7 und 8 Wenn der Schaltknopdreht auf LOW eingestellt ist dreht sich der Bohrer langsamladreht Wenn auf HIGH eingestellt dreht sich der Bohrer schnellaufend ACHTUNG 䡬 Beim Wechseln der Aufrichtgeschwindigkeit mit dem Schaltknopf sich vergewissern daß der Schalt er auf ZU ei...

Page 19: ...d die Manschette durch Drehung nach rechts im Unrzeigersinn von vorne gesehen festdrehen Siehe Abb 9 Sollte sich die Manschette während des Betriebs lockern ist diese wieder festzudrehen Eine fest zugedrehte Manschette gewährleistet erhöhte Spannkraft 2 Abnehmen der Werkzeugspitze Den Ring fest greifen und die Manschette durch Drehung nach links gegen den Uhrzeigersinn von vorne gesehen lösen Sieh...

Page 20: ... WARTUNG UND INSPEKTION 1 Nachprüfen des Werkzeuges Da ein stumpfes Werkzeug die Leistung vermindern wird und eventuell ein schlechtes Funktionieren des Motors verursachen wird das Werkzeug schärfen oder es wechseln sobald Verschleiß sichtbar wird 2 Nachprüfen der Befestigungsschrauben Alle Befestigungsschrauben regelmäßig auf gute Festschraubung nachprüfen Falls irgendeine der Schrauben locker se...

Page 21: ...haussures de sécurité anti dérapantes les casques ou les protections auditives dans des conditions appropriées réduisent les risques de blessures c Eviter les démarrages accidentels Veiller à ce que l interrupteur soit en position d arrêt avant de brancher l outil Transporter les outils électriques avec le doigt sur l interrupteur ou brancher les outils électriques avec l interrupteur en position ...

Page 22: ...rique élevé et une surchauffe ce qui entrainera la brûlure ou l endommagement de la batterie 6 Ne jetez pas la batterie au feu Elle pourrait exploser 7 Pour le forage dans un mur le sol ou le plafond vérifiez qu il n y a pas présence de cordons électriques enfouis etc 8 Apportez la batterie au magasin où vous l avez achetée dès que la durée de vie de post charge de la batterie devient trop courte ...

Page 23: ...seuse cruciforme No 2 65L 1 DV18DVC 2 Chargeur UC18YG 1 3 Boîtier en plastique 1 Modèle DV18DCL DV14DVC DV18DVC Vitesse à vide Basse Grande 0 400 0 1500 min 1 0 400 0 1500 min 1 0 400 0 1500 min 1 Vitesse à percussion à vide Basse Grande 0 5600 0 21000 min 1 0 5600 0 21000 min 1 0 5600 0 21000 min 1 Brique profondeur 30 mm 13 mm 13 mm 13 mm Perçage Bois épaisseur 18 mm 38 mm 32 mm 38 mm Métal épai...

Page 24: ...nt chargée la lampe témoin clignote en rouge À intervalles d une seconde voir Tableau 1 1 Indication de la lampe témoin Les indications de la lampe témoin sont expliquées dans le Tableau 1 selon la condition du chargeur ou de la batterie rechargeable Tableau 1 Indications de la lampe témoin S allume pendant 0 5 seconde Ne s allume pas pendant 0 5 seconde Eteint pendant 0 5 seconde S allume sans in...

Page 25: ... lorsque la température ambiante est basse ou la tension de la source d alimentation trop faible Si la lampe témoin ne s éteint pas quand 120 minutes se sont écoulées depuis le début de la charge arrêter la recharge et contacter LE SERVICE APRÈS VENTE HITACHI ATTENTION Si la batterie est échauffée à cause de l exposition directe au soleil etc juste apres le fonctionnement il se peut que la lampe t...

Page 26: ...z le repère de burin ou le repère de marteau en regard du repère triangulaire 䡬 Pour percer des trous dans du métal du bois ou du plastique sélectionnez rotation rotation seulement 䡬 Pour percer des trous dans des briques ou des blocs de béton sélectionnez percussion percussion rotation ATTENTION Si vous effectuez une opération généralement réalisée en rotation sur le réglage percussion l effet de...

Page 27: ...èche tourne dans le sens anti horaire Voir Fig 10 Des repères L et R sont prévus sur le bouton du sélecteur ATTENTION 䡬 Utilisez toujours l outil dans le sens horaire rotation quand vous l utilisez en tant que perceuse à rotation 6 Sélection de la couple de serrage et de la fréquence de rotation Tableau 5 Utiisation Position du Sélection de vitesse de rotation Positiondu bouton de changement capuc...

Page 28: ...ATTENTION Les réparations modifications et inspections des outils électriques Hitachi doivent être confiées à un service après vente Hitachi agréé Il sera utile de présenter cette liste de pièces au service après vente Hitachi agréé lorsqu on apporte un outil nécessitant des réparations ou tout autre entretien Lors de l utilisation et de l entretien d un outil électrique respecter les règlements e...

Page 29: ...nete attenzione alle accensioni involontarie Prima dell attivazione dell alimentazione verificate che l interruttore sia posizionato su OFF Il trasporto degli elettroutensili tenendo le dita sull interruttore o con alimentazione elettrica attivata dall interruttore su ON implica il rischio di incidenti d Prima di attivare l elettroutensile rimuovete qualsiasi chiave di regolazione Lasciando la chi...

Page 30: ...rente elettrica Può quindi causare bruciature o danni alla batteria 6 Non gettare la batteria nel fuoco Può esplodere 7 Quando si fanno fori sulle pareti pavimenti o soffitti controllare che non ci siano cavi elettrici nascosti 8 Non appena la vita della batteria dopo le operazioni di ricaricatura diventa troppo breve per fini pratici si porti la batteria al negozio dove è stata acquistata Non la ...

Page 31: ...metro 75 mm lunghezza 8 mm diametro 50 mm lunghezza 8 mm diametro 75 mm lunghezza Questo é un foro preliminare Questo é un foro preliminare Questo é un foro preliminare Batterie rechargeable EBM1830 Li ion 18V 3 0 Ah 10 batterie EB1414S Ni Cd 14 4 V 1 4 Ah 12 batterie EB1814SL Ni Cd 18V 1 4 Ah 15 batterie EB14B Ni Cd 14 4 V 2 0 Ah 12 batterie EB1820L Ni Cd 18V 2 0 Ah 15 batterie EB1424 Ni Cd 14 4 ...

Page 32: ...della batteria o del caricatore Batteria surriscaldata Impossibile ricaricare la ricarica comincerà quando la batteria si raffredda 2 Inserire la batteria nel caricatore Inserire la batteria saldamente fino a che viene in contatto con il fondo del comparto caricatore ATTENZIONE 䡬 Se la batteria è inserita a rovescio non solo la carica è imposs ibile ma possono anche essere causati problemi al cari...

Page 33: ...ONE Se la batteria è calda a causa dei raggi diretti del sole ad operazione eseguita la lampada spia del caricatore a volte non si illumina Prima di iniziare le operazioni di carico raffreddare la batteria 3 Staccare il caricatore dalla presa AC 4 Tenere il caricatore stretto e tirare fuori la batteria Scarica nel caso di batterie nuove ecc Poiché la sostanza chimica interna delle batterie nuove e...

Page 34: ...i fori in mattoni o in blocchi di cemento passare all impostazione percussione percussione rotazione ATTENZIONE Se un operazione normalmente eseguita con l impostazione rotazione viene invece eseguita con l impostazione percussione l effetto di foratura non solo aumenta ma può anche danneggiare la punta o altre parti 4 Cambio della velocità di rotazione Usare la manopola d intercambio per cambiare...

Page 35: ...ando se ne fa uso come trapano ad impatto 10 Funzionament dell interruttore 䡬 Premendo il grilletto interruttore l utensile si mette in movimento Lasciando andare il grilletto il motore si ferma 䡬 La velocità di rotazione del trapano può essere dell interruttore viene premuto La velocità è bassa quando il grilletto dell interruttore viene premuto leggermente e aumenta a mano a mano che l interruto...

Page 36: ...e da un centro assistenza Hitachi autorizzato Questa lista dei pezzi torna utile se viene presentata con l utensile al centro assistenza Hitachi autorizzato quando si richiedono riparazioni o altri interventi di manutenzione Nell uso e nella manutenzione degli utensili elettrici devono essere osservate le normative di sicurezza e i criteri prescritti in ciascun paese MODIFICHE Gli utensili elettri...

Page 37: ...lichamelijk letsel resulteren b Gebruik persoonlijke beschermingsmiddelen Draag altijd oogbescherming Persoonlijke beschermingsmiddelen zoals stofmaskers niet glijdende veiligheidsschoenen helm of oorbescherming vermindert het risico op lichamelijk letsel c Voorkom dat het gereedschap per ongeluk op kan starten Controleer of de schakelaar op de uit stand staat voordat u de stekker in het stopconta...

Page 38: ...van de accuterecht komt 4 Demonteer de oplaadbare batterij of acculader niet 5 Voorkom kortsluiting van de oplaadbare batterij Kortsluiting kan resulteren in oververhitting Dit kan schade of brandgevaar opleveren 6 Gooi de batterij niet in het vuur Een brandende batterij kan ontploffen 7 Kontroleer of er geen elektrische bedrading achter de muur het plafond of de vloer is voordat met het boren beg...

Page 39: ...skopdrijver Nr 2 65L 1 DV18DVC 2 Acculader UC18YG 1 3 Plastic doos 1 ACCULADER Model UC18YRL UC18YG Oplaadspanning 7 2 18 V 7 2 18 V Gewicht 0 6 kg 0 3 kg Model DV18DCL DV14DVC DV18DVC Onbelaste snelheid Laage Hoge 0 400 0 1500 min 1 0 400 0 1500 min 1 0 400 0 1500 min 1 Onbelaste slag verhouding Laage Hoge 0 5600 0 21000 min 1 0 5600 0 21000 min 1 0 5600 0 21000 min 1 Steen Diepte 30 mm 13 mm 13 ...

Page 40: ...olelampje in rood knipperen Met tussenpozen van 1 sekonde Zie Tabel 1 1 Aanduiding van de controlelampje De aanduidingen van het controlelampje zijn zoals aangegeven in Tabel 1 al naar gelang de toestand van de oplaadbare batterij of het acculader Tabel 1 Aanduidingen van het controlelampje Brandt ongeveer 0 5 sekonde Brandt ongeveer 0 5 sekonde niet Uit voor 0 5 seconde Blift branden Brandt ongev...

Page 41: ...lampje uit Het opladen zal langer duren bij lage temperatuur of wanneer de spanning van de stroombron te gering is Als het kontrolelampje ook na 120 minuten opladen nog niet dooft stop dan met opladen en neem dan kontakt op met uw BEVOEGDE HITACHI ONDERHOUDSDIENST LET OP Als de batterij aan direct zonlicht blootstaat na gebruik is het mogelijk dat het kontrolelampje niet aan gaat 3 Verwijder de st...

Page 42: ...ing op de machine 䡬 Voor het boren van gaten in metaal hout of plastic moet u Rotation uitsluitend rotatie gebruiken 䡬 Voor het boren van gaten in steen of beton moet u Impact impakt rotatie gebruiken VOORZICHTIG Indien Impact is ingesteld voor het boren dat normaliter met Rotation wordt uitgevoerd zal de kracht van het boren sterker zijn maar wordt het boorstuk of andere delen mogelijk beschadigd...

Page 43: ...letsel veroorzaken LET OP 䡬 Bovenstaande voorbeelden in Tabel 5 kunnen als standaard gezien worden voor de verschillende types schroeven en materialen alhoewel verschillende schroeven en materialen gebruikt worden in de praktijk Voor verschillende types dient het juiste draaikoppel te worden gekozen 䡬 Als u de klop boor schroefmachine gebruikt om een schroef met een vierkante of zeskantige kop in ...

Page 44: ...an kinderen 6 Lijst vervangingsonderdelen LET OP Reparatie modificatie en inspectie van Hitachi elektrisch gereedschap dient te worden uitgevoerd door een erkend Hitachi Service centrum Deze Onderdelenlijst komt van pas wanneer u deze samen met het gereedschap aanbiedt bij het erkende Hitachi Service centrum wanneer u om reparatie of ander onderhoud verzoekt Bij gebruik en onderhoud van elektrisch...

Page 45: ...ridad Utilice siempre una protección ocular El equipo de seguridad como máscara para el polvo zapatos de seguridad antideslizantes casco o protección para oídos utilizado para condiciones adecuadas reducirá los daños personales c Evite un inicio accidental Asegúrese de que el interruptor está en off antes de enchufarlo El transporte de herramientas eléctricas con el dedo en el interruptor o el enc...

Page 46: ...r la batería recargable ni el cargador 5 Nunca poner en cortocircuito la batería recargable Poner en cortocircuito la batería produce una corriente eléctrica enorme y el consecuente recalentamiento pudiendo quemar o deteriorar la batería 6 No tirar la batería al fuego Si se quema la batería puede explotar 7 Cuando se perfora una pared techo o piso confirmar si está en buenas condiciones el cable d...

Page 47: ...delo DV18DCL DV14DVC DV18DVC Velocidad sin carga Baja Alta 0 400 0 1500 min 1 0 400 0 1500 min 1 0 400 0 1500 min 1 Indice de impacto sin carga Baja Alta 0 5600 0 21000 min 1 0 5600 0 21000 min 1 0 5600 0 21000 min 1 Ladrillos Grosor 30 mm 13 mm 13 mm 13 mm Taladrado Madera Grosor 18 mm 38 mm 32 mm 38 mm Metal Grosor 1 6 mm 13 mm 13 mm 13 mm Apriete Tornillo para metales 6 mm 6 mm 6 mm de Tornillo...

Page 48: ...a comenzará la lámpara piloto permanecerá continuamente encendida en rojo Cuando la bateria se haya cargado completamente la lámpara piloto parpadeará en rojo A intervalos de 1 segundo Vea la Tabla 1 1 Indicaciones de la lámpara piloto Las indicaciones de la lámpara piloto mostradas en la Tabla 1 se producirán de acuerdo con la condición del cargador o de la batería Tabla 1 Indicaciones de la lámp...

Page 49: ...ón de montaje de la batería La lámpara piloto se apaga para indicar que la batería está completamente cargada El tiempo de carga será más largo a temperatura baja o si la tensión de la fuente de alimentación es demasiado baja Cuando la lámpara piloto no se apague incluso cuando hayan transcurrido más de 120 minutos después de haberse iniciado la carga pare ésta y póngase en contacto con un CENTRO ...

Page 50: ...en metal madera o plástico cambie a Rotación rotación solamente 䡬 Para taladrar orificios en ladrillos o en bloques de hormigón cambie a Impacto impaacto rotación PRECAUCIÓN Si realiza una operación en el ajuste Impacto que normalmente se realiza en Rotación el efecto de taladrar orificios no solamente aumentará sino que también puede dañar la broca u otras partes 4 Cambio de velocidad de rotación...

Page 51: ... apretado 2 Desmontaje de la broca Sujete firmemente el anillo y afloje el manguito girándolo hacia la izquierda visto desde el frente Consulte la Fig 9 PRECAUCIÓN 䡬 Cuando el manguito no pueda desatornillarse sujete la herramienta insertada en un tornillo de carpintero etc ajuste el modo de embrague a 1 11 y gire el manguito hacia la izquierda mientras accione el embrague 8 Confirmar que la bater...

Page 52: ...cio Autorizado de Hitachi Esta lista de repuestos será de utilidad si es presentada junto con la herramienta al Centro de Servicio Autorizado de Hitachi para solicitar la reparación o cualquier otro tipo de mantenimiento En el manejo y el mantenimiento de las herramientas eléctricas se deberán observar las normas y reglamentos vigentes en cada país MODIFICACIONES Hitachi Power Tools introduce cons...

Page 53: ...o uma máscara de pó sapatos de segurança anti derrapantes chapéu rígido ou protecção auricular utilizados para condições adequadas reduzirá os ferimentos pessoais c Evite ligar por acidente Certifique se de que o interruptor está na posição de desligado antes de ligar a ferramenta Transportar ferramentas eléctricas com o dedo no interruptor ou ligar ferramentas que estão com o interruptor ligado é...

Page 54: ... 5 Nunca provoque curto circuito na bateria recarregável Ao fazer isso a bateria provocará uma grande corrente elétrica e um sobreaquecimento podendo resultar em queima ou danos à bateria 6 Não jogue a bateria no fogo Queimando se ela pode explodir 7 Ao furar uma parede chão ou teto verifique se há cabos elétricos etc embutidos nesses locais 8 Leve a bateria à loja onde você a comprou assim que a ...

Page 55: ... 1 Coeficiente de impacto sem carga Baixa Alta 0 5600 0 21000 min 1 0 5600 0 21000 min 1 0 5600 0 21000 min 1 Tijolo Profundidade 30 mm 13 mm 13 mm 13 mm Perfuração Madeira Espessura 18 mm 38 mm 32 mm 38 mm Metal Espessura 1 6 mm 13 mm 13 mm 13 mm Aparafusa Parafuso para metal 6 mm 6 mm 6 mm mento Parafuso para 8 mm diâmetro 75 mm comprimento 8 mm diâmetro 50 mm comprimento 8 mm diâmetro 75 mm com...

Page 56: ... Não se acende por 0 5 segundo desliga se por 0 5 segundo Fica continuamente acesa Acende se por 0 5 segundo Não se acende por 0 5 segundo desliga se por 0 5 segundo Acende se por 0 1 segundo Não se acende por 0 1 segundo desliga se por 0 1 segundo Fica continuamente acesa Antes da recarga Durante a recarga Recarga completa Recarga impossível Standby em caso de sobreaquecimento Pisca VERMELHO Acen...

Page 57: ... o cabo de energia do recarregador 4 Segure o recarregador firmemente e puxe a bateria para fora Quantoàdescargaelétricanocasodenovasbaterias etc Como a substância química interna das novas baterias e daquelas que não foram usadas por um prolongado período não está ativada pode haver uma pequena descarga elétrica ao usá las pela primeira e segunda vez Este fenômeno é temporário e o tempo normal re...

Page 58: ... engrenagens 䡬 Quando se ajusta o comutador em HIGH alta velocidade e a posição da tampa estiver entre 16 e 22 pode ocorrer que a embreagem não esteja engatada e que o motor esteja bloqueado Caso isto aconteça ajuste o comutador para LOW velocidade baixa 䡬 Se o motor travar desligue o imediatamente Se o motor estiver travado por algum tempo ele ou a bateria podem queimar 䡬 Para aumentar a vida úti...

Page 59: ...atilho é apertado com mais força NOTA 䡬 Pode ser produzido um som de pio quando o motor estiver para começar a girar mas é apenas um ruído não um defeito da máquina 11 Para fazer furos em tijolos Uma força de pressão excessiva nunca aumenta a velocidade de perfuração Ela não apenas danifica a broca ou reduz a eficácia do trabalho mas pode também reduzir a vida útil da broca Ao fazer furos em tijol...

Page 60: ...desmontada juntamente com o CERTIFICADO DE GARANTIA que se encontra no fundo destas instruções de utilização para um Centro de Serviço Autorizado Hitachi NOTA Devido ao contínuo programa de pesquisa e desenvolvimento da HITACHI as especificações aqui contidas estão sujeitas a mudanças sem aviso prévio Informação a respeito de ruídos e vibração do ar Os valores medidos foram determinados de acordo ...

Page 61: ...χρήση εν ς ηλεκτρικού εργαλείου µπορεί να προκαλέσει σοβαρ προσωπικ τραυµατισµ b Χρησιµοποιείτε εξοπλισµ ασφαλείας Να φοράτε πάντοτε προστατευτικά γυαλιά για τα µάτια Εξοπλισµ ς ασφαλείας πως µάσκα για τη σκ νη αντιολισθητικά υποδήµατα σκληρ κάλυµµα κεφαλής ή προστατευτικά ακοής που χρησιµοποιούνται στις αντίστοιχες συνθήκες µειώνουν τις πιθαν τητες τραυµατισµού c Να αποφεύγετε την κατά λάθος έναρ...

Page 62: ...ρά 3 Μην αφήσετε ξένα υλικά να µπουν στην τρύπα σύνδεσης της επαναφορτιζ µενης µπαταρίας 4 Ποτέ µην αποσυναρµολογήσετε την επαναφορτιζ µενη µπαταρία και το φορτιστή 5 Ποτέ µην βραχυκυκλώσετε την επαναφορτιζ µενη µπαταρία Το βραχυκύκλωµα της µπαταρίας θα προκαλέσει ένα µεγάλο ηλεκτρικ ρεύµα και υπερθέρµανση Προκαλεί το κάψιµο ή την υπερθέρµανση της µπαταρίας 6 Μην πετάξετε την µπαταρία στη φωτιά Αν...

Page 63: ... mm 13 mm 13 mm 13 mm Μηχανική βίδα 6 mm 6 mm 6 mm Βίδωµα Ξυλ βιδα 8 mm διάµετρος 75 mm µήκος 8 mm διάµετρος 50 mm µήκος 8 mm διάµετρος 75 mm µήκος Απαιτεί µια δοκιµαστική τρύπα Απαιτεί µια δοκιµαστική τρύπα Απαιτεί µια δοκιµαστική τρύπα Επαναφορτιζ µενη µπαταρία EBM1830 Li ion 18V 3 0 Ah 10 στοιχεία EB1414S Ni Cd 14 4 V 1 4 Ah 12 στοιχεία EB1814SL Ni Cd 18V 1 4 Ah 15 στοιχεία EB14B Ni Cd 14 4 V 2...

Page 64: ...ουθώντας τις παρακάτω οδηγίες 1 Ó ÛÙ ÙÔ Î ÏÒ ÈÔ ÚÂ Ì ÙÔ ÙÔ ÊÔÚÙÈÛÙ Û ÌÈ ËÁ ÂÓ ÏÏ ÛÛfiÌÂÓÔ ÚÂ Ì ÙÔ AC ταν το καλώδιο ρεύµατος έχει συνδεθεί η δοκιµαστική λάµπα του φορτιστή θα αναβοσβήνει στο κ κκινο Κατά διαστήµατα του 1 δευτερολέπτου Ó Î 1 Ενδείξεις των λαµπών Ανάβει για 0 5 δευτερ λεπτα εν ανάβει για 0 5 δευτερ λεπτα κλειστ για 0 5 δευτερ λεπτα Ανάβει συνεχώς Ανάβει για 0 5 δευτερ λεπτα εν ανάβ...

Page 65: ...σβήνει για να δηλώσει τι η µπαταρία έχει φορτιστεί πλήρως Ο χρ νος φ ρτισης της µπαταρία γίνεται περισσ τερος ταν η θερµοκρασία είναι χαµηλή ή ταν η τάση της πηγής ρεύµατος είναι πολύ χαµηλή ταν η δοκιµαστική λάµπα δεν σβήνει ακ µα και αν έχουν περάσει περισσ τερες απ 120 λεπτά µετά την έναρξη της φ ρτισης σταµατήστε την φ ρτιση και επικοινωνήστε µε το ΕΞΟΥΣΙΟ ΟΤΗΜΕΝΟ ΚΕΝΤΡΟ ΕΞΥΠΗΡΕΤΗΣΗΣ ΤΗΣ HITAC...

Page 66: ...ορεί να προκαλέσει το σπάσιµο της βίδας λ γω της υπερβολικής δύναµης σφίξης 3 Αλλαγή απ την περιστροφή στην κρούση Βλέπε Εικ 5 Η Περιστροφή Περιστροφή µ νο και η Κρούση Κρούση µ νο µπορούν να τεθούν σε λειτουργία ταιριάζοντας το σηµάδι του τρυπανιού ή το σηµάδι της σφύρας µε το τριγωνικ σηµάδι στον εξωτερικ κορµ 䡬 Για να κάνετε τρύπες στο µέταλλο ξύλο ή πλαστικ γυρίστε στην Περιστροφή Περιστροφή µ...

Page 67: ...ς διαµέτρους βιδών Τρυπάνισµα Τούβλο Για 13 mm ή µικρ τερες διαµέτρους Ξύλο Για 32 mm ή µικρ τερες διαµέτρους DV14DVC Για 38 mm ή µικρ τερες διαµέτρους DV18DCL DV18DVC Μέταλλο Για τρυπάνισµα µε µια λεπίδα κατάλληλη για εργασία σε µέταλλο Για 6 mm ή µικρ τερες διαµέτρους βιδών Για 3 8 mm ή µικρ τερες ονοµαστικές διαµέτρους βιδών Για 8 mm ή µικρ τερες διαµέτρους DV14DVC Για 10 mm ή µικρ τερες διαµέτ...

Page 68: ...αι στεγν ύφασµα υγραµένο µε σαπουν νερο Μην χρησιµοποιήσετε διαλυτικά που περιέχουν χλώριο βενζίνη ή διαλυτικά µπογιάς επειδή λιώνουν τα πλαστικά 5 Αποθήκευση Αποθηκεύστε το κρουστικ δραπανοκατσάβιδο σε ένα χώρο που η θερµοκρασία είναι µικρ τερη απ 40 C και µακριά απ την πρ σβαση των παιδιών 6 Λίστα συντήρησης των µερών ΠΡΟΣΟΧΗ Η επισκευή η τροποποίηση και ο έλεγχος των Ηλεκτρικών Εργαλείων Hitach...

Page 69: ...ING D 1 20 RING GEAR 1 21 CARRIER 1 22 PLANET GEAR C 3 23 WASHER A 1 24 REAR CASE 1 25 SCREW SET D3_12 4 26 SHIFT ARM 1 27 SLIDE RING GEAR 1 28 PINION C 1 29 PLANET GEAR A SET 6 30 PINION B 1 31 FIRST RING GEAR 1 32 WASHER B 1 33 MOTOR SPACER 1 34 MOTOR 1 35 NAME PLATE 1 36 TAPPING SCREW W FLANGE D3_16 8 37 MACHINE SCREW W SP WASHER M4_6 2 38 FERRITE CORE 1 39 HITACHI LABEL 1 40 HOUSING A B SET 1 ...

Page 70: ... 19 SPRING D 1 20 RING GEAR 1 21 CARRIER 1 22 PLANET GEAR C 3 23 WASHER A 1 24 REAR CASE 1 25 SCREW SET D3_12 4 26 SHIFT ARM 1 27 SLIDE RING GEAR 1 28 PINION C 1 29 PLANET GEAR A SET 6 30 PINION B 1 31 FIRST RING GEAR 1 32 WASHER B 1 33 MOTOR SPACER 1 34 MOTOR 1 35 NAME PLATE 1 36 TAPPING SCREW W FLANGE D3_16 8 37 MACHINE SCREW W SP WASHER M4_6 2 38 FERRITE CORE 1 39 HITACHI LABEL 1 40 HOUSING A B...

Page 71: ... 19 SPRING D 1 20 RING GEAR 1 21 CARRIER 1 22 PLANET GEAR C 3 23 WASHER A 1 24 REAR CASE 1 25 SCREW SET D3_12 4 26 SHIFT ARM 1 27 SLIDE RING GEAR 1 28 PINION C 1 29 PLANET GEAR A SET 6 30 PINION B 1 31 FIRST RING GEAR 1 32 WASHER B 1 33 MOTOR SPACER 1 34 MOTOR 1 35 NAME PLATE 1 36 TAPPING SCREW W FLANGE D3_16 8 37 MACHINE SCREW W SP WASHER M4_6 2 38 FERRITE CORE 1 39 HITACHI LABEL 1 40 HOUSING A B...

Page 72: ...71 ...

Page 73: ...uisición 4 Nombre y dirección del cliente 5 Nombre y dirección del distribudor Se ruega poner el sellú del distribudor con su nombre y dirección CERTIFICAT DE GARANTIE 1 No de modèle 2 No de série 3 Date d achat 4 Nom et adresse du client 5 Nom et adresse du revendeur Cachet portant le nom et l adresse du revendeur CERTIFICADO DE GARANTIA 1 Número do modelo 2 Número do série 3 Data de compra 4 Nom...

Page 74: ...73 1 2 3 4 5 ...

Page 75: ...74 ...

Page 76: ...75 ...

Page 77: ...ttery For DV18DVC Latch Pull out Insert Handle Insert Pilot lamp Hole for connecting the rechargeable battery Drill mark Hammer mark Cap Triangle mark Weak Strong Black line Shift knob Low speed High speed Ring Sleeve Tighten Loose Trigger switch Selector button 1 2 3 4 5 6 7 8 9 0 A B C D E F G H I J K L M N O P 18 V aufladbare Batterie Für DV18DCL 14 4 V aufladbare Batterie Für DV14DVC 18 V aufl...

Page 78: ...us notre seule et entière responsabilité que ce produit est conforme aux normes EN60745 EN55014 et EN61000 en accord avec les Directives 73 23 CEE 89 336 CEE et 98 37 CE du Conseil Cette déclaration s applique aux produits désignés CE Italiano DICHIARAZIONE DI CONFORMITÀ CE Si dichiara sotto nostra responsabilità che questo prodotto è conforme agli standard EN60745 EN55014 e EN61000 conformemente ...

Reviews: