background image

English

15

 ●

If it is hard to turn the cap to hammer mark “ ”
position, turn the chuck slightly in either direction
and then turn the cap to hammer mark “ ”
position again.

4.

Change rotation speed
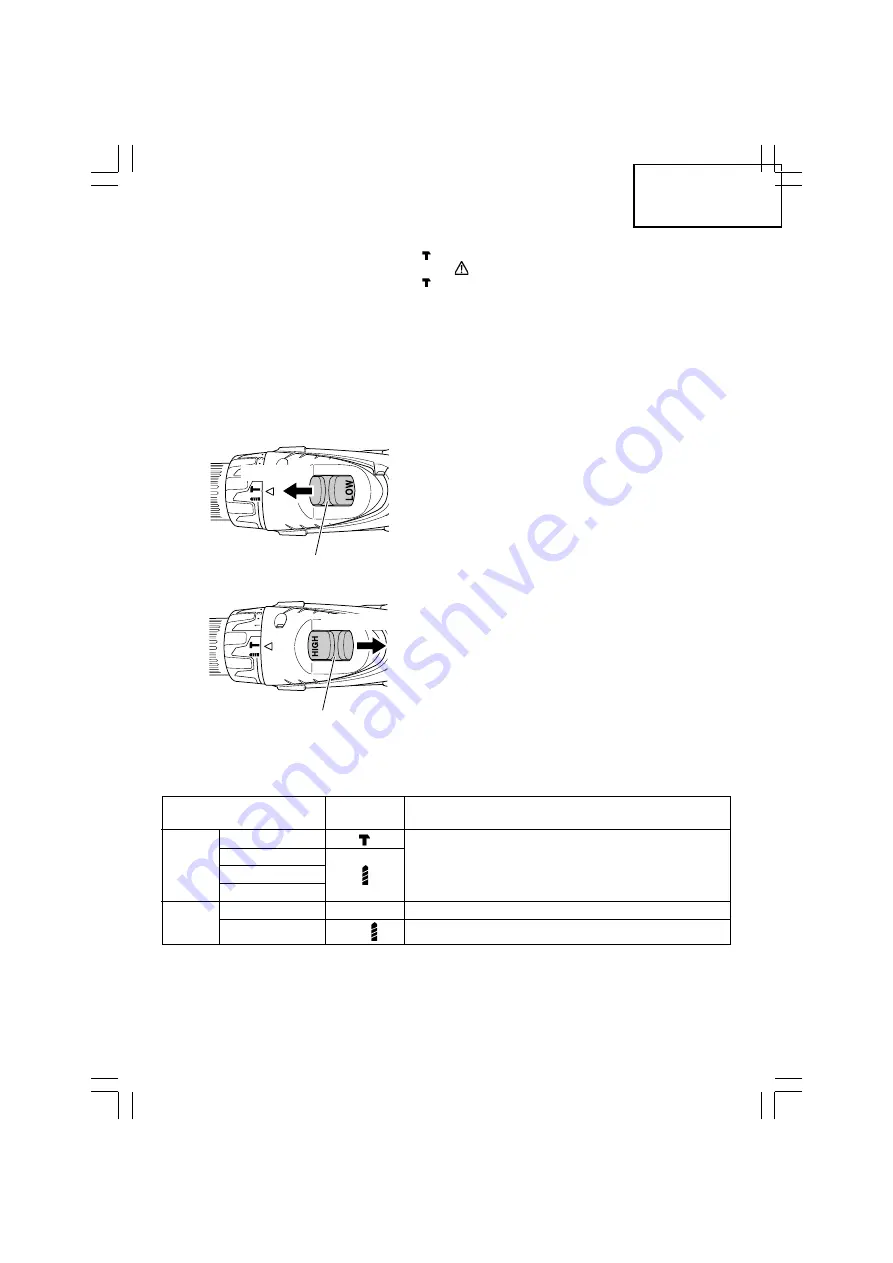
Operate the shift knob to change the rotational
speed.
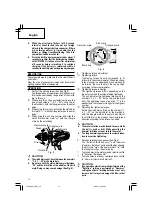
Move the shift knob in the direction of the arrow
(see Figs. 7 and 8).
When the shift knob is set to “LOW”, the drill
rotates at a low speed. When set to “HIGH”, the
drill rotates at a high speed.

CAUTION

 ●

When changing the rotational speed with the shift
knob, confirm that the switch is off.
Changing the speed while the motor is rotating
will damage the gears.

 ●

When setting the shift knob to “HIGH” (high
speed) and the position of the clutch dial is
bitween “16” and “22”, it may happen that the
clutch does not engaged and that the motor is
locked. In such a case, please set the shift knob to
“LOW” (low speed).

 ●

If the motor is locked, immediately turn the power
off. If the motor is locked for a while, the motor or
battery may be burnt.

 ●

To extend the lifetime, the lithium-ion battery
equips with the protection function to stop the
output. Therefore, if the tool is overloaded, the
motor may stop. However, this is not the trouble
but the result of protection function. In this case,
release the switch of tool and eliminate the causes
of overloading.

5.

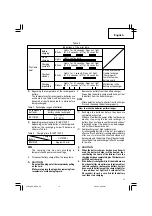
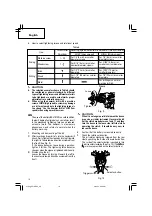
The scope and suggestions for uses
The usable scope for various types of work based
on the mechanical structure of this unit is shown
in Table 5.

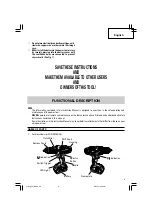
Fig. 7

Shift knob

Fig. 8

Shift knob

Table 5

Work

Clutch dial

Suggestions

Position

Brick

Drilling

Wood

Use for drilling purpose.

Steel
Aluminum
Machine screw

1 – 22

Use the bit or socket matching the screw diameter.

Driving

Wood screw

1 – 

Use after drilling a pilot hole.

Low speed

High speed

01Eng_DV18DGL_US

2/24/14, 9:04 AM

15

Summary of Contents for DV 18DGL

Page 1: ...nd this manual BEFORE operating the power tool Please keep this manual available for other users and owners before they use the power tool This manual should be stored in safe place INSTRUCCIONES DE SEGURIDADY MANUAL DE INSTRUCCIONES ADVERTENCIA La utilización INAPROPIADA O PELIGROSA de esta herramienta eléctrica puede resultar en lesiones de gravedad o la muerte Este manual contiene información i...

Page 2: ...IONS RELATIVES A LA BATTERIE AU LITHIUM ION 25 DESCRIPTION FONCTIONNELLE 27 NOM DES PARTIES 27 SPECIFICATIONS 28 Page ASSEMBLAGE ET FONCTIONNEMENT 29 UTILISATIONS 29 MÉTHODE DE RETRAIT ET D INSTALLATION DE LA BATTERIE 29 MÉTHODE DE RECHARGE 29 AVANT L UTILISATION 31 UTILISATION 31 ENTRETIEN ET INSPECTION 35 GUIDE DE DÉPANNAGE 36 ACCESOIRES 37 ACCESSOIRES STANDARD 37 ACCESSOIRES EN OPTION vendus sé...

Page 3: ...DE EXTRACCIÓN E INSTALACIÓN DE LA BATERÍA 46 MÉTODO DE CARGA 46 ANTES DE LA UTILIZACIÓN 48 OPERACIÓN 48 MANTENIMIENTO E INSPECCIÓN 52 GUIA DE IDENTIFICACION DE PROBLEMAS 53 ACCESORIOS 54 ACCESORIOS ESTÁNDAR 54 ACCESORIOS OPCIONALES de venta por separado 54 LISTA DE PIEZAS 55 CENTROS DE SERVICIO AUTORIZADOS DE HITACHI Hitachi Koki U S A Ltd proporciona un servicio de reparaciones bajo esta garantía...

Page 4: ...uctions for future reference The term power tool in the warnings refers to your mains operated corded power tool or battery operated cordless power tool 1 Work area safety a Keep work area clean and well lit Cluttered or dark areas invite accidents b Do not operate power tools in explosive atmospheres such as in the presence of flammable liquids gases or dust Power tools create sparks which may ig...

Page 5: ...ries or storing power tools Such preventive safety measures reduce the risk of starting the power tool accidentally d Store idle power tools out of the reach of children and do not allow persons unfamiliar with the power tool or these instructions to operate the power tool Power tools are dangerous in the hands of untrained users e Maintain power tools Check for misalignment or binding of moving p...

Page 6: ...ithout all guards or safety features in place and in proper working order If maintenance or servicing requires the removal of a guard or safety feature be sure to replacetheguardorsafetyfeaturebeforeresuming operation of the tool 10 Use right tool Don t force small tool or attachment to do the job of a heavy duty tool Don t use tool for purpose not intended for example don t use circular saw for c...

Page 7: ...uld result in a risk of fire and electric shock If extension cord must be used make sure a That blades of extension cord are the same number size and shape as those of plug on battery charger b That extension cord is properly wired and in good electrical condition and c That wire size is large enough for AC ampere rating of battery charger as specified in Table 1 If the input rating of a battery c...

Page 8: ...he following precautions 1 Make sure that swarf and dust do not collect on the battery During work make sure that swarf and dust do not fall on the battery Make sure that any swarf and dust falling on the powertoolduringworkdonotcollectonthebattery Do not store an unused battery in a location exposed to swarf and dust Before storing a battery remove any swarf and dust that may adhere to it and do ...

Page 9: ... or attachments that differ from those on your own power tool NAME OF PARTS SAVETHESE INSTRUCTIONS AND MAKETHEMAVAILABLETO OTHER USERS AND OWNERS OFTHISTOOL Do not place electrically conductive cuttings nails steel wire copper wire or other wire in the storage case Either install the battery in the power tool or store by securely pressing into the battery cover until the ventilation holes are conc...

Page 10: ...English 10 Battery BSL1815S 2 Battery Charger UC18YKSL Fig 2 Fig 1 Latch Ventilation holes Terminals Battery cover Pilot lamp Nameplate Guide rail 01Eng_DV18DGL_US 2 24 14 9 04 AM 10 ...

Page 11: ... mm Driver Wood screw 20 3 8 mm 75 mm Model BSL1815S Battery Type Li ion battery Voltage DC 18 V Weight 3 7 lbs 1 7 kg SPECIFICATIONS 1 Cordless Hammer Drill Model UC18YKSL Input power source Single phase AC 120 V 60 Hz Charging time At a temperature BSL1815S Approx 35 min of 68 F 20 C Charging voltage DC 14 4 V 18 V Charging current DC 2 0 A Weight 0 8 lbs 0 35 kg 2 Battery Charger NOTE The charg...

Page 12: ...S Drilling of brick and concrete block etc Driving and removing of machine screws wood screws tapping screws etc Drilling of various metals Drilling of various woods REMOVAL AND INSTALLATION METHOD OF BATTERY 1 Battery removal Hold the handle tightly and push the battery latch to remove the battery See Fig 3 CAUTION Never short circuit the battery 2 Battery installation Insertthebatterywhileobserv...

Page 13: ...ot immediately afteruse Ifsuchabatteryisrechargedimmediately after use its internal chemical substance will deteriorate and the battery life will be shortened Leave the battery and recharge it after it has cooled for a while CAUTION When the battery charger has been continuosly used the battery charger will be heated thus constituting the cause of the failures Once the charginghasbeencompleted giv...

Page 14: ...ing torque Tightening torque should correspond in its intensity to the screw diameter When too strong torque is used the screw head may be broken or be injured Be sure to adjust the cap position according to the screw diameter 2 Tightening torque indication The tightening torque differs depending on the type of screw and the material being tightened The unit indicates the tightening torque with th...

Page 15: ... locked In such a case please set the shift knob to LOW low speed If the motor is locked immediately turn the power off If the motor is locked for a while the motor or battery may be burnt To extend the lifetime the lithium ion battery equips with the protection function to stop the output Therefore if the tool is overloaded the motor may stop However this is not the trouble but the result of prot...

Page 16: ...ter clockwise direction as viewed from the front Fig 9 CAUTION When it is no longer possible to loosen the sleeve use a vise or similar instrument to secure the bit Set the clutch mode between 1 and 11 and then turn the sleeve to the loose side left side while operating the clutch It should be easy now to loosen the sleeve 8 Confirm that the battery is mounted correctly 9 Check the rotational dire...

Page 17: ...ng pulled The light goes out after releasing the trigger switch Fig 11 Fig 11 CAUTION Do not expose directly your eye to the light by looking into the light If your eye is continuously exposed to the light your eye will be hurt 13 Using the hook sold separately The hook is used to hang up the power tool to your waist belt while working CAUTION When using the hook hang up the power tool firmly not ...

Page 18: ...ies have been fully charged before storing them Prolonged storage of batteries with a low charge may result in performance deterioration significantly reducing battery usage time or rendering the batteries incapable of holding a charge However significantly reduced battery usage time may be recovered by repeatedly charging and using the batteries two to five times If the battery usage time is extr...

Page 19: ...tion Charge battery using appropriate charger Remove battery from tool and let battery cool for while Insert battery into charger until a pilot lamp red appears Plug charger into a working receptacle Remove battery from charger cool battery For more detail refer to Charging Method Remove battery from charger move battery and charger to a surrounding air temperature of above 32 F 0 C For more detai...

Page 20: ...ment or accessory can be dangerous and could cause injury or mechanical damage NOTE Accessories are subject to change without any obligation on the part of the HITACHI STANDARD ACCESSORIES OPTIONAL ACCESSORIES sold separately 1 Battery BSL1815 2 Hook NOTE Specifications are subject to change without any obligation on the part of the HITACHI DV18DGL 1 Phillips bit No 2 65L Code No 983006 1 2 Batter...

Page 21: ...ructions Tout manquement à observer ces avertissements et instructions peut engendrer des chocs électriques des incendies et ou des blessures graves Conservez tous les avertissements et toutes les instructions pour vous y référer ultérieurement Le terme outil électrique utilisé dans les avertissements se réfère aux outils électriques câblé ou aux outils à piles sans fil Ne pas utiliser d adaptateu...

Page 22: ...sitif de collecte de la poussière peut réduire les dangers associés à la poussière 4 Utilisation et entretien d un outil électrique a Ne pas forcer sur l outil électrique Utiliser l outil électrique adapté à vos travaux Le bon outil électrique fera le travail mieux et en toute sécurité au régime pour lequel il a été conçu b Nepasutiliserl outilélectriquesil interrupteur ne le met pas en position d...

Page 23: ...ateur 4 Tenir l outil électrique par les surfaces isolées permettantdel agripperpoureffectueruneopération où coupel attache peut entrer en contact avec des fils électriques masqués Le contact de l attache avec un fil sous tension peut transmettre du courant dans les pièces métalliques exposées de l outil et communiquer une décharge électrique à l opérateur 5 NE JAMAIS approcher les mains ni aucune...

Page 24: ...ssures graves LIRE TOUT CE MODE D EMPLOI 1 Ce manuel renferme des consignes de sécurité et d utilisation importantes pour le chargeur de batterie modèle UC18YKSL 2 Avant d utiliser le chargeur de batterie lire toutes les étiquettes d instruction et de précaution apposées sur 1 le chargeur de batterie 2 la batterie et 3 le produit utilisant la batterie 3 Pourréduiretoutrisquedeblessure NErechargerQ...

Page 25: ...dans des endroits à faible humidité et bien aérés 6 NE JAMAIS effectuer la recharge si la température est inférieure à 32 F 0 C ou supérieure à 104 F 40 C 7 NE JAMAIS raccorder deux chargeurs de batterie ensemble 8 NE JAMAIS insérer de corps étrangers dans l orifice de la batterie ou du chargeur de batterie 9 NE JAMAIS utiliser de transformateur élévateur pour la recharge 10 NE JAMAIS utiliser de ...

Page 26: ...e de mauvaise odeur de génération de chaleur de décoloration de déformation ou d anomalie en cours d utilisation de rechargement ou d entreposage ôtez immédiatement la batterie de l équipement ou du chargeur de batterie et ne l utilisez plus PRECAUTION 1 En cas de projection dans les yeux de liquide ayant fuit de la batterie ne vous frottez pas les yeux rincez les à l eau claire et contactez imméd...

Page 27: ...strations dans ce mode d emploi peuvent montrer des détails ou des accessoires différents de ceux de l outil motorisé utilisé NOM DES PARTIES 1 Perceuse à percussion sans fil DV18DGL Batterie BSL1815S 2 Chargeur de batterie UC18YKSL Fig 1 Fig 2 Loquet Orifices de ventilation Bornes Couvercle de batterie Lampe témoin Plaque signalétique Rail guide Plaque signalétique Indication R droite Batterie Ca...

Page 28: ...e à vide Faible 0 350 min Elevèe 0 1 400 min Cadence Faible 0 4 900 min d impact à vite Elevèe 0 19 600 min Brique 1 2 profondeur 1 3 16 in 30 mm 13 mm Perçage Bois 1 1 2 Epaisseur 11 16 in 18 mm 38 mm Capacité Métal 1 2 Epaisseur 1 16 in 1 6 mm 13 mm Vissage Petite vis 1 4 6 mm Vis en bois 20 3 8 mm 75 mm Modèle BSL1815S Batterie Type Batterie au Li ion Tension DC 18 V Poids 3 7 lbs 1 7 kg REMARQ...

Page 29: ...tion du chargeur sur une prise secteur Quand vous raccordez la fiche du chargeur à une prise murale la lampe témoin clignote en rouge À intervalles d une seconde Fig 3 AVERTISSEMENT Ne pas utiliser le cordon électrique s il est endommagé Le faire réparer immédiatement 2 Insérer la batterie dans le chargeur Insérez fermement la batterie dans le chargeur comme cela est indiqué dans la Fig 4 Fig 4 3 ...

Page 30: ...batterie Sil outilcontinue d être utilisé jusqu à épuisement du courant électrique la batterie risque d être endommagée et sa durée de vie se raccourcira 2 Eviter d effectuer la recharge sous des températures élevées Une batterie est toujours chaude immédiatement après son utilisation Si la batterie est rechargée immédiatement après utilisation les substances chimiques internes risquent de se dété...

Page 31: ...êtrerégléssuivant la position du sélecteur de débrayage de l appareil 1 Lorsqu on utilise cet outil comme tournevis aligner l un des chiffres 1 4 7 22 du capuchon ou les points noirs sur le repère triangulaire du boîtier extérieur 2 Quand la perceuse est utilisée avec un mèche aligner le repère sur le sélecteur de débrayage avec le triangle sur le corps de la perceuse 3 Lors de l utilisation de l ...

Page 32: ...ans la direction de la flèche voir les Fig 7 et 8 Quand le bouton de décalage est mis sur LOW petite vitesse la perceuse tourne à petite vitesse Quand mis sur HIGH grande vitesse la perceuse tourne à grande vitesse PRÉCAUTION Lorsqu on remplace la vitesse de rotation avec le bouton de changement s assurer que l interrupteur est éteint Le fait de changer la vitesse quand le moteur tourne endommager...

Page 33: ...nir lâche étant donné le couple de serrage trop élevé Utiliser la perceuse à percussion à LOW Petite vitesse avec une vis à métaux REMARQUE L utilisation de la batterie BSL1815S dans un environnement froid en dessous de 0 degré centi grade peut parfois entraîner un affaiblissement du couple de serrage et une réduction du volume de travail Il s agit d un phénomène purement temporaire et la batterie...

Page 34: ...e ne pourra qu endommager la pointe du foret ou réduire le rendement aussi bien que réduire la durée de vie du foret Faire fonctionner la perceuse à percussion avec une force de 10 à 15 kg de pression lors du forage dans la brique 12 Utilisation de l éclairage Appuyez sur le déclencheur pour allumer le témoin Le témoin reste allumé tant que vous appuyez sur le déclencheur Le témoin s éteint dès qu...

Page 35: ...clage et la procédure correcte de mise au rebut 5 Rangement Ranger dans un lieu dont la température est inférieure à 104 F 40 C et hors de portée des enfants REMARQUE Si vous pensez ne pas avoir à utiliser la pile pendant une longue période 3 mois ou plus veillez à ce qu elle soit entièrement chargée avant de la ranger Une pile moins chargée pourrait ne plus se recharger correctement après une lon...

Page 36: ... batterie n est pas correctement installée dans le chargeur Le chargeur n est pas branché La température de la batterie est trop chaude La température de la batterie est trop froide 7 Liste des pièces de rechange PRÉCAUTION Les réparations modifications et inspections des outils électriques Hitachi doivent être confiées à un service après vente Hitachi agréé Il sera utile de présenter cette liste ...

Page 37: ...utre attachement ou accessoire peut être dangereux et peut causer des blessures ou des dommages mécaniques REMARQUE Les accessoires sont sujets à changement sans obligation de la part de HITACHI ACCESSOIRES STANDARD ACCESSOIRES EN OPTION vendus séparément 1 Batterie BSL1815 2 Crochet REMARQUE Les spécifications sont sujettes à modification sans aucune obligation de la part de HITACHI DV18DGL 1 Mèc...

Page 38: ...RAMIENTA ELÉCTRICA ADVERTENCIA Lea todas las instrucciones y todas las advertencias de seguridad Si no se siguen las advertencias e instrucciones podría producirse una descarga eléctrica un incendio y o daños graves Guarde todas las advertencias e instrucciones para futura referencia El término herramienta eléctrica en las advertencias hace referencia a la herramienta eléctrica que funciona con la...

Page 39: ...zas móviles La ropa suelta las joyas y el pelo largo pueden pillarse en las piezas móviles g Si se proporcionan dispositivos para la conexióndeextraccióndepolvoeinstalaciones de recogida asegúrese de que están conectados y se utilizan adecuadamente La utilización de un sistema de recogida de polvo puede reducir los riesgos relacionados con el polvo 4 Utilización y mantenimiento de las herramientas...

Page 40: ...cialmente diseñados para eliminar las partículas minúsculas NORMAS Y SÍMBOLOS ESPECÍFICOS DE SEGURIDAD 1 Lleve protectores auditivos cuando utilice el taladro de percusión La exposición al ruido puede causar daños auditivos 2 Utilice los mangos auxiliares si es proporcionados con la herramienta La pérdida de control puede causar daños personales 3 Sostengalaherramientaeléctricaporlassuperficies de...

Page 41: ...pués séquelas bien 19 SIEMPRE utilice protección para los ojos que satisfaga los requisitos de la última versión de la norma Z87 1 de ANSI 20 Definiciones para los símbolos utilizados en esta herramienta V voltios corriente continua nº velocidad sin carga min revolucionesoreciprocaciónporminuto INSTRUCCIONES IMPORTANTES DE SEGURIDAD PARA EL CARGADOR DE BATERÍAS ADVERTENCIA La utilización inadecuad...

Page 42: ...ones ofrecidas a continuación ADVERTENCIA La utilización inadecuada de la batería o del cargador de baterías puede conducir a lesiones serias Para evitar estas lesiones 1 NUNCA desarme la batería 2 NUNCA incinere una batería aunque esté dañada o completamen te agotada 3 NUNCA cortocircuite la batería 4 NUNCA inserte ningún objeto en las ranuras de ventilacióndelcargador Silohiciesepodríarecibir de...

Page 43: ...o finaliza incluso cuando hatranscurridoundeterminadotiempoderecarga detenga inmediatamente la recarga 8 No coloque o exponga la batería a temperaturas elevadas o alta presión como en un microondas una secadora o un contenedor de gran presión 9 Aléjela del fuego inmediatamente cuando se detecte una fuga o un olor raro 10 No la utilice en un lugar donde se genere gran electricidad estática 11 Si ha...

Page 44: ...s de seguridad contenidas en este manual Algunas ilustraciones de este Manual de Instrucciones pueden mostrar detalles o accesorios diferentes a los de la propia herramienta eléctrica NOMENCLATURA 2 Cargador de baterías UC18YKSL Lampe témoin Plaque signalétique Rail guide Fig 2 Fig 1 Enganche Orificios de ventilación Terminales Taps de batería Carcasa Indicación L Dial del embrague Portabrocas sin...

Page 45: ...ja 0 350 min sin carga Alta 0 1 400 min Índice de impacto Baja 0 4 900 min sin carga Alta 0 19 600 min Ladrillo 1 2 1 3 16 in 30 mm de profundidad 13 mm Taladro Madera 1 1 2 Grosor 11 16 in 18 mm 38 mm Capacidad Metal 1 2 Grosor 1 16 in 1 6 mm 13 mm Destomil Tornillo pequeño 1 4 6 mm lador Tornillo para madera 20 3 8 mm 75 mm Modelo BSL1815S Battería Tipo Batería de Li ion Tensión DC 18 V Peso 3 7...

Page 46: ...icas el cargador se quemaría MONTAJE Y OPERACIÓN 1 Enchufe el cable de alimentación del cargador a un tomacorriente de CA Cuando haya conectado el enchufe del cargador a una toma de la red la lámpara piloto se encendrá en rojo A intervalos de 1 segundo ADVERTENCIA No utilice el cargador si su cable está dañado Haga que se lo reparen inmediatamente 2 Inserte la batería en la cargador Introduzca la ...

Page 47: ...a se calentará inmediatamente después de haberla utilizado Si recargase tal batería inmediatamente después de haberla utilizado su substancia química interna se deterioraría y la duración útil de la batería se acortaría Deje la batería y recárguela después de que se haya enfriado durante cierto tiempo PRECAUCIÓN Si utiliza continuamente el cargador de baterías éste se calentará lo que puede causar...

Page 48: ...al del embrague no podrá ajustarse entre los números 1 4 7 22 ni los puntos negros No utilice la unidad con el número de la dial del embrague en 22 y la línea negra en el medio de la marca de taladro Si lo hiciese podrían producirse datos Consulte la Fig 6 2 Ajuste del par de apriete 1 Par de apriete La intensidad del par de apriete deberá correspond er con el diámetro del tornillo Cuando se utili...

Page 49: ...eladial del embrague se encuentre entre 16 y 22 puede ser que el embrague no se aplique y que el motor se bloquee En tal caso ponga el mando de cambio en LOW baja velocidad Si se traba el motor desconectario de inmediato Si el motor se traba por cierto tiempo puede quemarse tanto él como la bateria Para ampliar su duración la batería de litio está equipada con la función de protección para detener...

Page 50: ...te Emplee el taladro de percusión en LOW baja velocidad cuando utilice tornillos mecánicos NOTA La utilización de la batería BSL1815S en lugares fríos menos de 0 grados centígrados puede resultar a veces en la reducción del par de apriete y el rendimiento del trabajo Sin embargo éste es un fenómeno temporal y cuando la batería se caliente volverá a la normalidad 7 Montaje y desmontaje de la broca ...

Page 51: ...rruptor de activación Fig 11 Fig 11 PRECAUCIÓN No exponga los ojos directamente a la luz evite mirar hacia ella directamente Si los ojos están expuestos de manera continua a la luz pueden resultar lesionados 13 Uso del gancho de venta por separado El gancho se usa para colgarse la herramienta con alimentación eléctrica del cinturón mientras se trabaja PRECAUCIÓN Cuando se utiliza el gancho se debe...

Page 52: ...idad más pequeña no se pueda cargar cuando se utilice si se ha almacenado durante un prolongado período de tiempo NOTA Almacenar baterías de ion litio Compruebe que las baterías de ion litio se han cargado completamente antes de almacenarlas Un almacenamiento prolongado de las baterías con carga baja podría deteriorar su funcionamiento reduciendo en gran medida el tiempo de uso de la batería o hac...

Page 53: ...omprobar la instalación de la batería Cargar la batería utilizando el cargador adecuado Retirar la batería de la herramienta y dejar que se enfríe Coloque la batería en el cargador hasta que la luz piloto red se encienda Enchufar el cargador en un receptáculo en funcionamiento Retire la batería del cargador enfríe la batería Para más información consulte la sección Método de Carga Retire la baterí...

Page 54: ...e resultar peligrosa y causar lesiones o daños mecánicos NOTA Las especificaciones están sujetas a cambio sin ninguna obligación por parte de HITACHI ACCESORIOS ESTÁNDAR ACCESORIOS OPCIONALES de venta por separado 1 Batería BSL1815 2 Gancho NOTA Las especificationes están sujetas a cambio sin ninguna obligación por parte de HITACHI DV18DGL 1 Broca de punta Phillips Núm 2 65L N de código 983006 1 2...

Page 55: ...47 NAME PLATE 1 48 BATTERY BSL1815S 2 49 WIRING SET INCLUD 35 38 42 44 1 501 DRIVER BIT NO 2 65L 1 502 CHARGER MODEL UC18YKSL 1 504 CASE 1 505 BATTERY COVER 1 Item No Part Name Q TY 1 SPECIAL SCREW LEFT HAND M6 23 1 2 DRILL CHUCK 13VLRV N W O CHUCK WRENCH 1 3 GEAR BOX ASS Y INCLUD 4 34 1 4 CLUTCH DIAL 1 5 CLICK SPRING 1 6 O RING 1 7 SPINDLE 1 8 SPRING C 1 9 RATCHET B 1 10 WASHER A 1 11 NUT 1 12 WA...

Page 56: ...LECTRIQUE AGRÉÉ PAR HITACHI Con respecto a la RECOLECCIÓN de baterías póngase en contacto con HITACHI KOKI U S A LTD número 1 800 59 TOOLS llamada gratis o con HITACHI AUTHORIZED POWER TOOL SERVICE CENTER Issued by Hitachi Koki Co Ltd Sinagawa IntercityTower A 15 1 Konan 2 chome Minato ku Tokyo 108 6020 Japan Distributed by Hitachi Koki U S A Ltd 3950 Steve Reynolds Blvd Norcross GA 30093 Hitachi ...

Reviews: