background image

– 3 –

EN

1L25

English

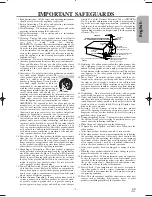
IMPORTANT SAFEGUARDS

1. Read Instructions - All the safety and operating instructions

should be read before the appliance is operated.

2. Retain Instructions- The safety and operating instructions

should be retained for future reference.

3. Heed Warnings - All warnings on the appliance and in the

operating instructions should be adhered to.

4. Follow Instructions - All operating and use instructions

should be followed.

5. Cleaning - Unplug this video product from the wall outlet

before cleaning. Do not use liquid cleaners or aerosol clean-
ers. Use a damp cloth for cleaning.
EXCEPTION: A product that is meant for uninterrupted ser-
vice and, that for some specific reason, such as the possibil-
ity of the loss of an authorization code for a CATV convert-
er, is not intended to be unplugged by the user for cleaning
or any other purpose, may exclude the reference to unplug-
ging the appliance in the cleaning description otherwise
required in item 5.

6. Attachments - Do not use attachments not recommended by

the video product manufacturer as they may cause hazards.

7. Water and Moisture- Do not use this video product near

water, for example, near a bath tub, wash bowl, kitchen sink,
or laundry tub, in a wet basement, or near a swimming pool,
and the like.

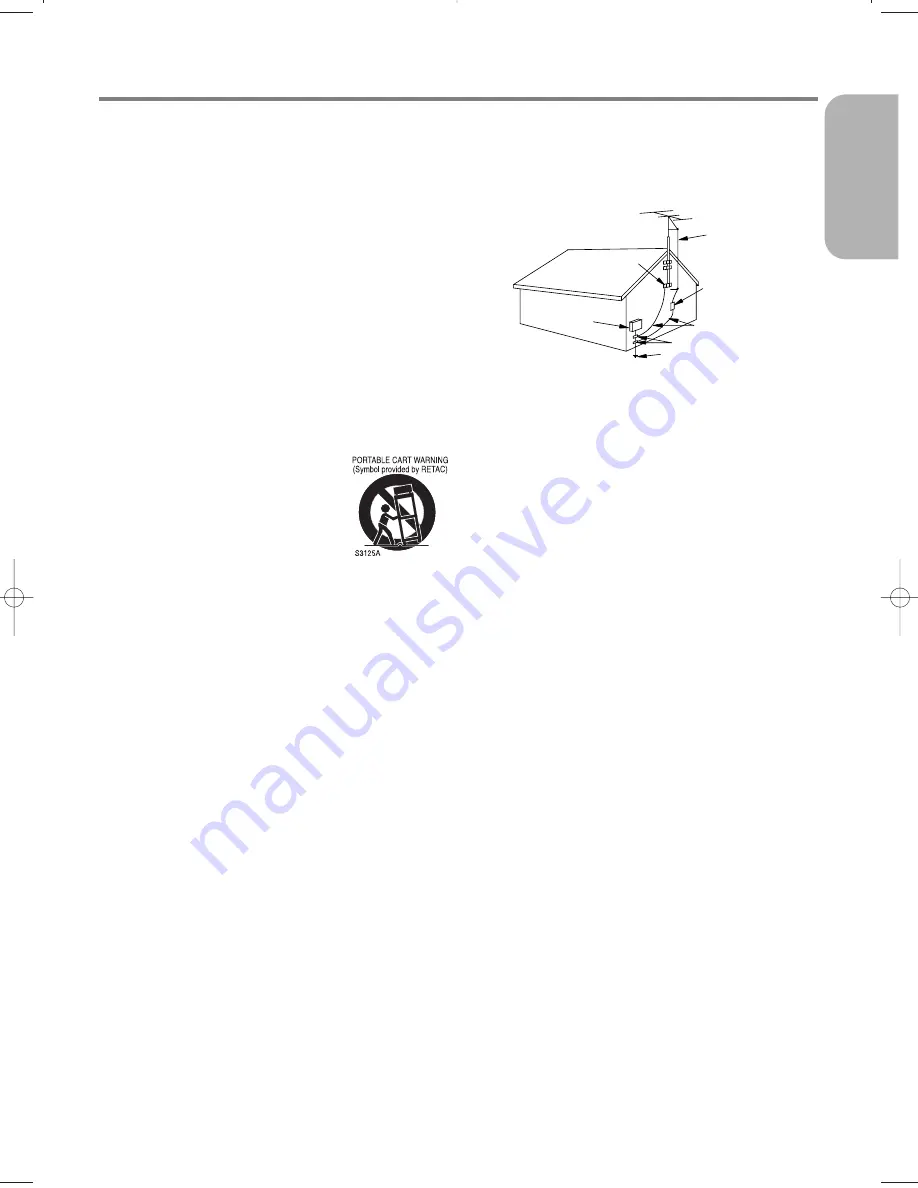
8. Accessories - Do not place this video product on an unstable

cart, stand, tripod, bracket, or table. The
video product may fall, causing serious
injury to a child or adult, and serious
damage to the appliance. Use only with a
cart, stand, tripod, bracket, or table rec-
ommended by the manufacturer, or sold
with the video product. Any mounting of
the appliance should follow the manufac-
turer's instructions and should use a
mounting accessory recommended by the manufacturer. An
appliance and cart combination should be moved with care.
Quick stops, excessive force, and uneven surfaces may
cause the appliance and cart combination to overturn.

AMEUBLES- Cet appareil ne doit être placé que sur un

meuble (avec ou sans roulettes) recommandé par le fabri-
cant. Si vous l’installez sur un meuble à roulettes, déplacez
les deux ensembles avec précaution. Un arrêt brusque, l’u-
tilisation d’une force excessive et des surfaces irrégulières
risquent de déstabiliser l’ensemble et de le renverser.

9. Ventilation - Slots and openings in the cabinet are provided

for ventilation and to ensure reliable operation of the video
product and to protect it from overheating, and these open-
ings must not be blocked or covered. The openings should
never be blocked by placing the video product on a bed,
sofa, rug, or other similar surface. This video product should
not be placed in a built-in installation such as a bookcase or
rack unless proper ventilation is provided or the manufac-
turer's instructions have been adhered to.

10. Power Sources - This video product should be operated only

from the type of power source indicated on the marking
label. If you are not sure of the type of power supply to your
home, consult your appliance dealer or local power compa-
ny. For products intended to operate from battery power, or
other sources, refer to the operating instructions.

11. Grounding or Polarization - This video product is equipped

with a polarized alternating-current line plug (a plug having
one blade wider than the other). This plug will fit into the
power outlet only one way. This is a safety feature. If you are
unable to insert the plug fully into the outlet, try reversing
the plug. If the plug should still fail to fit, contact your elec-
trician to replace your obsolete outlet. Do not defeat the
safety purpose of the polarized plug.

12. Power Cord Protection - Power supply cords should be rout-

ed so that they are not likely to be walked on or pinched by
items placed upon or against them, paying particular atten-
tion to cords at plugs, convenience receptacles, and the point
where they exit from the appliance.

13. Outdoor Antenna Grounding - If an outside antenna or cable

system is connected to the video product, be sure the anten-
na or cable system is grounded so as to provide some pro-
tection against voltage surges and built-up static charges.

Article 810 of the National Electrical Code, ANSI/NFPA
No. 70, provides information with regard to proper ground-
ing of the mast and supporting structure, grounding of the
lead-in wire to an antenna discharge unit, size of grounding
conductors, location of antenna-discharge unit, connection
to grounding electrodes, and requirements for the grounding
electrode. (Fig. A)

14. Lightning - For added protection for this video product dur-

ing a lightning storm, or when it is left unattended and
unused for long periods of time, unplug it from the wall out-
let and disconnect the antenna or cable system. This will pre-
vent damage to the video product due to lightning and
power-line surges.

15. Power Lines - An outside antenna system should not be

located in the vicinity of overhead power lines or other elec-
tric light or power circuits, or where it can fall into such
power lines or circuits. When installing an outside antenna
system, extreme care should be taken to keep from touching
such power lines or circuits as contact with them might be
fatal.

16. Overloading - Do not overload wall outlets and extension

cords as this can result in a risk of fire or electric shock.

17. Object and Liquid Entry - Never push objects of any kind

into this video product through any openings as they may
touch dangerous voltage points or short-out parts that could
result in a fire or electric shock. Never spill liquid of any
kind on the video product.

18. Servicing - Do not attempt to service this video product

yourself as opening or removing covers may expose you to
dangerous voltage or other hazards. Refer all servicing to
qualified service personnel.

19. Damage Requiring Service - Unplug this video product from

the wall outlet and refer servicing to qualified service per-
sonnel under the following conditions:

a. When the power-supply cord or plug is damaged.
b. If liquid has been spilled, or objects have fallen into the

video product.

c. If the video product has been exposed to rain or water.
d. If the video product does not operate normally by following

the operating instructions. Adjust only those controls that
are covered by the operating instructions as an improper
adjustment of other controls may result in damage and will
often require extensive work by a qualified technician to
restore the video product to its normal operation.

e. If the video product has been dropped or damaged in any

way.

f. When the video product exhibits a distinct change in perfor-

mance this indicates a need for service. 

20. Replacement Parts - When replacement parts are required,

be sure the service technician has used replacement parts
specified by the manufacturer or have the same characteris-
tics as the original part. Unauthorized substitutions may
result in fire, electric shock or other hazards.

21. Safety Check - Upon completion of any service or repairs to

this video product, ask the service technician to perform
safety checks to determine that the video product is in prop-
er operating condition.

22. Heat - This video product should be situated away from heat

sources such as radiators, heat registers, stoves, or other
products (including amplifiers) that produce heat.

FIGURE A

EXAMPLE OF ANTENNA GROUNDING

AS PER NATIONAL ELECTRICAL CODE

ANTENNA
LEAD
WIRE

ANTENNA
DISCHARGE UNIT
(NEC SECTION 810-20)

GROUNDING CONDUCTORS
(NEC SECTION 810-21)

GROUND
CLAMP

GROUND CLAMP

ELECTRIC
SERVICE
EQUIPMENT

POWER SERVICE GROUNDING
ELECTRODE SYSTEM
(NEC ART 250, PART H)

NEC – NATIONAL ELECTRICAL CODE

S2898A

H9651UD.qx3  04.3.2  8:53 PM  Page 3

Summary of Contents for DV PF74U

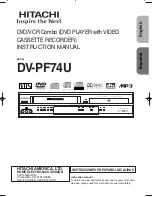
Page 1: ...ATIBLE STOP PLAY OPEN CLOSE CHANNEL VCR OUTPUT DVD INSTRUCCIONES EN ESPAÑOL INCLUIDAS DVD VCR Combo DVD PLAYER with VIDEO CASSETTE RECORDER INSTRUCTION MANUAL Instruction manual To obtain the best performance and ensure years of trouble free use please read this instruction manual completely MODEL DV PF74U HITACHI AMERICA LTD HOME ELECTRONICS DIVISION 900 Hitachi Way Chula Vista CA 91914 3556 Serv...

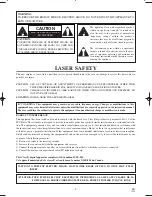
Page 2: ...ssly approved in the instruction manual The user could lose the authority to operate this equipment if an unauthorized change or modification is made CAUTION TO PREVENT ELECTRIC SHOCK MATCH WIDE BLADE OF PLUG TO WIDE SLOT FULLY INSERT ATTENTION POUR ÉVITER LES CHOC ÉLECTRIQUES INTRODUIRE LA LAME LA PLUS LARGE DE LA FICHE DANS LA BORNE CORRESPONDANTE DE LA PRISE ET POUSSER JUSQU AU FOND RADIO TV IN...

Page 3: ...d on or pinched by items placed upon or against them paying particular atten tion to cords at plugs convenience receptacles and the point where they exit from the appliance 13 Outdoor Antenna Grounding If an outside antenna or cable system is connected to the video product be sure the anten na or cable system is grounded so as to provide some pro tection against voltage surges and built up static ...

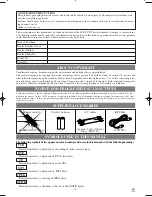
Page 4: ...n Corporation Reverse engineering or disassembly is prohibited SYMBOLS USED IN THIS MANUAL The following symbols below appear in some headings and notes in this manual with the following meanings Description refers to playback or recording of video cassette tapes Description refers to playback of DVD video discs Description refers to playback of audio CDs Description refers to playback of MP3 disc...

Page 5: ...SC 22 BASIC PLAYBACK 22 INDICE CONTROLES DEL FUNCIONAMIENETO Y SUS FUNCIONES 35 CAMBIO DE VCR DVD 38 CONEXIONES 39 DVD VCR A CONEXION DE TV 39 CANAL DE SALIDA RF 39 CONEXION A UN SISTEMA DE AUDIO 39 CONEXION A UN TV PARA VIDEO 39 PREPARACIÓN 39 PREPARACION DE UN CANAL AUTOMATICO 39 PREPARACION DE RELOJ 40 REPRODUCCIÓN DE UN DISCO 40 REPRODUCCIÓN BÁSICA 40 GENERAL FEATURES 22 DISC NAVIGATION 22 PAU...

Page 6: ...CR which are used to send high quality video to a TV via Component Video In Jacks Bit rate indication DRC Dynamic range control You can control the range of sound volume Black Level Setting Mode Hardware specifications Auto Head Cleaner 4 Head HiFi Stereo Trilingual on screen menu display selectable in English French or Spanish 181 channel capability PLL frequency synthesizer tuner with direct sta...

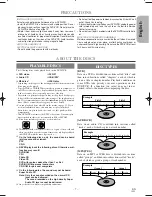
Page 7: ...to sections called titles and then into subsections called chapters each of which is given a title or chapter number Playback conditions on some DVDs take priority over user operations on this DVD VCR If a function you select does not run as desired refer to the manual accompanying the disc DISC TYPES Example Title 1 Title 2 Chapter 1 Chapter 2 Chapter 1 Chapter 2 Chapter 3 Chapter 4 AUDIO CD Data...

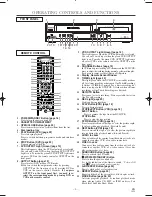
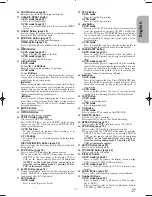
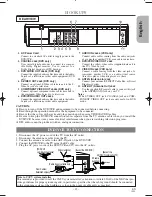
Page 8: ...ake the green VCR OUTPUT light come on select VCR on the remote control or OUTPUT on the front panel 10 CHANNEL Buttons page 19 InVCR mode press to changeTV channels on the DVD VCR press to adjust the tracking during normal or slow motion play back press to remove vertical jitter in a Still picture 11 Display Remote Sensor Window 12 TIMER Light page 20 This light glows when the DVD VCR is in stand...

Page 9: ...k This but ton does not affect DVD playback 37 SKIP Buttons DVD mode Press to skip Chapters or Tracks 38 STOP Button DVD mode Press to stop the disc motion VCR mode Press to stop the tape motion 39 h Button DVD mode Press to view the DVD picture in fast reverse motion or to reverse playback of an Audio CD MP3 or JPEG on discs For DVD press PAUSE STEP then press this but ton to begin slow reverse m...

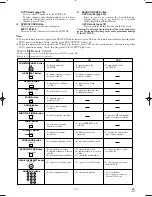
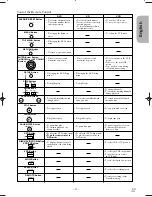
Page 10: ...a picture x2 x4 ANGLE Button AUDIO Button DISPLAY Button Το access various audio functions on a disc To select STEREO L CH or R CH SURROUND Button OPEN CLOSE EJECT Button SEARCH MODE Button Tour of the Remote Control Buttons on remote control work in different ways for DVD CD and VCR Refer to the following table for correct use To turn on and of the DVD VCR To mark a segment to repeat between A an...

Page 11: ...in DVD mode To select the DVD output mode SETUP PLAY SKIP CH DVD STOP PAUSE STEP ENTER CLEAR C RESET Button MENU Button TOP MENU Button RETURN Button TOP MENU RETURN MENU CLEAR C RESET To clear the chapter makers To clear the number that is entered incorrectly To clear the track makers To remove the most recently entered program To clear the number that is entered incorrectly To exit the VCR menu ...

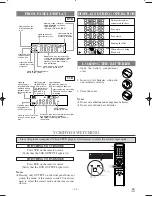
Page 12: ... up when the timer recording or an OTR recording has been set No disc inserted or cannot read the disc Tray open Tray closed Loading the Disc When a disc is being Play back DVD 1 Open the battery compartment cover 2 Insert two AA batteries with each one oriented correctly 3 Close the cover Notes Do not mix alkaline and manganese batteries Do not mix old and new batteries DVD VCR VCR DVD SWITCHING ...

Page 13: ...DVD VCR S VIDEO OUT AUDIO OUT COMPONENT VIDEO OUT AUDIO IN VIDEO OUT L Y CB PB CR PR R L R L R ANT IN ANT OUT VIDEO IN 0VM204468 1 2 3 8 9 11 5 4 6 7 10 1 AC Power Cord Connect to a standard AC outlet to supply power to the DVD VCR 2 COAXIAL Jack DVD only Use coaxial digital audio out to connect to a compat ible Dolby Digital receiver Use to connect to a Dolby Digital decoder or DTS decoder 3 DVD ...

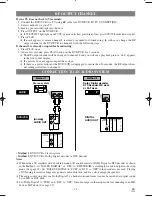
Page 14: ...R OUTPUT light lights up and VCR appears on the front panel display If not press DVD VCR on the remote control 5 Press PLAY If noise appears it means channel 3 is already occupied for broadcasting In such case change the RF output channel of the DVD VCR to channel 4 with the following steps If channel 3 is already occupied for broadcasting 1 Press PLAY once 2 After a few seconds press PLAY button ...

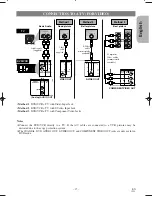
Page 15: ...DEO OUT L L Y CB PB CR PR L R R R AUDIO IN L R VCR DVD VCR AUDIO IN VIDEO IN AUDIO OUT VIDEO OUT L L R R DIGITAL AUDIO OUT COAXIAL AUDIO OUT DVD S VIDEO OUT COMPONEN VIDEO OUT L R or VIDEO IN VCR DVD VCR AUDIO IN VIDEO IN AUDIO OUT VIDEO OUT L L R R S VIDEO IN DIGITAL AUDIO OUT COAXIAL AUDIO OUT DVD S VIDEO OUT COMPONENT VIDEO OUT L R Y CB PB CR PR DIGITAL AUDIO OUT CB Y CR COMPONENT VIDEO IN or C...

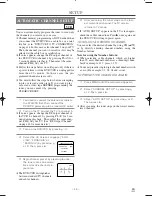
Page 16: ... need to connect the antenna or cable to the DVD VCR first Then connect the DVD VCR power plug to a standard AC outlet 2 Turn on the TV and set the TV to channel 3 If noise appears change the RF output channel of the VCR to channel 4 by pressing PLAY for 3 sec onds during playback Then select the same chan nel CH4 on your TV See RF Output Channel on page 14 for more details 3 Turn on the DVD VCR b...

Page 17: ...ntil the main menu appears 2 Select LANGUAGE SELECT by pressing K or L Then press B 3 Select ENGLISH FRANCAIS or ESPAÑOL by pressing K or L Then press CLEAR C RESET If you accidentally select Spanish or French and need English Press MENU and choose SELEC IDIOMA or SELECTION LANGUE Press B and select ENGLISH by pressing K or L Finally press CLEAR C RESET VCR TO ADD DELETE CHANNELS When scanning som...

Page 18: ...annel on page 14 for more details If you connect a TV to the DVD VCR using AV cable set the TV to channel AUX VIDEO 3 Begin playback by pressing PLAY Tracking adjustment will be done automatically Digital Tracking function when you start playback To adjust the tracking manually press SKIP CH on the remote or CHANNEL o p on the DVD VCR When a tape has reached the end the DVD VCR will rewind the tap...

Page 19: ...VD VCR VCR OTR One Touch Recording This feature allows you to set the recording length sim ply by pressing REC OTR 3 Press REC OTR to begin OTR REC and appear in the front panel display Change the recording length by pressing REC OTR repeatedly VCR If a tape ends during OTR the DVD VCR will stop eject the tape and switch to the DVD mode automati cally as the TIMER light blinks If the DVD power is ...

Page 20: ...M NUMBER 4 DATE 05 12 WED START TIME 07 30 PM END TIME 08 30 PM CHANNEL REC SPEED ONE TIME PROGRAM Press K or L repeatedly for the desired channel number Then press B PROGRAM NUMBER 4 DATE 05 12 WED START TIME 07 30 PM END TIME 08 30 PM CHANNEL 16 REC SPEED SP SP SLP ONE TIME PROGRAM 4 Set the start time First press K or L for the hour Then press B Next press K or L for the minute Then press B And...

Page 21: ...udio track Regular monaural audio None Mono Stereo broadcast STEREO L R Bilingual broadcast SAP Main audio program Sub audio program Stereo Bilingual broadcast STEREO SAP L R I STEREO SAP Selection Invalid nvalid TV STEREO SAP TV STEREO SAP L channel Mono L Main audio program Sub audio program L Sub audio program R channel Mono R Main audio program Sub audio program R Sub audio program Sub audio p...

Page 22: ...pictures may stop for a moment This happens when the 1st layer switches to the 2nd layer This is not a mal function GENERAL FEATURES DVD may contain menus to navigate the disc and access special features Press appropriate Number button or use Arrow L K B s to highlight your selection in the DVD main menu and press ENTER to confirm Note Unless stated all operations described are based on remote con...

Page 23: ... menu will appear 2 If the feature is not available symbol may appear on the TV screen 3 If disc menu is available on the disc audio language subtitle options chapters for the title and other options will appear for selec tion 4 Press Arrow L K B s to select an item and ENTER to confirm selection DVD CALLING UP A MENU SCREEN DURING PLAYBACK Press MENU to call up the DVD menu Press TOP MENU to call...

Page 24: ...nt track Press it repeatedly to go to the previous tracks Track number will appear briefly in the front display panel If SKIP H G is pressed while the playback is paused the playback will be paused again after skip ping to the next track Note SKIP H G are not available when playback is stopped TITLE CHAPTER SEARCH 1 During playback press SEARCH MODE repeatedly until you see the Title or Chapter se...

Page 25: ...atedly until Markers appear on the TV screen 2 Press Arrow s B to select 1 2 3 4 5 6 7 8 9 or 10 and ensure that appears in the display 3 When you reach the desired point press ENTER The Title or Track and elapsed playing time will appear in the TV screen 4 To return to the Marker later press SEARCH MODE repeatedly during playback until Makers appears Use Arrow s B to choose the desired marker the...

Page 26: ...z Constant bit rate 112kbps 320kbps JPEG MP3 MP3 JPEG PLAYBACK PLAY ENTER FILE LIST FOLDER MP3 JPEG DISC NAME folder name 1 folder name 2 folder name 3 folder name 4 file name 1 file name 2 file name 3 folder name 1 1 2 PROGRAM CD You may determine the order in which tracks will play 1 In stop mode press MODE The PROGRAM screen will appear 2 Press Arrow K L to select a track then press ENTER Press...

Page 27: ...elect between STEREO L CH or R CH STEREO both right and left channels are active stereo L CH only left channel is active R CH only right channel is active Note If the Virtual Surround setting is 1 or 2 the sound mode will be fixed to STEREO and cannot be changed CD DVDs allow you to select a language for subtitles if available during DVD disc playback 1 Press SUBTITLE during playback 2 Press SUBTI...

Page 28: ... 1 Press ANGLE during playback The selected angle will be displayed on the display bar at the top of the screen 2 Press ANGLE repeatedly to select your desired angle DVD PARENTAL CONTROL Parental Control provides limits for DVDs with extreme violence or adult themes A password you establish will override the limits This feature allows you to pre vent discs with objectionable scenes from being play...

Page 29: ...Hz and when the unit is connected to another source using the digi tal out jack DOWN SAMPLING function is available only on the discs recorded in the Dolby Digital format DOLBY DIGITAL Set to BITSTREAM when the player is connected to Dolby Digital Decoder BITSTREAM Dolby Digital Output PCM Converts Dolby Digital to PCM The default setting is BITSTREAM DTS Set to BITSTREAM when connected to DTS dec...

Page 30: ... mode will appear 3 Press Arrow s B to select DISPLAY then press ENTER to con firm 4 Press Arrow K L to select the below items then press ENTER TV ASPECT Press Arrow K L for an item selection then press ENTER 4 3 LETTER BOX displays a theater like image Black bars appear at the top and bottom of the screen 4 3 PAN SCAN is the traditional TV mode with a full height picture with both sides trimmed S...

Page 31: ...m 5958 Maltese 5966 Maori 5955 Marathi 5964 Moldavian 5961 Mongolian 5960 Nauru 6047 Nepali 6051 Norwegian NOR 6061 O R Occitan 6149 Oriya 6164 Oromo Afan 6159 Panjabi 6247 Pashto Pushto 6265 Persian 5247 Polish 6258 Portuguese POR 6266 Quechua 6367 Rhaeto Romance 6459 Romanian RUM 6461 Russian RUS 6467 S Samoan 6559 Sangho 6553 Sanskrit 6547 Scots Gaelic 5350 Serbian 6564 Serbo Croatian 6554 Seso...

Page 32: ...ing VCR TV Video or color fades in and out You cannot copy a copyrighted video tape You are experiencing copy guard protection when making a copy of a video tape Cannot remove the tape Check if the DVD VCR is in the VCR mode If not press VCR on the remote control to switch the mode No picture Connect the video cables firmly Insert a correct video disc that plays on this DVD VCR Press DVD on the re...

Page 33: ...ture may become blurred or interrupted while the TV program reception is clear Dirt accumulated on the video heads after long periods of use or the usage of rental or worn tapes can cause this problem If a streaky or snowy picture appears during playback the video heads in your DVD VCR may need to be cleaned 1 Please visit your local Audio Video store and purchase a good quality VHS Video Head Cle...

Page 34: ... VHF Channel 3 or 4 Power source 120 V AC 10 60 Hz 0 5 Power consumption 21 W standby 3 6 W Operating temperature 41 F 5 C to 104 F 40 C Dimensions W 17 3 16 435 mm H 3 3 4 94 mm D 9 3 16 233 mm Weight 6 0 lbs 2 7 kg Designs and specifications are subject to change without notice If there is a discrepancy between languages the default language will be English ...

Page 35: ... VCR OUTPUT verde se encienda presione el VCR en el control remoto o el OUTPUT en el panel delantero 10 Botones CHANNEL En el modo VCR presione para cambiar canales de TV en la DVD VCR presione para ajustar el seguimiento durante la reproducción normal o en movimiento lento presione para remover las fluctuaciones verticales en una imagen fija 11 Visualizador ventanilla del sensor remoto 12 Luz TIM...

Page 36: ...ograma mientras graba otro Botón DISC NAVIGATION Púlselo para visualizar las primeras ascenas de cada capítulo del título que astá siendo reprocido 35 Botón VCR Presione para seleccionar el modo VCR para el control remoto Usted puede cambiar el modo OUTPUT ya sea presionando el OUTPUT en el panel delantero o el DVD o VCR en el control remoto Sin embargo si usted presiona el OUTPUT en el panel dela...

Page 37: ...asero La descarga electroestática puede dañar permanentemente el DVD VCR DIGITAL AUDIO OUT COAXIAL AUDIO OUT DVD VCR DVD VCR S VIDEO OUT AUDIO OUT COMPONENT VIDEO OUT AUDIO IN VIDEO OUT L Y CB PB CR PR R L R L R ANT IN ANT OUT VIDEO IN 0VM204468 1 2 3 8 9 11 5 4 6 7 10 VISIÓN TRASERA Nota La toma S VIDEO OUT toma COAXIAL y tomas COMPONENT VIDEO OUT son sólo útiles en el modo DVD 1 Cable de aliment...

Page 38: ...OP EJECT PLAY REC OTR REC TIMER P R O G R E S S I V E S C A N DIGITAL AUTO TRACKING DVD VCR Combo DV PF74U MP3 JPEG PLAY BACK DVD CD CD R CD RW COMPATIBLE STOP PLAY OPEN CLOSE CHANNEL VCR OUTPUT DVD VCR OUTPUT DVD Bot n OUTPUT Luz DVD OUTPUT Luz VCR OUTPUT Bot n DVD Bot n VCR Presione el VCR en el control remoto Verifique que la luz VCR OUTPUT está encendida CAMBIO AL MODO VCR Notas Presionando só...

Page 39: ... vez El sintonizador explora y memoriza todos los canales activos en su área La videocámara distingue entre los canales de TV normales y los canales de cable 6 Después de explorar el sintonizador se detiene en el canal memorizado más bajo La pantalla de TV retorna al modo TV Si aparece otra vez AUTO SET UP en la pantalla de TV inspeccione las conexiones de cable Presione nuevamente B y la videogra...

Page 40: ... 1 Presione y y I Aparecerá Load brevemente en el visualizador Asegúrese que la luz DVD OUTPUT está encendida Si no lo está presione el botón DVD en el control remoto para cambiar al modo DVD 2 Presione OPEN CLOSE para abrir la bandeja de carga del disco 3 Ponga el disco elegido en la bandeja con la etiqueta hacia arriba 4 Presione PLAY La bandeja se cerrará automáticamente y la reproducción empez...

Page 41: ...MEMO ...
Page 42: ...RICA LTD HOME ELECTRONICS DIVISION 900 Hitachi way Chula Vista CA 91914 3556 Tel 1 800 HITACHI 1 800 448 2244 HITACHI CANADA LTD DIGITAL MEDIA DIVISION 2495 Meadowpine Blvd Mississauga Ontario L5N 6C3 CANADA Tel 1 800 HITACHI 1 800 448 2244 during the business hours Monday Friday EST 9 00am 7 00pm Saturday EST 9 00am 5 00pm durant les heures de hureau Lundi au Vedredi 9 00am 7 00pm h n e Samedi 9 ...
Page 43: ... FOR PARTS THE DURATION OF THE APPLICABLE EXPRESS WARRANTY CONTAINED ABOVE HITACHI SHALL NOT BE LIABLE TO THE PURCHASER OR TO ANY OTHER PERSON FOR ANY INCI DENTAL OR CONSEQUENTIAL DAMAGES OR LOSS OF PROFIT OF PRODUCT RESULTING FROM ANY DEFECT IN OR MALFUNCTION OR FAILURE OF THIS HITACHI PRODUCT SOME STATES DO NOT ALLOW LIMITATIONS ON HOW LONG AN IMPLIED WARRANTY LASTS OR THE EXCLUSION OF INCIDENTA...
Page 44: ... 2 All repairs must be performed by a Hitachi Authorized Service Facility 3 This warranty is valid only in the U S A LIMITED WARRANTY Hitachi America Ltd Home Electronics Division Hitachi war rants this component in duration as stated below Register your product on line at hitachi com tv or mail this portion to the following address Attn Warranty Department Hitachi America Ltd Home Electronics Div...

Reviews: